Currently, I am in New York City! I have, by this time, enjoyed Wicked and hopefully a baseball game. Yet, I must post (yay for postdating!) today. Why? It's Daring Baker time! This month's challenge was chosen by Chris at
Mele Cotte. The recipe she chose is from
Great Cakes by Carol Walter. It is a Filbert Cake.

I've heard of filberts but not a filbert cake; and I must admit that after looking at the recipe, I was not very excited (Sorry Chris!). I'm personally quite weary of buttercream and simple syrup drenched cakes. It seems that of the past six challenges, that has been 50% of them. However, I had a get together with friends coming up and proceeded to be a good DBer and participate.

I changed the nut that was used to a pecan, as I had those on hand already. The day that I did the challenge, I had a sore throat. The combination of not feeling well and it being a long process made me doubtful about the end result. First off, when I cut the cake into layers, I cut through the bottom, so there was an edge with a piece of cake missing! Then, when I made the praline paste, I didn't read the instructions well enough and apparently didn't let the praline process long enough...FYI - my praline STUCK to the parchment paper. AGH!

Anyway, my buttercream ended up a bit crunch, but I kind of liked the change in texture. Finally, my ganache. I have NO CLUE what happened to it but it was very thin and didn't set well. I could even see the apricot jam through it. However, after I decorated the cake, it looked so much better. I figured it would be okay.
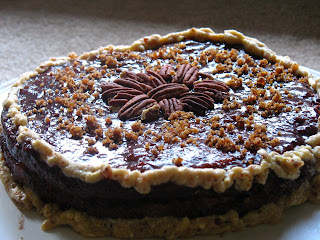
So, onto the get together. This was the first time we had been able to all get together since Labor Day, so we were all excited...especially the guys who said they like when people cook for them! During dinner, I mentioned cake but the guys in this group (especially one) aren't very big on desserts. So, about an hour after we sat down, J said "Didn't you say there's cake?" Surprised me that he was the one to mention it. I went and got the cake, preparing to cut it in the kitchen when he entered and saw it. It made me take it to the table so that everyone could see. Then, after we all had our pieces and had tried it, M asks "Is that apricot on here?" I was impressed! We had it with ice cream and M, after a second piece without, decided that it was better with because it "cut down on the sweetness!" ????

So, in the end, the cake ended up being a success. I said I probably wouldn't make it again and M acted surprised. I then modified my answer...well, unless someone requested it! Thanks Chris for the challenge...it was great, pushing me AGAIN to do something I wouldn't normally do. Check out the other great cakes at the
Blogroll.
Pecan Gateau with Praline Buttercream
adapted From Great Cakes by Carol Walter
1 pecan Genoise, 1 recipe sugar syrup, 1/8 recipe Praline Buttercream, heavy cream, whipped to soft peaks with praline stirred in, 1 recipe Apricot Glaze, 1 recipe Ganache Glaze, prepared just before using, pecans - toasted and coarsely chopped
Pecan Genoise
1 ½ cups pecans, toasted/skinned
2/3 cup cake flour, unsifted
2 Tbsp. cornstarch
7 large egg yolks
1 cup sugar, divided ¼ & ¾ cups
1 tsp. vanilla extract
5 lg. egg whites
¼ cup warm, clarified butter (100 – 110 degrees) - oops...missed this part, but it still worked
Position rack in the lower 3rd of the oven and preheat to 350 degrees. Grease and flour a 10” X 2” inch round cake pan.
Using a food processor, process nuts, cake flour, and cornstarch for about 30 seconds. Then, pulse the mixture about 10 times to get a fine, powdery mixture. You’ll know the nuts are ready when they begin to gather together around the sides of the bowl. While you want to make sure there aren’t any large pieces, don’t over-process. Set aside.
Put the yolks in the bowl of an electric mixer, with the whisk attachment, and beat until thick and light in color, about 3-4 minutes on med-high speed. Slowly, add ¾ cup of sugar. It is best to do so by adding a tablespoon at a time, taking about 3 minutes for this step. When finished, the mixture should be ribbony. Blend in the vanilla. Remove and set aside.
Place egg whites in a large, clean bowl of the electric mixer with the whisk attachment and beat on medium speed, until soft peaks. Increase to med-high speed and slowly add the remaining ¼ cup of sugar, over 15-20 seconds or so. Continue to beat for another ½ minute.
Add the yolk mixture to the whites and whisk for 1 minute.
Pour the warm butter in a liquid measure cup (or a spouted container). * It must be a deep bottom bowl and work must be fast.* Put the nut meal in a mesh strainer (or use your hand – working quickly) and sprinkle it in about 2 tablespoons at a time – folding it carefully for about 40 folds. Be sure to exclude any large chunks/pieces of nuts. Again, work quickly and carefully as to not deflate the mixture. When all but about 2 Tbsp. of nut meal remain, quickly and steadily pour the warm butter over the batter. Then, with the remaining nut meal, fold the batter to incorporate, about 13 or so folds.
With a rubber spatula, transfer the batter into the prepared pan, smoothing the surface with the spatula or back of a spoon. **If collected butter remains at the bottom of the bowl, do not add it to the batter! It will impede the cake rising while baking.
Tap the pan on the counter to remove air bubbles and bake in the preheated oven for 30-35 minutes. You’ll know the cake is done when it is springy to the touch and it separates itself from the side of the pan. Remove from oven and allow to stand for 5 minutes. Invert onto a cake rack sprayed with nonstick coating, removing the pan. Cool the cake completely.
*If not using the cake right away, wrap thoroughly in plastic wrap, then in a plastic bag, then in the refrigerator for up to 3 days. If freezing, wrap in foil, then the bag and use within 2-3 months.
Sugar Syrup
Makes 1 cup, good for one 10-inch cake – split into 3 layers
1 cup water
¼ cup sugar
In a small, yet heavy saucepan, bring the water and sugar to a boil and simmer for 5 minutes. Remove from heat, add the liqueur. Cool slightly before using on the cake. *Can be made in advance.
Praline Buttercream *
1 recipe Swiss Buttercream
1/3 cup praline paste
1 ½ - 2 Tbsp. Jamaican rum (optional)
Blend ½ cup buttercream into the paste, then add to the remaining buttercream. Whip briefly on med-low speed to combine. Blend in rum.
* I did a SMALL portion of this for decoration and then used the rest of the praline to flavor my whipped cream.
Swiss Buttercream
4 lg. egg whites
¾ cup sugar
1 ½ cups (3 sticks) unsalted butter, slightly firm
1 ½ -2 Tbsp. Grand Marnier or liqueur of your choice
1 tsp. vanilla
Place the egg whites in a lg/ bowl of a elevtric mixer and beat with the whisk attachment until the whites are foamy and they begin to thicken (just before the soft peak stage). Set the bowl over a saucepan filled with about 2 inches of simmering water, making sure the bowl is not touching the water. Then, whisk in the sugar by adding 1-2 tablespoon of sugar at a time over a minutes time. Continue beating 2-3 minutes or until the whites are warm (about 120 degrees) and the sugar is dissolved. The mixture should look thick and like whipped marshmallows.
Remove from pan and with either the paddle or whisk attachment, beat the egg whites and sugar on med-high until its a thick, cool meringue – about 5-7 minutes. *Do not overbeat*. Set aside.
Place the butter in a separate clean mixing bowl and, using the paddle attachment, cream the butter at medium speed for 40-60 seconds, or until smooth and creamy. *Do not overbeat or the butter will become toooooo soft.*
On med-low speed, blend the meringue into the butter, about 1-2 Tbsp. at a time, over 1 minute. Add the liqueur and vanilla and mix for 30-45 seconds longer, until thick and creamy.
Refrigerate 10-15 minutes before using.
Wait! My buttercream won’t come together! Reheat the buttercream briefly over simmering water for about 5 seconds, stirring with a wooden spoon. Be careful and do not overbeat. The mixture will look broken with some liquid at the bottom of the bowl. Return the bowl to the mixer and whip on medium speed just until the cream comes back together.
Wait! My buttercream is too soft! Chill the buttercream in the refrigerator for about 10 minutes and rewhip. If that doesn’t work, cream an additional 2-4 Tbsp. of butter in a small bowl– making sure the butter is not as soft as the original amount, so make sure is cool and smooth. On low speed, quickly add the creamed butter to the buttercream, 1 Tbsp. at a time.
Refrigerate in an airtight container for up to 5 days, or can be frozen for up to 6 months. If freezing, store in 2 16-oz. plastic containers and thaw in the refrigerator overnight or at room temperature for several hours.
Praline Paste
1 cup (4 ½ oz.) Hazelnuts, toasted/skinless
2/3 cup Sugar
Line a jelly roll pan with parchment and lightly butter.
Put the sugar in a heavy 10-inch skillet. Heat on low flame for about 10-20 min until the sugar melts around the edges. Do not stir the sugar. Swirl the pan if necessary to prevent the melted sugar from burning. Brush the sides of the pan with water to remove sugar crystals. If the sugar in the center does not melt, stir briefly. When the sugar is completely melted and caramel in color, remove from heat. Stir in the nuts with a wooden spoon and separate the clusters. Return to low heat and stir to coat the nuts on all sides. Cook until the mixture starts to bubble. **Remember – extremely hot mixture.** Then onto the parchment lined sheet and spread as evenly as possible. As it cools, it will harden into brittle. Break the candied nuts into pieces and place them in the food processor. Pulse into a medium-fine crunch or process until the brittle turns into a powder. To make paste, process for several minutes. Store in an airtight container and store in a cook dry place. Do not refrigerate.
Apricot Glaze
Good for one 10-inch cake
2/3 cup thick apricot preserves
1 Tbsp. water
In a small, yet heavy saucepan, bring the water and preserves to a slow boil and simmer for 2-3 minutes. If the mixture begins to stick to the bottom of the saucepan, add water as needed.
Remove from heat and, using a strainer, press the mixture through the mesh and discard any remnants. With a pastry brush, apply the glaze onto the cake while the cake is still warm. If the glaze is too thick, thin to a preferred consistency with drops of water.
Ganache Glaze
Makes about 1 cup, enough to cover the top and sides of a 9 or 10 inch layer or tube cake
6 oz. (good) semisweet or bittersweet chocolate, like Lindt
6 oz. (¾ cup heavy cream
1 tbsp. light corn syrup
1 Tbsp. Grand Marnier, Cointreay, or dark Jamaican rum (optional)
¾ tsp. vanilla
½ - 1 tsp. hot water, if needed
Blend vanilla and liqueur/rum together and set aside.
Break the chocolate into 1-inch pieces and place in the basket of a food processor and pulse until finely chopped. Transfer into a medium sized bowl and set aside.
Heat the cream and corn syrup in a saucepan, on low, until it reached a gentle boil. Once to the gently boil, immediately and carefully pour over the chocolate. Leave it alone for one minute, then slowly stir and mix the chocolate and cream together until the chocolate is melted and incorporated into the cream. Carefully blend in vanilla mixture. If the surface seems oily, add ½ - 1 tsp hot water. The glaze will thicken, but should still be pourable. If it doesn’t thicken, refrigerate for about 5 minutes, but make sure it doesn’t get too cold!
Assembling Cake
Cut a cardboard disk slightly smaller than the cake...or place on top of 3 pieces of parchement set in a triangle on your cake plate to protect it; these will be removed after decorating. Divide the cake into 3 layers and place the first layer top-side down on the disk. Using a pastry brush, moisten the layer with 3-4 Tbsp. of warm sugar syrup. Measure out 1 cup of praline buttercream and set aside.
Spread the bottom layer with a ¼-inch thickness of the whipped cream. Place the middle layer over the first, brush with sugar syrup, spreading with cream.
Moisten the cut side of the third layer with additional sugar syrup and place cut side down on the cake. Gently, press the sides of the cake to align the layers. Refrigerate to chill for at least 30 minutes.
Brush the top and sides of the cake with warm apricot glaze, sealing the cut areas completely. Chill while you prepare the ganache.
Place a rack over a large shallow pan to catch the ganache drippings. Remove the gateau from the refrigerator and put it the rack. With a metal spatula in hand, and holding the saucepan about 10 inches above the cake, pour the ganache onto the cake’s center. Move the spatula over the top of the ganache about 4 times to get a smooth and mirror-like appearance. The ganache should cover the top and run down the sides of the cake. Patch any bare spots on the sides with a smaller spatula Let the cake stand at least 15 minutes to set after glazing. If using parchment under the cake, remove now.
Garnish with praline buttercream. I don't have a pastry bag, so I just used a plastic bag with the corner cut out! Refrigerate uncovered for 3-4 hours to allow the cake to set. Remove the cake from the refrigerator at least 3 hours before serving.
Leftover cake can be covered with foil and kept in the refrigerator for up to 5 days.
 I wasn't incredibly excited about it but it turned out to be pretty good. Daddy got lamb chops,
 Mama got traditional moussaka,
 and I got vegetable moussaka.
 We decided that the vegetable moussaka was better. Instead of the meat mixture it had spinach and feta. So good when put together with the bechamel. After dinner, we went to the Gershwin Theater to see Wicked.
 OH...it was so good! I can't wait to see it again, which hopefully I'll get to do as it is coming to Birmingham AND Memphis this year! After the play we hung around and got autographs from a couple of the actors (Boq
 and Fiyero!
 ). Then we went back to our hotel in Newark. We stopped by a bread shop, Au Bon Pain, first to get breakfast, as our hotel only had a $12 buffet! For a snack after the theater we got an apple struddel and chocolate covered shortbread. Breakfast for me was museli...SO GOOD! I had never had it but got it twice while we were there. Mama and Daddy had cinnamon scone and another apple struddel. What a great first day.
  To see what we did and what we ate on Monday, stop back by tomorrow!


 Easy Summer Salad
 Well, I also made these butterfinger "brownies." I thought that the texture of these was perfect. It had that moist denseness that really good blondies possess. I got the recipe from
  Butterfinger Brownies
 SOOOO good. The chicken was perfect...moist, tender, and so flavorful! We marinated the chicken (I think) in raspberry vinegarette and the steak in Dale's. Apparently, the steak was over marinated, but I didn't have any. As to the vegetables, this is what makes it great for ARF Tuesday over at
  So, for a great summer dinner full of antioxidants, try kabobs!
 I must admit to you that I was not very excited about this challenge when it was revealed. I don't know why, but I just wasn't. The only thing I was glad of was that I would be able to make the bread for my family when I went home after my exam. In the end, this recipe excited me and I really enjoyed making it.
 I decided to use a peach filling because my parents had just gotten some from the farmer's market. I enlisted the help of my father but he's "never been good at peeling things," so the help left rather quickly! :-) In the end, I decided not to peel the peaches and it turned out well. I even ate some of the leftovers straight from the pot! :-)
  The first braid I made cooked a lot faster than the 25 minutes instructed. I probably could have taken it out after 5 minutes at 350 but I left if another 5 minutes, 5 short of that instructed and it was already a little too brown. For the second braid, I wanted to make a calzone type braid with sausage and cheese for my brother, but we forgot to get sausage, so I just filled it with chocolate and butterscotch chips.
  This time, the bread baked properly and was very good. The recipe was chosen by Ben at
  Spread the butter evenly over the center and right thirds of the dough.
 Fold the left edge of the detrempe to the right, covering half of the butter.
  Fold the right third of the rectangle over the center third.
  The first turn has now been completed. Mark the dough by poking it with your finger to keep track of your turns, or use a sticky and keep a tally. Place the dough on a baking sheet, wrap it in plastic wrap, and refrigerate for 30 minutes.
 If you will not be using the dough within 24 hours, freeze it. To do this, roll the dough out to about 1 inch in thickness, wrap tightly in plastic wrap, and freeze. Defrost the dough slowly in the refrigerator for easiest handling. Danish dough will keep in the freezer for up to 1 month.

 Cool and serve the braid either still warm from the oven or at room temperature. The cooled braid can be wrapped airtight and stored in the refrigerator for up to 2 days, or freeze for 1 month.
 Workday Salad
  They are not sweet scones, but the blueberries add the perfect amount of sweetness and tartness. To me, it was just so much fun to bite into a blueberry and have its flavor meld with the wholesome wheatiness of the scone. So, try these out...they're healthy and yummy! One of the things a favorite pediatric attending told me...if you tell your child such-and-such is a treat, he'll think it's a treat. SO, if you bring you child up on less sweet muffins/scones, he'll think that's how they should be rather that the sweeter version. Sweet or not, these are very good! Check out the other great recipes over at Cate's.
 Whole Wheat Blueberry Scones
 the S'more Cupcake!!! I found
  S'more Cupcakes
  Place 7-8 marshmallows on top of each batter.
  Top with remaining batter. Be careful not to run out of batter; just be "frugal" with your batter until you're sure you have enough.
 Bake at 350F degrees for 22-25 minutes or until done. Cool in pans or on sheet for 15 minutes. Remove from pans and cool completely on a wire rack.
 When cool, ice with chocolate frosting. Before ready to serve, place a small square (each large rectangle will provide 8) in the cupcake. Top with a few marshmallows. Enjoy!
 Many of you have probably heard about or seen the Sweet Melissa cookbook; in fact, there were several giveaways, all of which I entered but none of which I won! Oh, well. I did, however, see
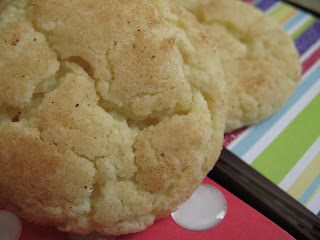
  Anyway, I took a little bag of these to Emily at church and she later said that she barely got out of the orchestra room with them in tact! I agree, they were quite good. The outside has that sugary crispness but the inside is soft. In addition to great texture, they're not flat!
  They stayed nice and rounded on the top...though one of my friends has a recipe that make really rounded snickerdoodles, maybe she uses shortening? So, if you want a good cookie to make with your kiddos or even to relieve some stress (like me!), try these cookies!
  Snickerdoodles- adapted from