Showing posts with label Fruit. Show all posts

Wednesday, June 10, 2015

Cherry turnovers -Gluten free

Early on in September, I made David some cherry turnovers.  He really misses poptarts being gluten free.  I can't say that I'm sad we don't have those around the house but I do like to indulge him...
so I made these.  I think he mostly had them for dessert but you could consider them like a big pop tart.
 The filling was really good with fresh cherries!  The dough had cinnamon in it, which made it so much better than just regular dough.  It wasn't the easiest of doughs to work with but I made do.

Gluten-Free Sweet Cherry Turnovers from The Best of this Life
(original recipe says serves 4 but I got more like 6-8)

Dough
1 1/2 cup white rice flour
1/4 cup oat flour
1/4 cup almond flour
1/4 cup of sugar
1/2 cup butter (right out of the fridge)
2 eggs
1 tsp cinnamon
1/2 tsp vanilla
6 Tbsp of cool water
In a large bowl mix all flours, sugar & cinnamon together. Cut the butter up and work it into the flour. Beat two eggs, add in the vanilla and water – mix into the flour mixture.  Keep working the dough until all is well blended and you have a nice tender consistency.  Remove from the bowl and form a rectangle – place in the refrigerator for about an hour.
 
 
Sweet Cherry Filling
2 loosely filled cups of sweet cherries (pitted & halved)
1/3 cup brown sugar
1/4 cup of water
2 Tbsp of tapioca flour
1 tsp cinnamon
Mix all ingredients in a saucepan over high heat.  Bring to boil and then reduce to low heat and simmer. Cook for 12-15 minutes, stirring often so that it doesn’t stick.  Once cooked, remove from heat and allow to cool completely.
 
Assembly:
Separate dough into several pieces.  Roll out into a long rectangle.  Top one half with cherry filling then fold the other half of dough over and seal well with a fork on all side.Place on a baking sheet.  Then place the sheet into an oven preheated to 350.  Bake for 22-25 minutes. Enjoy!! 

Saturday, February 21, 2015

Cheesecake for Mother's Day

David is always so sweet to make desserts that I like when it is a special occasion.  Last mother's day, he and Kate set to work making a cheese cake for me. 
They had such a fun time and you could tell that Kate was loving the time with her Daddy...
of course, she loved licking the batter, too!
 The cake was delicious.  There was a funny story to go with it, though.  David had gotten all the ingredients at the grocery store specifically for the cake, so he purchased extra eggs. 
After he finished making the cheesecake and had poured it into the pan, he looked over at the counter and asked "what are those eggs doing out on the counter?"  Ha!  Forgot to put the eggs in the cheesecake...so, we scraped the batter out and beat the eggs in.  It all turned out great! 
David even cooked the blueberries himself. 

Almond Crust
1 cup almond meal
1/2 cup crushed, slivered almonds
1/4 cup white sugar
1/4 teaspoon baking soda
1/4 teaspoon cinnamon
3 Tablespoons melted butter

Preheat oven to 350.  Whisk almond meal, almonds, sugar, baking soda and cinnamon in a bowl.  Stir in butter until moistened.  Pour into a springform pan and press firmly into the bottom.  Bake in oven for about 10 minutes (to set crust).

Blueberry Cheesecake
2 (8 oz) packages cream cheese, softened
1 cup sour cream
3/4 cup white sugar
1 teaspoon vanilla
2 tablespoons flour (used gluten free)
4 eggs

Decrease oven temperature to 325.  Beat cream cheese until soft.  Then beat in sour cream, sugar, vanilla and flour.  Beat in eggs one at a time.  Pour the mixture onto the set crust.  Place pan into preheated over and bake for 1 hour or until firm to the touch.

Blueberry Topping
2 cups frozen (or fresh) blueberries
1/8 cup sugar
2 teaspoons cornstarch.  

Put all ingredients into a saucepan and cook on the stove on medium high heat until it all thickens.  Pour over the cooked cheesecake and enjoy!

Tuesday, July 08, 2014

Birthday Dessert

So, this is how far behind I am on posting.  Back in February when I turned 31, David made me a really yummy frozen strawberry dessert. 
I picked it because he had said he thought it looked good, it was (roughly) gluten free, and sounded good to me, too.  Um, can we just say I LOVED this!  I think I ate it almost every night until it was gone.  one night I had it for supper.  And one night I had two pieces.  I blame being in first trimester of pregnancy on that one!  :-)
 I say "roughly" gluten because we did use Nature Valley granola bars which are labeled gluten free but also don't have wheat as an ingredient.  This works for us, though it may not work for you.  I think K had a good time banging the bars!  :-)

Frozen Strawberry Crunch Cake from Tablespoon
  • 1 box Nature Valley Granola Bars
  • 1/3 cup brown sugar
  • 1/2 cup flour (gluten free if needed)
  • 6 tablespoons melted butter
  • 2 egg whites
  • 1/2 cup sugar
  • 1 cup heavy whipping cream
  • 1 lemon, juiced
  • 4 ounces cream cheese
  • 1 1/2 cups freshly chopped strawberries
  • Directions

    Preheat oven to 350.  Unwrap all granola bars.  Place them in a bag and bang to a course crumb (or use your food processor ut kids love the slamming part!). In a large bowl, add the crumbs, brown sugar, flour and melted butter and mix together. 
    Then spread into an 8x8-inch pan that has been covered with parchment paper. Bake at 350ºF for 20 minutes. Let cool. Then divide in half and set aside.
     
    Meanwhile, in a mixing bowl, combine eggs whites and sugar and mix on high. Add the heavy cream and continue mixing for another 5 minutes.  After this, add the lemon juice and cream cheese then mix on low until well mixed.  Fold strawberries into this mixture.
     
    In a buttered glass pan, press half crumbs on the bottom.  Top with strawberry mixture and then press the remaining crumbs on top.  Cover and place in freezer for 3 hours or more.  Enjoy!

    Saturday, October 05, 2013

    Facebook Banana Bread

    Several years ago when I actually went home to visit my parents more often, I seemed to develop this tradition of making banana bread every time I went home.
     So, it's completely appropriate that my mom found a banana bread recipe that I should try.  Several Sundays ago, K helped me make the recipe.  It is a "healthy" recipe and turned out really good. 

    We didn't have regular applesauce, only the strawberry squeeze pac, which K refuses to eat.  Score...now I've used them all!  And K got to squeeze it in.  The only problem was the clumps of flour that turned up as I cut into it!  Ha!  I decided to just stir the batter.  Actually, to let K stir! 

    She LOVES to stir and, since I use the mixer most of the time, she doesn't get to stir much.  Oh well...you can eat flour, right?!  ;-) 

    Facebook Banana Bread adapted from Facebook (unfortunately, I don't know where it came from originally!)
    Ingredients

    2 cups whole wheat flour (used all purpose)
    1 teaspoon baking soda
    1/4 teaspoon salt
    1/2 cup unsweetened applesauce (used two of those kids squeeze packs because it's what I had!)
    3/4 cup honey (about 2/3 cup)
    2 eggs, beaten
    3 mashed overripe bananas

    Directions

    Preheat oven to 350 degrees F (175 degrees C). Lightly grease a 9x5 inch loaf pan. In a large bowl, combine flour, baking soda and salt. In a separate bowl, mix together applesauce and honey. Stir in eggs and mashed bananas until well blended. Stir banana mixture into flour mixture; stir just to moisten. Pour batter into prepared loaf pan.

    Bake in preheated oven for 60 to 65 minutes, until a toothpick inserted into center of the loaf comes out clean. Let bread cool in pan for 10 minutes, then turn out onto a wire rack.

    Friday, April 26, 2013

    Apples All Around

    We had a bag of apples in the fridge and David requested that I make apple pie or turnovers or something apple while we have so many apples.  So, last week I made an apple turnover cake. 

    K helped me and kept calling it a birthday cake!  :-)  Unfortunately, due to the candy incident, she couldn't have any (did finally get some right before we finished it) but did great when I told her no.  This is very easy to make.  I didn't have any applesauce and just left it out.  I thought the cake was a "tad" dry, so I think the applesauce would have helped with that.  Only used about 2 apples and I thought it could use more.  Try it for yourself.  Would make a good breakfast cake.  :-) 


    Apple Turnover Cake adapted from Nerdy Baker

    For Filling:
    1 heaping cup of sliced apples (I used 2 apples)
    1/3 cup sugar
    1/4 teaspoon cinnamon
    2 tablespoons cornstarch
    2 teaspoons water

    Plus
    1/2 cup brown sugar (I used a 1/4 cup each of dark and light)
    1/2 teaspoon cinnamon

    For Cake:
    1/3 cup butter
    3/4 cup sugar (I used splenda)
    1/2 cup applesauce (didn't use)
    1 teaspoon vanilla
    2 eggs
    2 1/4 cups flour
    1 teaspoon baking powder
    1 teaspoon baking soda
    1 teaspoon salt
    1 teaspoon cinnamon
    1 cup sour cream (I used fat free...originally called for greek yogurt)

    For Glaze:
    2 cups powdered sugar
    1 teaspoon vanilla
    6 tablespoons milk

    Method

    For filling:  Make your filling by combining apples, sugar, water, cinnamon and cornstarch in a small saucepan.  Cook on low heat for 5 to 7 minutes, stirring constantly until the sauce is thickend and the apples are a bit soft.  Set aside to cool.  In a small bowl, mix the brown sugar and cinnamon together until well combined and set aside.
    For Cake:  Preheat oven to 350°.  Grease and flour a 9×13 baking dish.  Set aside.
    Cream butter and sugar until light and fluffy, about 3 minutes.  Add applesauce (if using) and vanilla and mix till combined.  Add the eggs, one at a time, beating well after each addition. Sift the dry ingredients together.  Add the dry ingredients to the batter in three parts alternating with the yogurt in two parts, beginning and ending with the dry ingredients.  Beat until just combined. Spoon half of the batter into the prepared pan.  Spoon the cooled apple mixture over the batter carefully and spread as evenly as possible.  Sprinkle 2/3 of brown sugar cinnamon mixture over apples and cover with the rest of the batter.  Sprinkle the rest of the brown sugar cinnamon mixture over the top. Bake for 45-55 minutes, until a toothpick inserted into the center of the cake comes out clean.

    For Glaze:  While the cake is baking, make the glaze.  In a bowl, mix the powdered sugar, vanilla, and milk until the glaze is desired consistency.  When the cake comes out of the oven, immediately but carefully pour onto hot cake.  Try to pour as evenly as possible.  You might have to pick up the cake and tilt it to spread the glaze evenly.  I even poured some out that pooled at the corners and repoured that over the top.  Let the cake sit for awhile for the glaze to set.  Enjoy!

    Thursday, November 08, 2012

    Ring Cake

    Remember back in February when D surprised me by making a cake to take to Sunday School?!  Well, he did it again!  This time it was the Sunday after we got engaged.  He made an apple-butterscotch ring cake.  He said he thought it was appropriate seeing as we were celebrating the gift of a ring.  ;-)  He knows that I prefer a non-chocolate something and like apple.  It turned out great! 

    Unlike my pictures...sorry!  I especially loved the goodies (pieces of the cake that either break off or fall to the plate...the best part!).  D said he ended up using 1 1/2 apples and it was still a lot of apple.  If you're looking for a fall recipe to make for a get together, for Thanksgiving, or just for fun, try this one out!

    Apple-Butterscotch Ring Cake
    Apple base
    3 SMALL apples peeled and chopped (2 1/2 cups)
    1 cup chopped pecans
    1 cup butterscotch chips
    1/2 cup brown sugar
    1 teaspoon apple pie spice (or a combination of cinnamon and nutmeg)
    1/4 cup butter, melted

    Cake
    1 box yellow cake mix
    1 box butterscotch instant pudding
    1 1/3 cups water
    1/2 cup butter, softened
    4 eggs

    Preheat oven to 325 degrees.  Prepare a bundt pan with cooking spray.  In a medium bowl, top apples, pecans, butterscotch chips, brown sugar, spices, and butter.  Set aside until ready to use.

    In a large mixing bowl beat all the cake ingredients together, scraping frequently.  Pour the apple mixture into the prepared pan.  Pour the better on top of this.  Bake for 55 minutes or until golden and springs back when touched.  Place heatproof plate on top and turn the plate over.  Remove the pan an allow cake to cool slightly.  Enjoy!

    Sunday, October 21, 2012

    Gooey Apple Breakfast Pull Aparts

    During my studying over the past, oh, five months I must admit that I took frequent breaks.  It's just hard to study all day long!  Two weeks ago, I found a recipe for apple cinnamon monkey bread that looked really good.  I decided to make it for Sunday School.  We used to have some form of breakfast treat each week but haven't recently so I thought it would be fun to take something. 
    Instead of using the traditional biscuits, this recipe used cinnamon rolls, which I suppose makes it easier since you don't have to toss it in cinnamon sugar.  This is actually a Pillsbury recipe.  It called for granola bars on "top."  Well, I used them but they kind of stuck to the pan...oh, well!  That just means they were super gooey and yummy!  I thought the apple actually turned out great.  It cooked perfectly.  A really yummy fall treat that you can portion as you want!  A couple of pieces for a little treat or several to "equal" a full cinnamon roll.  Try it out!


    Apple cinnamon Pull-Aparts from Pillsbury
    4  crunchy granola bars (2 pouches from 8.9-oz box), crushed (3/4 cup)*
    1/4 cup Fisher® Chef's Naturals® chopped pecans
    1 teaspoon ground cinnamon
    2/3 cup milk
     3/4 cup packed light brown sugar 
     
    2 cans Grands cinnamon rolls with icing set aside
     
    1 Granny smith apple cored, peeled and chopped
     
  • Heat oven to 350°F. Spray 12-cup fluted tube cake pan with Baking cooking spray. In small bowl, mix crushed granola bars, pecans and 1/2 teaspoon of the cinnamon. Sprinkle mixture evenly in bottom of pan.
  • In large bowl, mix milk, brown sugar and remaining 1/2 teaspoon cinnamon. Separate both cans of dough into 10 rolls; set icing aside. Cut or tear each roll into quarters. Stir roll pieces and apples into whipping cream mixture to coat. Spoon mixture into pan; spread evenly.
  • Bake 50 to 60 minutes or until deep golden brown. Immediately place heatproof serving plate or platter upside down over pan; turn plate and pan over (do not remove pan). Cool 5 minutes. Remove pan; scrape any remaining topping in pan onto coffee cake. Cool 5 minutes longer. Drizzle reserved icing over top. Serve warm. Enjoy!
  •  

    Friday, July 06, 2012

    Ask and You Shall Receive...Cherry Cobbler

    My best friend from residency is working in a clinic that isn't associated with the hospital...so I don't get to see her at work anymore.  I think we're going to try to get together a couple of times a month for sure to visit and let K and Lukie play together.  We decided that we should cook out for July 4th.  So, after we came up with the big plan (hamburgers and hotdogs with fruit salad) I asked D what he wanted for dessert.  "Cherry or apple pie."  Hmmm...we had just had blueberry pie a week or so ago but he says "I like pie."
     Then he said cobbler would work.  Okay....then I see that cherries are on sale for $1.99.  WOW!  That's huge...they're usually $4/pound.  So, I bought a bag...but forgot to get a cherry pitter.  So, I sat on my floor and pitted 3 pounds of cherries with a knife. 
    My hands were stained after...but it was worth it!  :-)  The recipe for cobbler I found was pretty simple.  Just put the fruit on the bottom and top with a batter.  It was a bit difficult to spread. 
    You do pour a simple syrup/corn starch mixture on top...I might try to use less sugar next time and let the fruit do its own sweetening.  Jason, Sarah's husband, really enjoyed it as well.  You could use any fruit you wanted to with this.  A great year-round dessert. 

    Cherry Cobbler
    4 cups fruit, prepared as appropriate
    1 1/2 cups sugar, divided
    1/2 cup butter/margarine
    1/2 cup milk
    1 tsp vanilla
    1 cup self rising flour (original recipe said 1 cup flour and 1 tsp baking powder)
    1/2 tsp salt
    1 cup boiling water
    1 tsp corn starch (ooops...I used 1 tbsp!)

    Preheat oven to 375.  Spray 13X9 pan with cooking spray.  Pour prepared fruit in bottom of pan.  In a mixer, cream butter and 3/4 cup sugar.  Stir in flour.  Then add milk and vanilla.  Spread this over the fruit.  Heat water to boiling and dissolve remaining 3/4 cup sugar and corn starch.  Pour over top of batter.  Place in preheated oven and bake for 35-40 minutes or until browned.  Enjoy topped with ice cream and in the presence of friends and family!

    Tuesday, May 08, 2012

    A Guest Post, Welcome D

    D made a dessert for a party a while back and took pictures...without me asking him to!  My comments below in blue!  Check it out!

    Greetings all!  D here.  I’m giving Claire a little bit of a break today, and bringing you a simple recipe to boot.  This was one of C-prime’s favorite recipes to take to functions – even more-so than our sausage balls – as it comes together nicely and lends itself to using those crystal bowls that otherwise you never get to use.  That said, we never knew what to call it.  She called it Strawberry Stuff, and I guess that’s what it is.  Claire asked if it was a trifle, and I explained we didn’t have fancy words like that in Alabama.
    A few months ago, one of Claire and my friends was having a birthday, and her husband hosted a surprise birthday party.  I decided to take this along.  I was told it came out okay, but there were chocolate chip cookies at the party, so I wouldn’t know.  It was good...might use more strawberries next time.  I wouldn't know about the chocolate chip cookies!  :-)  

    Strawberry Stuff
    Ingredients
    16 oz. strawberries (fresh or frozen (thaw them if they’re frozen, though))
    1 angel food cake (store bought is just fine)
    2 packets Dream Whip (or 16 oz (a guess) Cool whip)
    2 cups cold milk (for dream whip if using)
    1 teaspoon vanilla (for dream whip if using) 


    1.       Rinse your strawberries (I know all cookbooks say to wash fruit, but really, you’re just rinsing them.  I’ve yet to see anybody break out the Dawn to prepare fruit.  Ha! He makes me laugh!)  Cut the green caps off.  Slice the strawberries.  Here you’re going for nice, bite-sized pieces.  Anywhere from 4-8 per strawberry, probably.  Remember that strawberries have a rough radial symmetry about the long axis, so I would advise using this to your advantage to maintain uniform slicing. 
     
    2.       Tear the angel food cake into bite-sized chunks.  Yes, this is as technically demanding as it sounds.
    3.       Prepare the Dream Whip (or just get your Cool Whip out)
    Mix the ingredients in a large bowl.  You won’t think you need a large bowl.  But you do.  Mix on low speed with an electric mixer until blended.  Then beat on high speed for 4 minutes until topping thickens and forms peaks.  Several concepts here were new to me.  I’m still not sure about the peaks thing:  if you’re mixing it, it’s going to be flat.  A little wrinkly, but still flat.  No peaks. Don't worry...education will occur!  When you pull the mixer out of the whip, it should pull up and leave "peaks" in the whip.  Leaving that aside, I always thought that mixing was a binary process.  Either something is mixed or it isn’t.  But I must confess, the texture really did change once I started beating it on high.  For that matter, the color of the surrounding countertop changed, too.  I’d never beaten anything on high before.  I guess it adds more air and reaches a lighter, fluffier texture. Exactly! First you mix...then you whip "into shape!"
     
    4.       (Optional) At this point, I had started mixing the ingredients together and felt something was missing.  C-prime always used frozen strawberries for this recipe, and I think that syrup, or nectar, or whatever, was what I was looking for.  So I used our Magic Bullet to blend the strawberries I hadn’t used into a syrup.
    5.       (More Optional) I also seem to remember adding Splenda to this recipe.  I didn’t this time, and I was told it was plenty sweet.  Sweeten to taste.  That sounds good.


    Isn’t this a huge strawberry leaf?!

    6.       In a rotating fashion, mix your ingredients in a large serving bowl.  You’re not trying to achieve layers (unless you decide to do a trifle...then you DO want layers.  If making a trifle, I would do the following layers: cake, berries, whipped stuff, cake, berries, whipped stuff), but it makes for less stirring if you add them a little at a time.
     a.       One of the attractive things about this recipe was always the eye-popping color.  I’m not sure if it was not using the frozen strawberries, or mixing in the syrup with the Dream Whip, but it turned pink and didn’t pop as much as I remembered.  Alas.
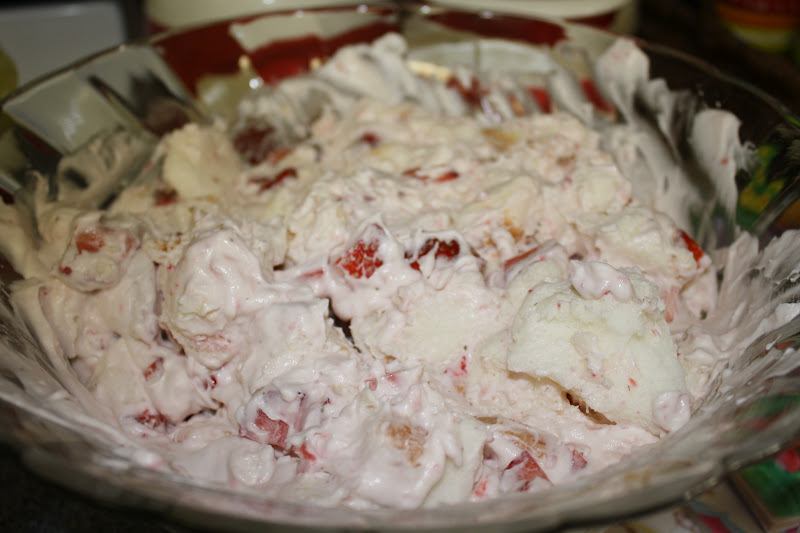
    7.       Once a satisfactory degree of homogeneity is reached, cover with cling wrap (which is never serving quality, ironically - just remove before serving! :-)) and chill until served.  The longer it sets, the more the cake will soak up the Dream Whip.  This is not really a problem, though - makes it better...will soak up strawberry juice too...yum!  Just an observation.  Then...enjoy!
    8


    Friday, February 03, 2012

    Strawberry Cake with Toddlers

    My best friend's birthday was last month, and I told her that I was going to make her a cake.  Well, I was on call the Saturday before so I knew I wouldn't have time to make it the next day...which meant I needed to make it pre-call.  D brought K over and she helped me make the cake. It was quite fun.  We all donned our aprons and baked away.

    There were a couple of times when K got really excited.  First was when we put the first egg in...the batter became BRIGHT red!  WOW!

    Then when I put the eggs in...she SO wanted to crack them on her own.  I let her help crack the eggs but did have to go fishing after a couple of shell pieces before we added it to the batter, but I think it's important to let kids help as much as they can.

    Then came the sifting...she helped and thought that was pretty neat.

    I made two layers and four small cupcakes for K.  I think her favorite part of the day was licking the spoon!
     Sunday night after we went to my friend Katie's house, I came back and made the icing.  It wasn't quite as thick as I would have liked but ended up making a pretty cake.

    Strawberry Cake adapted from allrecipes.com
    2 cups sugar
    1 package strawberry jello (I used sugar free...when you make baked good that already have sugar, don't need the extra sugar from the jello)
    1cup oil
    4 eggs
    2 3/4 cups sifted cake flour
    2 1/2 teaspoons baking powder
    1 cup milk (I used buttermilk)
    1 tablespoon vanilla
    1/2 cup strawberry puree (thawed frozen strawberries blended in the food processor)

    Preheat oven to 350 degrees.  Spray 2 9-inch round cake pans with Pam with flour (splurged on this when it was on sale and LOVE it!).

    In a large bowl, blend oil, sugar, and jello.  Add the eggs one at a time, blending after each egg.  Sift together the flour and baking powder.  Starting and ending with the flour mixture, add flour and milk alternately to the batter.  Blend in vanilla and puree.  Pour the batter evenly into the prepared pans.  Place the pans in the oven and bake for 25-30 minutes or until a knife comes out clean when inserted into the center.  Allow to cool for at least 10 minutes before removing from the pans.

    Strawberry Icing
    1 cup pureed strawberries
    1/2 cup (1 stick) softened butter
    3-4 cups powdered sugar

    In a food processor, puree strawberries.  Add the softened butter and blend.  Then pour in the sugar until reaches desired consistency.  Place one cake layer on serving dish.  Spread icing over that layer.  Top with the remaining cake layer.  Then spread icing over the top and down the sides of the cake until all sides are covered.  Top with a sliced strawberry.  Enjoy!
    (sorry for the poor quality...taken by cell phone at work!)

    Saturday, November 26, 2011

    Deep Dish Apple Pie

    Happy Thanksgiving...a little late!  I hope you all had a wonderful time with those you love.  We had about 20 people at my parents' house.  It was smaller than usual but still very enjoyable.  At the end of the 3 days, we had so much food left over...now we know who REALLY eats the food...all the people who weren't here this year.  ;-) We always have tacos on Wednesday night and then a conglomeration of desserts.

      However, my aunt Jo Ellen decided to make a deep dish apple pie.  Let me tell you, it was beautiful and delicious.  She got the recipe out of a Southern Living magazine.  I would highly recommend it!  She used premade pie crusts, but you could make your own crust if you REALLY wanted to be hard core about it.

    Easy Skillet Apple Pie from Southern Living Sept 2011
    4 pounds of apples (the recipe suggests 2 eat of granny smith and  braeburn.)
    1 teaspoon ground cinnamon
    3/4 cup sugar
    1/2 up butter (1 stick)
    1 cup packed brown sugar
    1 package refrigerated pie crust (has two in the package)
    1 egg white (we did not use this)
    2 tablespoons sugar for dusting

    Preheat oven to 350.  Peel and cut apples.  We used an apple-peeler-corer-slicer on some; so, we had wedges and thin slices.  I think the combination of sizes was actually a good thing.  Toss apples with cinnamon and the 3/4 cup sugar.  Melt the butter in a 10-inch cast iron skillet.  After it is melted, add the brown sugar and stir until sugar is dissolved.  Place one pie crust in the bottom of the pan on top of the sugar mixture.  Pour the apples over the pie crust and top with the remaining crust.  Brush with egg white if desired.  Sprinkle sugar on top.  Cut small slits in the top crust.  Place in over and bake for 1 hour to 1 hour 10 minutes or until golden and bubbly.  Remove from oven and cool for 30 minutes before serving.  Serve with ice cream or cool whip.  Enjoy!

    Tuesday, November 01, 2011

    Apple Pie...in a Muffin

    So, I have had several requests to post this recipe ever since I made the muffins.  Plus, it's finally cool and fall like here...so, I give you apple pie muffins.  After making a fruit salad for that surprise party a few weeks back, I had LOTS of apples left over.  So, I went in search of a good recipe to use those apples.  I stumbled across this muffin recipe and thought it looked great...plus, it had a crumble topping.  I think the top is the best part of the muffin...so a crumble top is even BETTER!  I ended up using applesauce in replacement of the oil to make these a little bit healthier.

    On a side note, I am of the opinion that applesauce does make the "shelf life" of baked goods a lot shorter.  So, if you do use the applesauce, either eat these quickly, or freeze them!

    On the other hand, the texture of the muffins was still good.  I didn't think the topping was quite crispy and dry enough.  I still haven't figured out how to make the best topping.  All in all, though, these were really good muffins!  These were great and had a great amount of apple in them.  Check them out!

    Apple Pie Muffins adapted from My Baking Addiction

    2 1/4 cups all-purpose flour
    2 teaspoons cinnamon
    1 teaspoon baking soda
    1/2 teaspoon kosher salt
    1 egg
    1 cup buttermilk
    1/2 cup applesauce
    1 teaspoon vanilla extract
    1 1/2 cups packed brown sugar
    2 cups peeled, chopped apples - I used gala but granny smith is the traditional type

    Topping:
    1/2 cup packed brown sugar
    1/3 cup all-purpose flour
    ¼ cup rolled oats
    1 teaspoon ground cinnamon
    2 tablespoons butter, melted

    Preheat the oven to 375 degrees F. Spray muffin tin with baking spray.  In a large bowl, whisk together flour, cinnamon, baking soda, and salt. In a small bowl, whisk together the egg, buttermilk, applesauce, vanilla and brown sugar. Stir until sugar has dissolved. Pour liquid mixture into the flour mixture and stir until just combined. Gently fold in apples. Use a large scoop to fill each muffin well, filling the cups to the top.

      In a small bowl, stir together 1/2 cup of brown sugar, 1/3 cup flour, rolled oats, and cinnamon. Drizzle in 3 tablespoons of melted butter, mixing until well blended. Sprinkle this over the tops of the muffins. Bake in preheated oven for 25 minutes, or until the tops of the muffins spring back when lightly pressed.  Cool on wire rack. Store at room temperature or freeze. Enjoy!