Showing posts with label work. Show all posts

Saturday, August 20, 2016

Boat Ride

In June, we prepared to welcome the new interns at work.  To do this, we, of course, had a party; this party was at the yatch club. 
It was hot but nice to be out near the water. 
The kids had a blast running around and playing with other kids and the ducks.
  After eating, we got to go out on the boat.  We took a nice little long ride. 
Caleb enjoyed it but was ready to be out of his puddle jumper by the time we got back.  '
Kate actually fell asleep. 
She had a small fever when we got home but was better the next day (thankfully, since she had camp the next week!). 
We are blessed to have fun little activities like this associated with work. And thankful for kids who enjoy it and enjoy being with other people.

Sunday, August 31, 2014

What a Week! 36 weeks

 What a fun and busy week!  I had my work shower on Monday.  We got a lot of diapers for the baby along with a  few other fun things....and got to eat some yummy food.  Then the next day, my other clinic threw a surprise shower for the FOUR of us who are pregnant.  One of the nurses is due the day after me, one of the other doctors is having twin boys (due one month after me), and another doctor is pregnant as well.  Got lots more diapers there. 
(and I THOUGHT I was showing here!)

Thursday was a CRAAAAAZY day!  I mean, it was so not good.  I arrived at work and had a patient waiting for me.  No biggie.  However, I spent a good deal of time talking with the family.  By the time I was done, another patient had arrived.  After that patient, FOUR had arrived - including one that was supposed to come the NEXT day but came early.  Sigh.  I didn't finish morning clinic until 1256.  My first afternoon patient arrived at 102.  In the meantime, the school had called saying that Kate was complaining of her stomach hurting and wanted us to come get her (no, she didn't have fever, she wasn't sick...her stomach just hurt).  So, David got her and brought her to clinic with him.  She was fine!  The saw the rest of my patients and left to go to a meeting that I was 10 minutes late to.  Then, instead of going to get free dinner at journal club as I had planned, I sat in my office and did notes for three hours...leaving with still two left to do.  I got home at 815 that night.  When I got home, I looked at my feet and asked David if they looked puffy.  Yep!  We both agreed they were.  Thankfully, elevation helped.  I think that not getting to eat all day, being stressed, and on my feet a lot had a lot to do with that. 

Thankfully, Friday was much better!  I had an easier clinic day and came home to rest before going to the gym to do kickboxing followed by swimming with Kate.  Then we went to get the infant carrier and out to eat.  Was a good day.  Saturday, we went to the gym again and then to my friend's house to swim and cook out.  Kate had a GREAT time with another friend's little girl who is the same age.  Last night I organized the diapers and we cleaned out the nursery.  Today, David put together the infant carrier.  I'm a little worried because I'm having trouble un-clicking the carrier from the base.  I've heard you get used to it and it's easier with baby in it.  I hope so! 

I have a doctor's appointment Tuesday with weekly visits following that.  Just praying that Mr. Boogie Man (he is dancing tonight!) stays put where he is for two more weeks so I can finish work as planned.  Then we are ready for him.  So exciting!
 
Due Date: September 25, 2014  
How Far Along: 36 weeks 3 days
Fruit/Veggie: papaya, romaine lettuce  - 17-20 inches, 5.5-6 pounds
Gender: It's a BOY!  
Exercise: Still exercising almost daily.  I'm definitely slower, have a LOT of trouble bending over.  I will say, a lady last Monday told me I was her hero for still being working out.  Really made my day. 

Sleep: Again, not sleeping well.  I think it's just par for the course right now.  Oh well!

Cravings: Um...not really anything.   Still not much appetite.  Cold and sweet things are nice.

What I love: Feeling and watching the baby move! He's having a boogie party right now!  Getting the nursery cleaned up, baby stuff put together, and spending time with family this HOLIDAY WEEKEND!!!!

What I miss: turning over in bed easily, sleeping, being able to pick things up off the floor

What I'm looking forward to:  getting the baby bedding in, spending the day with David and Kate tomorrow, only two more weeks of work!

What I'm thankful for:  My sweet husband, always taking care of me.  A healthy pregnancy. Getting things ready for baby, sweet coworkers

Monday, March 10, 2014

Just Like Starbucks?

On New Years' Eve, I had a full clinic scheduled.  I decided that since my nurses had to come because of that I'd make something fun.  I found a recipe for cinnamon scones that were supposed to be like Starbucks.  Admittedly, I have never had one of these scones so I can't really compare.  These were pretty good but dried out quickly.  Maybe that's just scones?

Starbucks' Cinnamon Chip Scones from On Your Plate
2 cups flour
2 teaspoons baking powder
1/2 teaspoon baking soda
1 stick of butter, cut into small pieces
3/4 cup cinnamon chips
1/2-3/4 buttermilk (or skim milk)
for glaze: 1 cup powdered sugar and 1 tablespoon water
sift together the dry ingredients and work the butter in until the mixture resembles cornmeal. Add in the chips and toss together. Slowly add the milk until the dough just comes together. Roll the dough out into a square that is approximately 1 inch thick. Cut into triangles and brush with egg wash. Bake at 400 degrees for 15 minutes. Let scones cool completely and then drizzle with glaze.

Thursday, January 09, 2014

Party #2

The day after our Sunday School party, we were supposed to have a Christmas party with the pediatric dental folks from the hospital; we had even told K we were going.  Unfortunately, David was really tired and I was indifferent, so we ended up going home.  K was upset but got over it very quickly (I can't remember why but there was something that helped!).  The next party was my pediatric neurology party.  It was held at one of the other doc's house.  K fell asleep on the way over there but quickly bounced back and, of course, was asking for food as soon as we walked in the door!  I think hers was the first plate fixed. 
Then she proceeded to sit at this big ottoman and eat...forget that all the other kids were upstairs playing.  This girl is serious about her food, regardless of if it's pizza or raw veggies! 
Dr. Parker, Mrs. Evans and baby John Harmon watched over K.  Then I shared a cookie with my girl and she was off to play. 
We just kind of mingled the rest of the night.  Ended up with a gift card for a dinner out (YES!!!) and took some fun pictures with my love by the tree. 
K fell asleep within 5 minutes of leaving.  Hint to mamas out there - take pajamas with you, then you don't have to wake sleeping babies when you get home.  Thankfully, I had already packed for our trip to Alabama - at least for K.  We got home and I packed me and David and he loaded the car.  But, before we took off for celebration with David's family, we had one more party to attend...and K would FINALLY get to meet Santa!

Monday, December 23, 2013

More S'more Items!

When David did his ER shift in November, I made a S'more bar for him to take.  This was when he was trying gluten free for a bit but this wasn't gluten free.  I wanted to try it, though, and figured the ER shift would be a good time to try.  It turned out GREAT!  I love anything graham and could have eaten many of these myself.  I may have doubled this recipe but I can't remember if I did or not.  I'm sure it would double fine!

S'mores Bars adapted from Truffled Delights
1/2 cup butter (1 stick)
1/4 cup brown sugar
1/2 cup sugar
1 egg
1 tsp. vanilla
1 1/3 cups flour
3/4 cup graham cracker crumbs
1 tsp. baking powder
2 king-sized chocolate bars
1 1/2 cups marshmallow fluff

Preheat oven to 350 degrees & spray an 8-inch baking pan.  In a large bowl, cream together butter and sugar until light.  Beat in egg and vanilla.  In a small bowl, whisk flour, graham cracker crumbs, baking powder and salt.  Add to butter mixture and mix at a low speed until combined.
Divide dough in half and press into an even layer on the bottom of the prepared pan.  Place chocolate bars over dough.  Spread chocolate with marshmallow creme/fluff.  Place remaining dough in a single layer on top of the marshmallow.  Bake for 30-35 minutes, until lightly browned.  Let cool and cut into bars.  Enjoy!

Saturday, November 30, 2013

A Rich Season

If you don't feel rich after Thanksgiving, maybe at least these bars will make you feel rich.  They are called Cookie Dough Billionaire Bars.  Let me tell you, they are SOOOO good!  They were actually adapted from a cookbook that I was given for our wedding, The Cookie Dough Lovers Cookbook.  I really MUST pull that cookbook off the shelf and use it more...and soon!  :-) 
I mean, I love anything with cookie dough in it but these were super good.  I actually made these for one of my co-workers.  She joked with David that I hadn't made her a treat for her birthday; so, of course, I felt like I had to make her something (even though I knew she was joking).  After David took these to her, she texted me that they were probably the best thing she had eaten and wanted the recipe.  These are definitely a little better chilled but will suffice any time. If you need a good Christmas party recipe, these fit the bill. 

Cookie Dough Billionaire Bars adapted from Bake or Break
For shortbread:
1/3 cup unsalted butter, softened
1/3 cup granulated sugar
1/2 teaspoon vanilla extract
1/4 teaspoon salt
1 cup all-purpose flour

For caramel:
7 ounces soft caramel candies (I used the caramel bits, AWESOME product!)
2 tablespoons heavy cream or almond milk

For cookie dough:
1/2 cup unsalted butter, softened
1/4 cup granulated sugar
1/2 cup light brown sugar, packed
2 tablespoons almond milk
1/2 teaspoon vanilla extract
3/4 cup all-purpose flour
1/8 teaspoon salt
1/2 cup mini semisweet chocolate chips

For chocolate glaze:
4 ounces semisweet chocolate
1 tablespoon unsalted butter

To make shortbread:
Preheat oven to 350°. Line an 8-inch square baking pan with parchment paper, leaving about a 1-inch overhang on 2 sides. Using an electric mixer on medium speed, beat butter and sugar until light and fluffy. Add vanilla and salt, beating until combined. Add flour and mix until combined. (Dough may be crumbly.)
Press dough into bottom of prepared pan. Using a fork, poke shallow holes into the dough. Bake 18-22 minutes, or until edges are golden. Cool on wire rack.

To make caramel:
Place caramel and cream in a small saucepan over medium heat. Cook, stirring constantly, until melted. Pour over shortbread and spread evenly. Refrigerate about an hour, or until set.

To make cookie dough:
Using an electric mixer on medium speed, beat butter, sugar, and brown sugar until light and fluffy. Add cream and vanilla, and mix well. Reduce mixer speed to low and add flour and salt, mixing until combined. Stir in chocolate chips.Using a spatula, spread cookie dough evenly on top of caramel layer. Place in refrigerator while making the glaze.

To make chocolate glaze:
Place chocolate and butter in a microwave-safe bowl. Heat at half power in 30-second increments until chocolate melts when stirred. Spread evenly over cookie dough layer. Chill about 30 minutes, or until set.
Using the edges of the parchment paper, lift the bars out of the pan and onto a cutting board. Use a sharp knife to cut into squares.Keep bars refrigerated in an airtight container.  Enjoy!

Notes
Recipe adapted from The Cookie Dough Lover's Cookbook.

Tuesday, November 05, 2013

Muffins but Not for Him

Remember when David made the shrimp for me?  Well, I thought about him when I did baking that weekend.  I made banana butterscotch muffins since I knew he didn't really like banana that much and would prefer chocolate over butterscotch...so I went in search of a recipe to fit the bill. 
I found this recipe from the Baldpate Inn.  Now, I have no clue what the Baldpate Inn is other than it gave me this recipe.  The muffins ended up really good and my co-workers loved them.  I think they ate them for the rest of the week!  Definitely a good muffin.

Banana Butterscotch Muffins from the Baldpate Inn
1 Cup Oatmeal, uncooked quick variety
1/2 cup white sugar
2 bananas
1 cup all-purpose flour
1 tsp Baking powder
1/2 tsp Baking soda
1/2 tsp Salt
1/2 cup Butterscotch chips
1 Egg
1/4 C milk
1/4 C Vegetable Oil
1 tsp Vanilla extract

Preheat over to 400.  Puree peeled bananas.  Add bananas with liquids to dry ingredients, stirring by hand just to blend.  To bake, fill greased muffin tins 2/3 full.  Bake in preheated oven at 400 degrees for 13-15 minutes, until top springs back when lightly touched.  this makes 1 dozen muffins.
Butterscotch Banana Muffins from the Baldpate Inn

Friday, September 27, 2013

Tres Leches...but which ones?!

I changed divisions within the pediatric department in July.  It's not what I originally thought I'd be doing but it was definitely an opportunity given to be by God!  I have been working in the pediatric neurology clinic and the people I work with are great!  My division chair is so helpful and encouraging, always available to help me and so supportive of family.  One of the other physicians I had worked with in the past and so was excited to work with him again.  He is a great teach, hilarious, and helpful.  The whole department is like a family...see my crazy and fun co-workers?!
  So, when it was Brad's birthday, we all got together for lunch.  I decided that was the perfect time to make my Daring Baker challenge for the month...a Tres Leches cake!  Inma of la Galletika was our Sept. 2013 Daring Bakers’ hostess and WOW did she bring us something decadent and delicious! Pastel de Tres Leches or Three Milk Cake, creamy yet airy, super moist but not soggy.. just plain delish!

The cake was very easy to make and turned out great.  I used a springform pan rather than a regular cake pan.  I think this just makes it easier to remove and cut.  When I told everyone that I made a tres leches cake I was immediately asked what the three milks were.  Brad's guess:  goat, cow, and...well, something wrong!  The recipe calls for evaporated milk, sweetened condensed milk, and milk (though I used almond milk).  Be careful, though, when you make the syrup....THIS is what happens if it overflows!
 I decided to use cinnamon to flavor the cake, but I was a little unsure about what to use for the filling.  All the examples I saw used fruit but I didn't know what people would want...and was using this for Brad's birthday cake.  So...I decided to make a nutella cream filling.  I just took a half cup of nutella and mixed it with some of the whipped cream I made for the outside.  I thought it turned out good. Of course, David's comment was that you couldn't taste the nutella.  Alas! 
Everyone at the office liked it.  The description was "like tiramisu without the coffee."  Brad even said that, after having five cakes that day, this cake was his favorite!  Thanks, Inma, for such a delicious challenge!


Classic Three Milks Cake:

Servings: 12
Ingredients for the vanilla sponge cake
5 large eggs (separated)
½ cup (120 ml) (4 oz) (125 gm) sugar
2 teaspoons (10 ml) of vanilla extract
1 cup (240 ml) (5 oz) (140gm) all-purpose (plain) flour (sifted)
For three milks syrup
1 can (14 oz) (400 gm) sweetened condensed milk
1 can (12 oz) (340 gm) evaporated milk
1 cup (240 ml) heavy cream (about 35% fat) or 1 cup of half & half or 1 cup milk
1 cinnamon stick
2 teaspoons (10 ml) rum (or other flavoring)
Topping and filling
2 cups (500 ml) of whipping cream (about 30% fat)
½ cup (120 ml) (4 oz) (125 gm) sugar
Canned or fresh fruit (to fill and decorate the cake)
Directions For the Sponge Cake:
  1. Preheat oven to moderate 180°C/350°F/gas mark 4. Prepare a square 9”x9” (23cmx23 cm) pan or 9” (23 cm) round cake pan
  2. Separate the egg whites from the yolks.
  3. Beat the egg whites on medium speed, 3 - 5 minutes.
  4. When soft peaks form slowly add the sugar in small batches.
  5. Whip until stiff peaks form about 5 minutes. Set aside.  
  6. In a medium bowl beat egg yolks at medium-high speed for about 5 to 6 minutes, or until the egg yolks become pale colored, creamy and puffy. (OR hand beat...yes sir I did!)Stir in vanilla.
  7. Pour the egg yolks over the egg whites, gently fold until just combined trying not to lose any volume from the mixture.
  8. Fold in the flour little by little in the form of rain. Mix until just combined (over-beating will result in a denser, flatter cake).
  9. Pour the batter into the prepared 9”x9” (23cmx23 cm) square cake pan or 9” (23 cm) round cake pan.
  10. Bake in the preheated moderate oven for 25 minutes or until the toothpick comes out clean
  11. Let it cool.
Three milks syrup
  1. In a saucepan add the sweetened condensed milk, evaporated milk, heavy cream and cinnamon stick, bring to a boil, reduce the heat and continue boiling for 5 minutes. Remove it and let it cool.
  2. Once it is cool, add the rum or any other flavoring you are using
  3. Gradually brush all the milk soaking liquid into all sides of the cake (including the cut surfaces) until all absorbed. Best to rest the cake in the fridge overnight to complete the soaking process. 
Topping
  1. Whip the cream, when soft peaks form add the sugar little by little, continue whipping until stiff peaks form about 2 mins. 
Assembly:
Cut the cooled cake in half and place the bottom half on a cake plate.  Poke with a fork to allow the cake to absorb the milk syrup.  Spoon the syrup over the cake so that it is soaked!  Top the bottom layer with your desired filling.  Top with the second layer of cake.  Poke holes in that layer and spoon with syrup until soaked!  Cover with whipped cream topping.  Refrigerate for at least an hour...longer is better!  Enjoy!

Tuesday, September 17, 2013

Congratulatory Cookie Cake

David always has a cookie cake for his birthday.  I didn't get a chance to make his this year for birthday (though he had one when we visiting his parents) but I did make one to celebrate him completing the medicine boards.  It was actually kind of fun...I made it the day before and hit it in our guest room.  Ha! 
I found this recipe that claimed to be just like the cookie cakes that you buy.  I'm not sure I'd say that but only because the pan they instruct you to use makes the cookie so thick!  Texture-wise it was GREAT.  Moist and gooey.  I thought it was great.  David thought it was great. And the other residents thought it was great, too!  I do think I'd make this again.  The instructions say to use a cake pan but I used a spring form pan which was great.  Definitely as good as a store bought cookie cake even if not exactly like it. 

Chocolate Chip Cookie Cake from Life, Love, and Sugar
Yield: one 8 or 9-inch cookie cake

Cookie Cake
3/4 cup unsalted butter, room temperature
3/4 cup dark brown sugar
1/4 cup sugar
1 egg
2 tsp vanilla extract
2 cups all purpose flour
2 tsp cornstarch (I think this may be the key)
1 tsp baking soda
1/2 tsp salt
1 1/4 cups semi-sweet chocolate chips OR about 1 cup of chocolate chunks

Vanilla Buttercream
1/2 cup butter
1/2 cup shortening
4 cups powdered sugar
1 tsp vanilla extract
2-3 tbsp water
 
Instructions

Cream butter and sugar together until light and fluffy, about 3-4 minutes. Mix in egg and vanilla extract. With the mixer on low speed, add flour, cornstarch, baking soda and salt.  Stir in chocolate chips. Dough will be thick.  Chill for at least 30 minutes or overnight. When ready to bake, preheat oven to 350 degrees. Place parchment paper into the bottom of your cake pan (I actually used a springform pan) to help the cookie not stick. Spread the dough out into the cake pan. Bake for 18-20 minutes or until the edges are slightly golden.
Remove from oven and let cool for a couple minutes on the cookie sheet, then transfer to cooling rack to cool completely.

For Vanilla Buttercream
Beat the shortening and butter until smooth. Slowly add 3 cups of powdered sugar. Mix until combined. Mix in the vanilla extract and 1 tbsp water. Add the rest of the powdered sugar and mix until smooth. Add more water to get the right consistency.

Tuesday, August 27, 2013

Mawa and Bolinhas

David is not the most adventurous eater, so when I was able to get him to try Indian (and me...I had never had it!) in London while we were on our honeymoon I was excited!  I was even more thrilled when he said he liked it.  He then commented that I should bake something Indian since I like to bake.  However, there aren't really any "classic" Indian desserts that are common knowledge.  So, when the challenge this month for the Daring Bakers was to make two Indian desserts I was excited.  Aparna of My Diverse Kitchen was our August 2013 Daring Bakers’ hostess and she challenged us to make some amazing regional Indian desserts. The Mawa Cake, the Bolinhas de Coco cookies and the Masala cookies – beautifully spiced and delicious!


Smile  

I decided to make the Mawa cake and Bolinhas de Coco cookies.  The cake was really good.  David liked it...without the decorative almonds!  I took it to work as well.  They enjoyed it a lot.  Someone even made the comment "you can really taste the milk."  I hadn't thought about it but you could.  It just tasted creamy! 
Making the mawa took a little longer than I thought but I may have had the temperature a little too low. 

I had a bit of trouble with the Bolinhas cookies as I couldn't find semonlina.  Semolina flour yes, semonlina...no.  So, I used grits. 
They are a bit too tough.  I guess I should have used cream of wheat (farina) or corn meal.  Anyway, the taste was really good but the texture is just crunchy.  Alas, fun concept.
All in all a fun and different challenge.  I had never heard of mawa cake but am so glad I got to try it!  Thanks, Aparna!

Mawa Cake
Ingredients
For the Mawa:
1 litre (4 cups) full fat milk
For the cake:
1/2 cup (1 stick) (120 ml) (4 oz) (115 gm) unsalted Butter (soft at room temperature)
3/4 cup (180 ml) packed crumbled mawa
1-1/4 cups (300 ml) (10 oz) (280 gm) castor sugar
3 large eggs
5 to 6 cardamom pods, powdered, (about 1-1/2 tsp powdered cardamom)
2 cups (500ml) (9 oz) (260 gm) cake flour
1 teaspoon (5 ml) (5 gm) baking powder
1/4 teaspoon salt
1/2 cup (120 ml) milk
1 teaspoon (5ml) vanilla extract (optional)
Cashewnuts (or blanched almonds) to decorate (about 18 to 20)

Directions:
1. First make the “Mawa”. Pour the milk into a heavy bottomed saucepan, preferably a non-stick one. Bring the milk to a boil, stirring it on and off, making sure it doesn’t stick to the bottom.
Turn down the heat to medium and keep cooking the milk until reduces to about a quarter of its original volume. This should take about an hour to an hour and a half.
2. The important thing during this process is to watch the milk and stir it frequently to make sure it doesn’t stick to the sides or bottom of the pan and get burnt. The danger of this happening increases as the milk reduces and gets thicker.
3. Once the milk it has reduced to about one fourth, 1/4 quantity, lower the heat to low and let cook for a little while longer. Keep stirring regularly, until the milk solids (mawa) take on a lumpy appearance. There should be no visible liquid left in the pan, but the mawa should be moist and not stick to the sides of the pan.
4. Remove the pan from heat and transfer the mawa to a bowl and let it cool completely. Then cover and refrigerate it for a day or two (not more) till you’re ready to make the cake. It will harden in the fridge so let it come to room temperature before using it.
You should get about 3/4 to 1 cup of mawa from 1 litre (4 cups) of full-fat milk.
5. Now start preparations for the cake by pre-heating your oven to moderate 180°C/350°F/gas mark 4. Beat the butter, the crumbled mawa and the sugar in a largish bowl, using a hand held electric beater, on high speed until soft and fluffy. 
6. Add the eggs, one at a time, and beat on medium speed till well incorporated. Add the vanilla and milk and beat till mixed well.
7. Sift the cake flour, baking powder, cardamom, and salt onto the batter and beat at medium speed and well blended. If you cannot find cake flour, place 2 tablespoon of cornstarch in the bottom of your 1-cup measure and then fill it with all-purpose (plain) flour to make up to 1 cup.
8. Grease and line only the bottom of an 8 inch (20 cm) spring form pan. Pour the batter into this and lightly smooth the top. Place the cashew nuts (or blanched almonds) on top of the batter randomly. Do not press the nuts down into the batter. A Mawa Cake always has a rustic finished look rather than a decorated look.
9. Bake in a preheated moderate oven for about 1 hour until the cake is a golden brown and a skewer pushed into the centre comes out clean. Do not over bake the cake or it will dry out. If the cake seems to be browning too quickly, cover it will aluminium foil hallway through the baking time.
10. Remove from oven and allow it to cool for 10 min in the tin. Release the cake, peel off the parchment from the base and let it cool completely.

Bolinhas de Coco
Ingredients:
2 cups (500 ml) (5-1/3 oz) (150 gm) fresh grated coconut, packed
1-1/2 cups (360 ml) (9 oz) (250 gm) semolina
1-1/4 cups (300 ml) (8-3/4 oz) (250 gm) granulated sugar
3/4 cup water (180ml) (6 oz) (175 gm) water
A pinch of salt
2 tablespoons (30 ml) (1 oz) (30 gm) ghee (clarified butter) or melted unsalted butter
2 large eggs
8 to 10 pods cardamom, powdered (about 1-1/2 teaspoon)

Directions:
1. Run the grated coconut in your processor or the small jar of your blender a couple of times so that the flakes are smaller and uniform in texture. Do not grind into a paste. Keep aside.
2. Put the semolina in a pan and toast/ roast it, over low to medium heat, until it starts giving off an aroma, and looks like it’s about to start changing colour. This should take a couple of minutes. Do not brown. Transfer the semolina into a bowl and keep aside.
3. In the same pan, pour the water and add the sugar to it. Place it on medium heat and keep stirring until the sugar dissolves completely. Once the sugar has dissolved, keep stirring the solution and let it cook for about 2 minutes. Turn off the heat. The sugar solution should just begin to start forming a syrup but is still watery. Do not cook until it forms a thick syrup.
4. Add the toasted/ roasted semolina and mix well. Then add the coconut, salt and ghee (or melted butter) and mix well. Put the pan back on the stove, and over medium heat stir the coconut mixture until it is really hot and easily forms a thick clump. This should take about 2 to 3 minutes.
5. Take the pan off the heat and let the semolina coconut mixture cool to room temperature. Transfer this into a bowl or container, cover and refrigerate for at least 8 hours, ideally overnight. For really fluffy biscuits/ cookies, the overnight rest is recommended.
6. The next day, take the dough out of the fridge and let it come to room temperature. Separate the yolks from the egg whites. Lightly beat the yolks with a fork to break them and add to the dough. Also add the powdered cardamom and mix well with a wooden spoon or fork.
7. Whisk the egg whites by hand until frothy and add to the dough. Mix well till incorporated.
8. You will now have a slightly moist and sticky dough. Refrigerate this dough for about half an hour so it firms up a bit.
9. Pre-heat your oven to moderate 180°C/350°F/gas mark 4. Line your baking trays with parchment or grease them well with some ghee or melted butter.
10. Take the dough out and pinch off walnut sized bits of dough. The dough should be firm enough to handle without difficulty. If the dough is sticking to your palms, lightly dust your palms with flour before shaping the dough. Roll the bits of dough into balls and then flatten them very slightly.
11. Decorate the top by marking criss-crosses (3 equidistant lines one way and another 3 crossing them at right angles), with a table knife. Press down a bit but not too deep or right through the biscuit/ cookie. Use up all the dough this way.
12. Place the shaped dough on the baking trays leaving a little space between them. Bake in a preheated moderate oven for about 20 to 25 minutes until they’re a golden brown and done. Let them cool on the sheets for about 5 minutes and then transfer to racks to cool completely.
13. Store the biscuits/ cookies in airtight containers. This recipe makes about 4 dozen Bolinhas de Coco.


Monday, August 19, 2013

Birtday (Oreo) Blondies

One week my grocery store had those birthday cake oreos on sale and I wanted to try them, but I also didn't want them sitting around the house. 
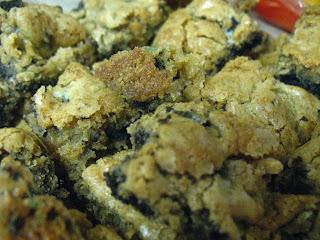
So, I found a recipe that K and I could use them in.  These cream cheese blondies were great...and eaten quickly by the folks at work.
 K had a BLAST breaking the oreos into pieces.  She giggled the whole time. 


Birthday Cake Oreo Cream Cheese Blondies adapted from Teenage Taste who:
Adapted from That’s So Yummy and LemonPi; originally from Dam Good Sweet by David Guas and Raquel Pelzel
Inspired by Sally’s Oreo Cheesecake Cookies

Ingredients:
  • 1 cup butter, at room temperature
  • 6 tablespoons cream cheese, at room temperature (I used reduced fat.)
  • 2.5 cups all-purpose flour
  • 3 teaspoons baking powder
  • 1.2 teaspoon salt
  • 2.5 cups light brown sugar, packed
  • 2 teaspoon vanilla extract
  • 2 large eggs
  • 24 Oreo cookies, broken into about quarters
Directions:
  1. Preheat the oven to 350 degrees Fahrenheit.  Line a 13 x 9-inch square baking pan with foil, grease with nonstick spray, and set aside.
  2. In a medium bowl, wisk the flour, baking powder and salt together and set aside.
  3. Using a stand mixer or a hand mixer, cream the butter, cream cheese, brown sugar, and vanilla on medium speed until well combined, about 1 minute.  Increase the mixer speed to high and beat for 15 seconds.  Stop the mixer, scrape down the sides of the bowl, and add the egg.  Blend on medium speed for 30 seconds.  Add the dry ingredients and combine on low-speed until just a few dry streaks remain.  Add the chopped Oreos and mix with a wooden spoon until just combined.
  4. Scrape the batter into the prepared baking pan.  Press the batter into a smooth and even layer in the pan and bake until lightly golden and puffy around the edges (the center should still feel quite soft), about 18–22 minutes.  Cool for 10 minutes and then run a paring knife around the edge of the pan to release the cake.  Cool for at least 4 hours before turning the cake out of the pan and onto a large plate.

Thursday, June 27, 2013

Pie in the Sky

Rachael from pizzarossa was our lovely June 2013 Daring Bakers’ host and she had us whipping up delicious pies in our kitchens! Cream pies, fruit pies, chocolate pies, even crack pies! There’s nothing like pie! Smile  Now, I knew that David would LOVE the apple pie...but I wanted to make the crack pie!  Attempt #1...oops, gotta cool for an hour.  Not enough time, made cookies.  Attempt #2...must cool overnight and I have no cream.  Made the apple pie!  It was really good.  My mom helped cut the apples using our apple-peeler-corer-slicer.  It was great!  Unfortunately, my dad has the pictures and hasn't sent them to me yet!  Maybe I'll update with them later.  As for the crack pie...attempt #3 was a success.
 I ended up cutting them into little bars and took them to the ER with me.  OH SO GOOD!  They were gone very quickly.  They were definitely ooey gooey.  I preferred them straight out of the fridge but still good room temp.  I will say that I had a hard time cutting these even in bars...so, I'm not sure how it would have been trying to cut into pie slices.  Either way...make the crack pie.  That's an order!

Crack Pie
Crust
9 tablespoons (1 stick + 1 tbsp) (135 ml) (4½ oz) (125g) unsalted butter, room temperature, divided (6 & 3 tbsp; 85gm & 40gm)
5 1/2 tablespoons (85 ml)(2½ oz) (70 gm) (packed) light brown sugar, divided (4 & 1½ tbsp; 50 gm & 20 gm)
2 tablespoons (30 ml) (30 gm) (1 oz) white sugar
1 large egg
3/4 cup plus 2 tablespoons (210 ml) (80 gm) (2¾ oz) old-fashioned oats
1/2 cup (120 ml) (2½ oz) (70 gm) all-purpose flour
1/8 teaspoon (2/3 gm) baking powder
1/8 teaspoon (2/3 gm) baking soda
1/4 teaspoon (1½ gm) salt

Position rack in center of oven and preheat to moderate 350°F/180°C/gas mark 4. Line a 13x9x2 inch/33x22x5cm metal baking pan with parchment (baking) paper. Lightly spray or butter a 9 inch/22cm diameter glass or ceramic pie dish. Combine 6 tablespoons (85 gm) of the softened butter, 4 tablespoons (50 gm) of the brown sugar and the white sugar in medium bowl. Using an electric mixer, beat until light and fluffy, about 2 minutes.  Add egg and beat until pale and fluffy, about 1 minute.  Add oats, flour, baking powder, baking soda, and salt and beat until well blended, about 1 minute.  Dump oat mixture into prepared baking pan and press out evenly to edges of pan.  Bake until light golden, 18 minutes. Transfer baking pan to wire rack and cool cookie completely, about an hour.

Using your fingertips, crumble the cookie a into large bowl - there should be no identifiable pieces of cookie remaining. Add the remaining 3 tablespoons (45 gm) butter and 1-1/2 tablespoons (20 gm) brown sugar. Rub in with your fingertips until the mixture is moist and sticks together when pressed between your fingers.
Transfer cookie crust mixture to pie dish. Using your fingers, press mixture evenly onto bottom and up sides of pie dish (about 1 inch/2.5cm up the sides if your pie dish is deep). If your pie dish is shallow, place it on a baking sheet in case of overflow.

Filling:
3/4 cup (160 ml) (170 gm) (6 oz) white sugar
1/2 cup (packed) (120 ml) (100 gm) (3½ oz) light brown sugar
1 tablespoon (15 ml) (8 gm) (¼ oz) dry milk powder
1/4 teaspoon (1½ gm) salt
1/2 cup (1 stick) (120mlk) (4 oz) (115gm) unsalted butter, melted, cooled slightly
6 1/2 tablespoons (100ml) heavy whipping cream
4 large egg yolks
1 teaspoon vanilla extract
Powdered sugar for dusting 

Position rack in center of oven and preheat to moderate 350°F/180°C/gas mark 4. If possible, use bottom-only heat, or the filling may brown too quickly.  Whisk both sugars, milk powder, and salt together in a medium bowl. Add melted butter and whisk until blended. Add cream, then egg yolks and vanilla and whisk until well blended. Pour filling into crust.

Bake 30 minutes (filling may begin to bubble up). Reduce oven temperature to 325°F/160°C/gas mark 3. Continue to bake until filling is brown on top and set around edges but center still jiggles slightly, about 20 minutes longer. Cool pie completely in pie dish on wire rack. Chill uncovered overnight. Sift powdered sugar lightly over top of pie. Cut pie into thin wedges and serve cold.

Apple Pie
Crust
2/3 cup (160 ml) (150 gm) (5-1/3 oz) unsalted butter
1¾ cups (420 ml) (250 gm) (8-2/3 oz) all-purpose flour
2 teaspoon (10 ml) (10 gm) (1/3 oz) sugar
1/4 teaspoon (1½ gm) salt
3-8 tablespoons (45-120 ml) cold water

 Weigh/measure out the correct amount of butter, wrap it in foil and freeze it for at least 30 minutes. Sift the flour, sugar and salt into a large bowl. Using the large holes on a box grater, grate the frozen butter directly over the flour in the bowl. Hold the butter by the foil to avoid warming it up too much and work as quickly as possible. Using a table fork, toss the grated butter in the flour until it's all coated. Alternatively, finely chop the butter and rub in with your fingertips, working quickly to avoid warming it. This is best left to those lucky folk with cool hands!

Sprinkle 3 tablespoons (45 ml) of cold water over the mixture and mix together with the fork. Add more water, spoon by spoon, as needed - it will depend on temperature, humidity and a million other factors, but the finished dough should be moist and starting to come together, but not wet. I used 7 tablespoons (315 ml). Use your fingertips to test if it's sticking together. Finish by using your hands to quickly bring the dough together into a ball. Just press, don't knead.  Wrap dough in plastic and refrigerate for at least 30 minutes.

Filling:
1 – 1½ kg (2¼ to 3-1/3 pounds) apples (depending on the depth of your pie dish)
1 cup (240 ml) (200 gm) (7 oz) light brown sugar, lightly packed (more or less to taste)
1 tsp ground cinnamon

Preheat oven to hot 220°C/425°F/gas mark 7 . Lightly grease a deep 9"/24cm ceramic or metal pie dish. Take 2/3 of the pastry dough and roll out to fit pie dish, right up to the rim. Line the pie dish with it, prick all over the bottom with a fork and set aside.  Peel, quarter, core and slice the apples (or use apple-peeler-corer-slicer) and place in a bowl. How tightly you can pack them into the pie depends on how thinly they are sliced.  Sprinkle the brown sugar and spice(s) over the apples and toss well to coat.  Pack the apples tightly into the lined pie dish. The filling can come up above the rim of the dish in a mound. Roll out the remaining pastry dough to fit over the apples.  Place the dough lid on the pie and press the edges together. Trim the edges as necessary and crimp the seam closed with your fingers or the back of a fork.

Place pie dish on a baking sheet and put it into the center of the oven. Bake for 20 minutes, then reduce heat to moderate 180°C/350°F/gas mark 4 and bake for a further 30 minutes. The top should be light golden brown.  Serve hot, warm or cold.

Thursday, June 06, 2013

Amish quick bread

A couple of weeks ago when D was working in the ER, K and I decided to make some bread. 
I had seen a recipe for Amish breakfast bread on pinterest and thought it looked good.  Well, let me just tell you...it was!  Poor David didn't realize that is was a sweet bread when I sent it to work...he thought it was "just" my typical sourdough bread, so he didn't eat it. 
But, I will tell you that it was all gone from the peds lounge and the ER lounge by the end of the day.  I did have to make some minor changes in that I didn't have any regular flour, so I used cake flour.  The flour I typically use (White Lily) is more like cake flour anyway...I think.  It worked well.  The best part of the bread...the crunchy top!  YUM!!!!

Amish Breakfast Bread
(makes 2 loaves)
1 cup butter, softened
2 cups sugar
2 eggs
2 cups buttermilk or 2 cups milk plus 2 tablespoons vinegar or lemon juice
4 cups cake flour
2 teaspoons baking soda
Cinnamon/sugar mixture:
2/3 cups sugar
2 teaspoons cinnamon 
Preheat oven to 350.  Spray 2 loaf pans with cooking spray.  In the bowl of a mixer, cream together butter, 2 cups of sugar, and eggs.  Add milk, flour, and baking soda and stir until mixed.  Put 1/2 of batter (or a little less) into greased loaf pans (1/4 in each pan).  Mix in separate bowl the 2/3 c sugar and cinnamon.  Sprinkle 3/4 of cinnamon mixture on top of the 1/2 batter in each pan.  Add remaining batter to pans; sprinkle with last of cinnamon topping.  Swirl with a knife.  Bake at 350 degrees for 45-50 min.  or until toothpick tester come clean.  Cool in pan for 20 minutes before removing from pan.  Enjoy!

Monday, May 27, 2013

Princess Cake for the ER

Korena of Korena in the Kitchen was our May Daring Bakers’ host and she delighted us with this beautiful Swedish PrinsesstÃ¥rta! 

This was one of those challenges that I wasn't sure if I'd have enough time to make.  However, David was working in the ER the first weekend and I found out they were bringing food one night...so, I made this that weekend.  K helped with the cake and kept asking if she was going to eat "birthday cake."  don't you know...ALL cakes are birthday cakes!  :-) 
I decided to go simple and just make a quick fondant instead of marzipan (not a big fan anyway!).  K had to taste every color because obviously the different colors taste different.  I make the logo of our hospital for the decoration and it was a hit in the ER.  They ate half overnight and I took the other half to the lounge the next day.  It was gone by the time I went home.  I'd say people liked it!

Vanilla Custard

Ingredients
1 cup (240ml) heavy cream, divided
4 egg yolks from large eggs
2 tablespoons (30 ml) (15 gm) (½ oz) cornstarch
2 tablespoons (30 ml) (30 gm) (1 oz) granulated white sugar
1 vanilla bean, split and scraped (or 2 teaspoons (10 ml) vanilla extract)
Directions:
1. In a medium bowl, whisk together the cornstarch, sugar, and egg yolks. Gradually whisk in ½ cup (120 ml) of heavy cream until smooth. Meanwhile, in a medium saucepan over medium heat until just boiling. Slowly whisk the hot cream into the bowl with the egg mixture to temper the eggs.
2. Pour the mixture back into the saucepan and cook over medium-low heat, whisking constantly, until it becomes thick like pudding and just comes to a boil. The mixture must hit a boil for the cornstarch to properly thicken the custard, and also to cook out any starchy taste. If it starts to look curdled or lumpy, remove it from the heat and whisk vigorously until smooth, then return to the heat. As soon as it comes to a boil, remove it from the heat. If using vanilla extract, add it now.
(If desired, pass the custard through a fine mesh sieve before continuing.)
3. Pour the custard into a clean bowl and press a piece of plastic wrap directly onto the surface to prevent a skin from forming. Refrigerate until completely cold. Can be prepared a day ahead and kept in the refrigerator.

Sponge Cake

Ingredients
Fine dry breadcrumbs for the pan (such as crushed panko)
4 large eggs, at room temperature
1 cup (240 ml) (225 gm) (8 oz) granulated white sugar
½ cup (120 ml) (70 gm) (2½ oz) all-purpose (plain) flour
½ cup (120 ml) (65 gm) (2¼ oz) potato starch (or cornstarch)
1 teaspoon (5 ml) (5 gm) baking powder
1/8 teaspoon salt
Directions:
1. Preheat the oven to moderate 350°F/180°C/gas mark 4 with a rack in the lower third of the oven. Thoroughly butter a 9” (23 cm) round springform pan, line the bottom with a circle of parchment paper, then butter the paper. Dust the buttered pan with enough breadcrumbs to coat the bottom and sides, just like flouring a cake pan. Set aside.
2. Place the eggs and granulated white sugar in a mixing bowl and beat on medium-high speed with an electric mixer or stand mixer with whisk attachment until the eggs are tripled in volume and very light coloured and fluffy, about 5 minutes. The mixture should fall from the beaters in thick ribbons. Don’t overbeat the eggs – once they form thick ribbons and stop growing in volume, stop beating.
3. Sift the all-purpose (plain) flour, potato starch, baking powder, and salt into a bowl, then sift the flour mixture over the whipped eggs. With a balloon whisk, fold the flour into the eggs until blended, keeping as much air in the batter as possible. Use large, gentle yet confident strokes, bringing batter from the bottom of the bowl to the top. Once mixed, the batter should be quite thick and smooth.
4. Pour the batter into the prepared pan, spread it out evenly, and bake in the lower third of the preheated moderate 350°F/180°C/gas mark 4 oven for about 40 minutes or until golden brown on top, springy to the touch, and a toothpick inserted in the center comes out with a few moist crumbs sticking to it. Let the cake cool in the pan for a few minutes then run a knife around the edge and remove the sides of the springform pan. Don’t worry if it sinks a bit in the middle. Invert the cake onto a cooling rack and peel off the parchment paper. If the cake is lopsided, press gently to make it level, then allow it to cool completely before continuing. The cake can be made a day ahead and stored, well-wrapped in plastic, at a cool room temperature.

Prinsesstårta Assembly

Ingredients
2 cups (480 ml) heavy cream, chilled
granulated white sugar, to taste (scant 1 tablespoon is plenty)
Sponge Cake, cooled
1/3 cup (80 ml) seedless raspberry jam (or regular jam pressed through a sieve to remove seeds)
Vanilla Custard, chilled
Marzipan Covering and Rose
Icing sugar, for rolling and dusting
Optional: melted chocolate, royal icing, or piping gel
Directions:
1. In a large bowl, whip the heavy cream until soft peaks form. Add sugar to taste (keep in mind that the rest of the cake components are sweet, so the whipped cream should be very lightly sweetened at most) and continue whipping the cream until stiff. You want it to be sturdy enough to provide structure to the cake, but not over-whipped enough to make butter. Set the whipped cream aside.
2. With a long serrated knife, slice the sponge cake into three even layers. This cake is very delicate, so do this as carefully as possible. Use a gentle sawing motion to move the knife through the cake instead of trying to pull it through the cake. Use a spatula to help you lift off each layer after you cut it. Set aside the middle layer – this will become the top layer of the assembled cake as it is the most flexible and therefore easiest to bend into a dome over the whipped cream.
3. Place one of remaining layers on a cake board or serving platter and spread it evenly with the raspberry jam. Spread or pipe half the chilled custard over the jam in an even layer, leaving enough room around the edges so that it doesn’t spill over the sides of the cake.
4. Top the custard with another layer of cake. Spread or pipe the remaining custard evenly over it, again leaving some room around the edges.
5. Reserve ½ cup (120 ml) of the stiffly whipped cream. Pile the rest into a mound on top of the custard. Spread it into a thick layer with a thin, flexible spatula or off-set spatula, then hold the spatula at an angle to shape the whipped cream into a dome, piling it up in the middle of the cake as much as possible. 
6. Place the final layer of sponge cake (the one cut from the middle of the cake) on top of the whipped cream. Do not press on the top of the cake – instead, gently tuck the edges of the cake layer into the whipped cream, so that they are flush with the cream. This will create a smooth, seamless dome on top of the cake.
7. Gently spread the reserved ½ cup (120 ml) of whipped cream over the entire cake to fill in any cracks and even out the surface. If necessary, refrigerate the cake to firm it up before continuing.
8. Use the rolling pin to drape the rolled-out marzipan or fondant sheet over the cake and smooth it around the cake gently with your hands. If it seems like it wants to fold or buckle around the cake, gently lift and stretch it away from the cake with one hand while smoothing it down with the other. 

Enjoy!