Showing posts with label Christmas baking. Show all posts

Sunday, January 05, 2014

Caramel Cake

What is it about the Christmas season that is so busy?!  I love it but it also just gets tiring.  The week after we got back from Thanksgiving vacation (a week away from work with a 4 year old isn't much vacation, though!) our church had its Christmas music.  I was in the praise team and had several practices.  That took up the entire week.  Somehow the next week was busy as well - I think David and I were both on call. We sang at a local event called Christmas on Ice. 
I think David worked in the ER that Saturday.  Then Sunday night, we had our first party of the month.  It was our Sunday School party.  The theme was "Team Spirit" and we were supposed to dress in our best team gear.  I don't really have any team gear...so I stole David's and K's.  Check this out: 
How awesome is my outfit...complete with hairbow and pager?! 
:-)  It was worth it...I won!  YES!  This was a pot-luck event.  I took green bean bundles, spinach salad, and white velvet caramel cake.  When I saw this cake, I KNEW that I had to make it.  OH MY!  It was SOOOO good!  The icing was wonderful, though I can't see how in the world you could ever use two batches on a single cake. 
The layers between the cake layers were somewhat thin but I don't know that a larger batch of icing could fix that.  Regardless, this was fantastic!  If you like caramel cakes you really must try this. 


The party was fun.  LOTS of food and fellowship. 
We had a dirty Santa in which we won some crawfish pies (YUM!) and a camouflage stainless steel flask (which is now no longer in our possession). Probably the best gift was the bag of two goldfish.  YES!
 We then played Pictionary and the girls totally rocked!  Can't wait for next year.

White Velvet Caramel Cake 
4 oz egg whites–room temperature
1 cup milk–divided–room temperature (I used almond milk)
2¼ tsp vanilla
3 cups sifted cake flour
1½ cup sugar
1 Tbs + 1 tsp baking powder
12 Tbs unsalted butter-room temperature
¼ tsp kosher salt

Preheat oven to 350.  In a mixer combine all the dry ingredients, and mix for about 30 seconds. Add the butter and mix until the flour gets crumbly. Stir in 1/4 cup of the milk and bring the speed to medium high and beat for about 30 seconds.  In a bowl, stir together the egg whites, remaining 3/4 cup milk and vanilla.  Add to the dry ingredients in 3 additions, scraping down the sides and beating for about 5-10 seconds after each addition. Do not over mix, but make sure it is all incorporated.  Pour into 2- round cake pans.  Smooth the batter.  
 
Place pans into the oven and bake for 35 minutes or until a tester comes out clean. Cool in pan for 10 minutes, then turn over onto cooling rack and allow to cool completely.  Slice each round into two horizontally to make 4 layers total.

Caramel Icing
2 cups light brown sugar
1 stick unsalted butter
1/3 cup whole milk
2 Tbs real maple syrup
1/4 tsp kosher salt
1 tsp vanilla extract
3 cups confectioner's sugar
Bring brown sugar, butter, milk, maple syrup and salt to a simmer.  Simmer just until the sugar is no longer grainy, don't let it boil - this takes several minutes.  Remove from heat and add vanilla, stirring constantly.  Allow to cool just slightly...so that it isn't scorching hot, but nicely warm.  Whisk in powdered sugar.  Whisk well - mind still had lumps in it. Alas!  Cool some but it should still be pourable.  Pour icing on each layer as you stack it. Once all the layers are set, pour the remaining icing over the top.  ENJOY!

Friday, December 27, 2013

Whoopie!

The December Daring Bakers' Challenge had us all cheering - the lovely and talented Bourbonnatrix of Bourbonnatrix Bakes was our hostess and challenged us to make fun, delicious and creative whoopie pies! Delicious little cake-like cookies sandwiching luscious filling in any flavors we chose... What else is there to say but "Whoopie!"  When I saw the options on recipes, I thought I might make red velvet, as K has become obsessed with red velvet (despite never having it). 
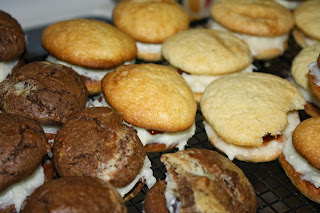
In the end, I was so late in making this challenge (read Christmas day!), I just made the vanilla version and split it into to batches.  One batch I kept vanilla and the other I added about 1/3 cup cocoa to making it chocolate. 
I used the cream cheese filling recipe.  For the vanilla version, I placed a spoonful of strawberry jelly in the middle. 
This gave a nice little surprise flavor.  I really enjoyed it.  K even tried it and seemed to like it.  Of course, I'm sure she'll still say that she is "allergic" to jelly despite not having any anaphylaxis to this whoopie pie!  For the chocolate version, I added some chocolate chips to the filling.  I knew that David would likely want something extra as he doesn't care for cream cheese stuff that much. 
He said it was "pretty good" and had a second one last night.  My parents enjoyed them as well.  Daddy's response was "yeah yeah yeah."  I think that this whoopie pie challenge was a success.  We even sang "Happy Birthday" to Jesus using them as the birthday cake.  K thought it was perfect.  :-)


VANILLA WHOOPIE PIES
Recipe source: FoodNetwork Magazine
Servings: 8 whoopies
Ingredients
2 ¾ cups(660 ml) (11-2/3 oz) (330 gm) flour
1 teaspoon (5 ml) (5 gm) baking soda
¾ teaspoon (3¾ gm) baking powder
¾ teaspoon salt
½ cup (1 stick) (4 oz) (115 gm) butter, softened
1 1/3 cups (320 ml) ( (10-2/3 oz) (300 gm) granulated sugar
2 teaspoons (10 ml) vanilla
1 large egg
2/3 cup (160 ml) buttermilk
Whisk flour, baking soda, baking powder and salt in a bowl. In a separate bowl, beat butter, granulated sugar and vanilla with a mixer on medium-high speed until fluffy; beat in the egg. On low speed, beat in the flour mixture in 3 batches, alternating with the buttermilk in 2 batches; beat until just combined.
Line 2 baking sheets with parchment paper. Scoop 16 mounds of batter onto the baking sheets, about 2 inches (50 mm) apart (about 2 tablespoons (30 ml) batter per cookie); gently form into rounds with damp fingers and smooth the tops. Refrigerate until firm, about 30 minutes.
Preheat the oven to moderately hot 400°F/200°C/gas mark 6. Bake the cookies until they spring back when pressed, 10 to 12 minutes. Cool 5 minutes, then remove to a rack to cool completely.

For the Cream Cheese Filling
3 cups (750 ml) (13 ¼ oz) (375 gm) confectioners’ sugar
1/2 cup (120 ml) (1 stick) (4 oz) (115 gm) unsalted butter, softened
8 ounces (225 gm) cream cheese, softened
1 teaspoon (5 ml) pure vanilla extract
1/4 teaspoon (1½ gm) salt
Directions:
1. Sift the confectioners’ sugar into a medium bowl and set aside.
2. In the bowl of an electric mixer fitted with the paddle attachment, beat the butter until it is completely smooth. Add the cream cheese and beat until combined.
3. Add the confectioner’s sugar, vanilla, and salt and beat until smooth. Be careful not to over beat the filling or it will lose structure.

To assemble, take one cookie, place filling on the flat side.  If using jam as a filler, leave a "blank" space in the center the put a dollop of jam in the middle.  Top with another cookie.  Enjoy!

Thursday, December 26, 2013

Bread Pudding...with Croissants

Thanksgiving every year gives me a chance to try something new for dessert since we have so many people.  A few months back when we renewed our Sam's membership, David had to start a new membership due to some of their rules for changing names on the memberships.  With that, he got a free "case" of croissant rolls.  I knew we would (and didn't need to) eat all of them before they went bad; so, I froze most of them.  this recipe MANY months ago and this was the perfect time to use it.  Let's just say that before Thanksgiving was over, this was ALL GONE!  It was so good.  I think this would be a delicious bread pudding with white chocolate added.  But blueberry made it healthy...er...um, less decadent?  Um, just good, maybe?!  I used fresh frozen blueberries but with this being a cooked dessert you could definitely use frozen.  Try it out!  I got many compliments.
When it got close to Thanksgiving, I decided to make a new bread pudding: blueberry croissant bread pudding.  I pinned

Croissant Bread Pudding adapted from  The Girl Who Ate Everything 
(This recipe is doubled from the original recipe)
  • 3 large croissants, cut up (about 5 to 5 1/2 cups)
  • 1 cup fresh or frozen blueberries
    campaignIcon
  • 1 package (8 oz.) cream cheese, softened
  • 2/3 cup sugar
    campaignIcon
  • 2 eggs
  • 1 teaspoon vanilla
  • 1 cup milk

  • Read more at http://www.the-girl-who-ate-everything.com/2013/02/blueberry-croissant-puff.html#giHCIkk1DC7a59JS.99
     6 croissants
    2 cups fresh/frozen blueberries
    2 bars 1/3 less fat cream cheese
  • Preheat oven to 350 degrees.
  • Place croissant pieces in a 9 inch square pan. Sprinkle with blueberries.
  • Beat cream cheese, sugar, eggs and vanilla in medium bowl with electric mixer until well blended. Gradually add milk, beating well after each addition. Pour evenly over croissant pieces. Let stand 20 minutes.
  • Bake at 350°F for 35 to 40 minutes or until set in center and golden brown. You may want to cover it with foil for the last 10 minutes if the tops are getting too browned.
  • Serve warm sprinkled with powdered sugar.
  • Variation: Instead of baking in a square pan bake individually. Place croissant pieces evenly in 10 (1/2-cup) ramekins; sprinkle with blueberries and pour cream cheese mixture evenly over croissant pieces. Let stand 20 minutes. Bake at 350°F for 20 to 25 minutes or until set in center and golden brown.

  • Read more at http://www.the-girl-who-ate-everything.com/2013/02/blueberry-croissant-puff.html#giHCIkk1DC7a59JS.99
    1 1/3 cups (1 cup likely fine) sugar
    4 eggs
    2 cups almond milk
    2 teaspoons vanilla

    Preheat oven to 350 degrees.  Spray a 13 X 9 pan with cooking spray.  Cut croissants into small cubes.  Place these into the pan.  Sprinkle with blueberries.  Beat the cream cheese, sugar, eggs, and vanilla until smooth.  Gradually add the milk until mixed well.  Pour over the bread and blueberries.  Allow to soak for at least 20 minutes.  Place into the oven and bake for 35-40 minutes.  We served with ice cream.  Enjoy!
    • 3 large croissants, cut up (about 5 to 5 1/2 cups)
    • 1 cup fresh or frozen blueberries
      campaignIcon
    • 1 package (8 oz.) cream cheese, softened
    • 2/3 cup sugar
      campaignIcon
    • 2 eggs
    • 1 teaspoon vanilla
    • 1 cup milk
    Get a Peach Almond Coffee Cake Recipe
    Instructions
    1. Preheat oven to 350 degrees.
    2. Place croissant pieces in a 9 inch square pan. Sprinkle with blueberries.
    3. Beat cream cheese, sugar, eggs and vanilla in medium bowl with electric mixer until well blended. Gradually add milk, beating well after each addition. Pour evenly over croissant pieces. Let stand 20 minutes.
    4. Bake at 350°F for 35 to 40 minutes or until set in center and golden brown. You may want to cover it with foil for the last 10 minutes if the tops are getting too browned.
    5. Serve warm sprinkled with powdered sugar.
    6. Variation: Instead of baking in a square pan bake individually. Place croissant pieces evenly in 10 (1/2-cup) ramekins; sprinkle with blueberries and pour cream cheese mixture evenly over croissant pieces. Let stand 20 minutes. Bake at 350°F for 20 to 25 minutes or until set in center and golden brown.

    Read more at http://www.the-girl-who-ate-everything.com/2013/02/blueberry-croissant-puff.html#giHCIkk1DC7a59JS.99
      • 3 large croissants, cut up (about 5 to 5 1/2 cups)
      • 1 cup fresh or frozen blueberries
        campaignIcon
      • 1 package (8 oz.) cream cheese, softened
      • 2/3 cup sugar
        campaignIcon
      • 2 eggs
      • 1 teaspoon vanilla
      • 1 cup milk
      Get a Peach Almond Coffee Cake Recipe
      Instructions
      1. Preheat oven to 350 degrees.
      2. Place croissant pieces in a 9 inch square pan. Sprinkle with blueberries.
      3. Beat cream cheese, sugar, eggs and vanilla in medium bowl with electric mixer until well blended. Gradually add milk, beating well after each addition. Pour evenly over croissant pieces. Let stand 20 minutes.
      4. Bake at 350°F for 35 to 40 minutes or until set in center and golden brown. You may want to cover it with foil for the last 10 minutes if the tops are getting too browned.
      5. Serve warm sprinkled with powdered sugar.
      6. Variation: Instead of baking in a square pan bake individually. Place croissant pieces evenly in 10 (1/2-cup) ramekins; sprinkle with blueberries and pour cream cheese mixture evenly over croissant pieces. Let stand 20 minutes. Bake at 350°F for 20 to 25 minutes or until set in center and golden brown.

      Read more at http://www.the-girl-who-ate-everything.com/2013/02/blueberry-croissant-puff.html#giHCIkk1DC7a59JS.99
      e croissants, cut up (about 5 to 5 1/2 cups)
    • 1 cup fresh or frozen blueberries
      campaignIcon
    • 1 package (8 oz.) cream cheese, softened
    • 2/3 cup sugar
      campaignIcon
    • 2 eggs
    • 1 teaspoon vanilla
    • 1 cup milk
    Get a Peach Almond Coffee Cake Recipe
    Instructions
    1. Preheat oven to 350 degrees.
    2. Place croissant pieces in a 9 inch square pan. Sprinkle with blueberries.
    3. Beat cream cheese, sugar, eggs and vanilla in medium bowl with electric mixer until well blended. Gradually add milk, beating well after each addition. Pour evenly over croissant pieces. Let stand 20 minutes.
    4. Bake at 350°F for 35 to 40 minutes or until set in center and golden brown. You may want to cover it with foil for the last 10 minutes if the tops are getting too browned.
    5. Serve warm sprinkled with powdered sugar.
    6. Variation: Instead of baking in a square pan bake individually. Place croissant pieces evenly in 10 (1/2-cup) ramekins; sprinkle with blueberries and pour cream cheese mixture evenly over croissant pieces. Let stand 20 minutes. Bake at 350°F for 20 to 25 minutes or until set in center and golden brown.

    Read more at http://www.the-girl-who-ate-everything.com/2013/02/blueberry-croissant-puff.html#giHCIkk1DC7a59JS.99

    Sunday, December 22, 2013

    S'More Cookies

    I found some mini-marshmallows at Target one day.  They are so tiny and fun.  On the back is a recipe for S'more cookies. 
    The link is to the original recipe...before it was even put on the marshmallow bit container this year! :-)  I omitted the hot chocolate mix but they turned out GREAT!  It made about 6 dozen cookies.  I sent most of them to the residents' lounge, and, per report, they were gone by the end of the day! 
    K was super excited about the "smarshmallows" and kept telling David that he needed to try one.  They both enjoyed the cookies as did I.  It has a great soft texture without being cakey.  I would definitely make these again!

    S'More Cookies adapted from Love from the Oven

    2 and 1/2 sticks room temperature butter
    1 cup sugar
    2/3 cup brown sugar
    2 eggs
    1 teaspoon vanilla
    3 1/4 cups flour
    1 teaspoon salt
    1 1/4 teaspoon baking soda
    1 teaspoon baking powder
    1 cup chocolate chips
    1 cup Marshmallow Bits

    Preheat oven to 350.  Cream together your butter and both sugars until light  and fluffy.   And in eggs and vanilla and blend well.  Add the dry ingredients a little at a time to your wet ingredients.   Then add the chocolate chips and marshmallow bits.  Drop on to your cookie sheets.  Bake for 8-11 minutes.   Allow to cool for a minute then remove to cooling racks to completely cool.  Enjoy!!!

    Sunday, February 10, 2013

    Swwwwweeeeet!

    When I started getting ready for the wedding (which is now 4 weeks away!!!) I started a pinterest account.  I didn't think I'd use it much and was attempting to ONLY use it for wedding.  Yeah right!  That thing is great.  It's like a computerized filing system.  It's not just social network, it's USEFUL!  Now I have an easy way to keep recipes organized without clutter!  Score!  Over Christmas, I kept wanting to make this recipe I saw on Peabody's site but couldn't find the "special edition" oreos she used.  Then one day I was in the store and saw the ginger "Newman O's."  They are basically organic oreos and would work perfectly!  I made the fudge and man, was it good!  Good thing I planned to take it to work.  And it was soon gone.  Just know that it is sweet!  I didn't have the marshmallow creme so added just a bit more confectioner's sugar, which may be one reason it was so sweet...and i have a feeling it was a bit more "icing-y" than it would have been.  But still, I would totally make it again!  As always, thanks, Peabody!

    Gingerbread Oreo Fudge

    3 cups granulated sugar
    3/4 cup unsalted butter
    2/3 cup Evaporated Milk
    2 cups white chocolate chips
    1 cup marshmallow creme (optional)
    1/2 cup finely crushed ginger flavored sandwich cookies
    1 teaspoon vanilla extract
    1 cup crumbled Gingerbread Oreos

    Line 9-inch-square baking pan with foil.  Combine sugar, butter and evaporated milk in medium, heavy-duty saucepan. Bring to a full rolling boil, stirring constantly. Boil, stirring constantly, for 3 minutes. Remove from heat. Stir in white chocolate chips, marshmallow creme (if using), finely crushed cookies and vanilla extract.
    Pour into prepared pan. Sprinkle crumbled cookies on top. Gently swirl cookies into fudge using a knife without touching bottom of pan.  Refrigerate for 1 hour or until firm.  Lift from pan; remove foil. Cut into 48 pieces. Store in airtight container in refrigerator. Peabody got 12 pieces…I actually got 48…they were very little but it was SOOOO rich!

    Adapted from Nestle Toll House

    Saturday, January 19, 2013

    Surprise...redone!

    When I was little, my mom served a dessert one night when my cousins were over.  It was a dessert with a shortbread pecan crust topped with chocolate pudding, cream cheese mixture, and cool whip.  Well, my cousin Joe decided that it would be fun to tell my brother, then about 2-3 years old, that the dessert smelled good and that he should smell it.  Well, he did and....SMACK!  Joe slammed his face into the dessert.  It "exploded" all over the living room, Philip screamed, and Aunt Margaret made not only Joe but his brother and sister clean up the mess!  Ever since that day, we called that dessert "Joe's surprise!"
      A couple of months ago, I found a recipe on pinterest that was exactly like that dessert except that the base was chocolate chip cookie instead of shortbread.  Well, I thought that D would really like it, so I pinned it.  Come December, I decided that it would be the perfect dessert for Christmas.  Everyone liked it!  My dad, I think, preferred the shortbread crust but D, of course, loved the chocolate chip cookie crust.  :-)  I love when he likes what I make!!  I didn't have two chocolate puddings but used one chocolate and one (random) pumpkin.   It added a little cinnamon to the mix.  Yum!  This really is a GREAT dessert!  Try for yourself.  I think it may have to go into the rotation of desserts D likes, along with the brownie trifle he loves.  :-)

    Joe's Surprise Remade a.k.a. Chocolate Chip Cookie Delight adapted from Taste of Home
    Ingredients:
    1 tube (16-1/2 ounces) refrigerated chocolate chip cookie dough or one recipe chocolate chip cookies (about 2/3 dough used)
    1 package (8 ounces) 1/3 less fat cream cheese, softened
    1 cup confectioners' sugar
    1 carton (12 ounces) frozen whipped topping, thawed, divided
    3 cups cold skim milk
    1 package (3.9 ounces) instant chocolate pudding mix (sugar free)
    1 package (3.4 ounces) instant pumpkin/vanilla pudding mix (sugar free)

    Preheat oven to 350.  Press cookie dough into an ungreased 13-in. x 9-in. baking pan. Bake at 350° for 14-16 minutes or until golden brown. Cool on a wire rack.

    In a large bowl, beat cream cheese and confectioners' sugar until smooth. Fold in 1-3/4 cups whipped topping. Spread over crust.

    In a large bowl, whisk milk and pudding mixes for 2 minutes then refrigerate for 30-60 minutes. Spread over cream cheese layer. Top with remaining whipped topping. Sprinkle with nuts and chocolate curls if desired. Cover and refrigerate for 1-2 hours...will be more firm if you have time to refrigerate overnight.  Enjoy!

    Yield: 15 servings.

    Saturday, January 12, 2013

    My Favorite Bite

    The other snack dessert I made this Christmas was a snickerdoodle cookie dough bite.  The original recipe had rolos in the middle; however, I am a Reese's lover...so, I substituted Reese's for the rolos.  Um...YUM! My favorites all in one...snickerdoodles, Reese's, and cookie dough.  :-)  Now, to me, these had a better texture than the chocolate chip dough bites.  They had a bit more texture and were less "sticky." 

    Reece's Stuffed Snickerdoodle Bites from Cooking Classy 
    1 1/2 cups all-purpose flour
    1 tsp cinnamon
    1/8 tsp nutmeg
    1/4 tsp salt
    1/2 cup salted butter, softened
    2/3 cup packed light brown sugar
    1/4 cup granulated sugar
    1/4 tsp cream of tartar
    3 Tbsp milk
    1 1/2 tsp vanilla extract
    28 Reese's candies
    3 Tbsp granulated sugar
    3/4 tsp cinnamon

    In a mixing bowl, stir together flour, 1 tsp cinnamon, nutmeg and salt, set aside. In the bowl of an electric mixer, cream together butter, brown sugar, 1/4 cup granulated sugar and cream of tartar until pale and fluffy, about 4 minutes. Stir in milk and vanilla extract. Add dry ingredients and mix until combine. In a separate small mixing bowl, whisk together 3 Tbsp granulated sugar and 3/4 tsp cinnamon. Scoop dough out 1 (even) TBSP at a time, then press one Reese's candy into the center of scooped dough and roll into a ball. Roll each dough ball into cinnamon sugar mixture. Chill or serve immediately. Store Cookie Dough Bites in refrigerator. Enjoy!

    Friday, January 11, 2013

    Dessert Bites

    Yikes!  I didn't realize it had been so long since I posted.  I've made several different things for my residents at work but before that, we need to finish up Christmas stuff.  Next up, chocolate chip cookie dough balls.  When my dad tried these, his comment was "It's like eating dough..." Well....yes...thus, cookie dough balls.  I did feel like the texture was a little bit too "sticky."  I needed to keep them cool, which made the chocolate chips quite hard.  They were still good though.  I shared with the residents who were on schedule to work at Christmas and they enjoyed them.  Next post I'll share MY favorite, the snickerdoodle balls.  YUM!

    Chocolate Chip Cookie Dough Bites from Cooking Classy 
    1/2 cup salted butter, softened
    3/4 cup packed light-brown sugar
    1/3 cup granulated sugar
    1/4 tsp salt
    3 Tbsp milk
    1 tsp vanilla extract
    1 1/2 cups all-purpose flour
    1/4 cup milk chocolate chips, chopped
    1/4 cup semi-sweet chocolate chips, chopped

    Topping

    1/3 cup semi-sweet chocolate chips

    In the bowl of an electric mixer, cream together butter, brown sugar, granulated sugar and salt until pale and fluffy about 3 - 4 minutes. Stir in milk and vanilla extract. Add in flour and mix just until combine (dough will seem dry at first but it will come together). Mix in chopped chocolate chips. Scoop dough out 1 equal tablespoon at a time and roll into balls. Place on parchment or wax paper. If drizzling with chocolate, place 1/3 cup semi-sweet chocolate chips in a microwave safe container and microwave on 50% power in 30 second intervals, stirring after each interval until melted and smooth. Pour melted chocolate into a small ziploc bag, seal bag and cut a very small tip off the corner of the bag. Drizzle chocolate over tops of truffles and allow to set.  For more firm cookie dough bites, chill 1 hour in refrigerator. Store in refrigerator in an airtight container.Enjoy!

    Monday, December 31, 2012

    Two Tone Fudge

    Despite being on service (i.e., covering hospital patients) for the past week, I still had a great Christmas!  D came back from AL on December 24 so that we could have Christmas here together with K.  Santa delivered gifts late to his house (not sure what happened there!  ;-)  ) so, I was there when K saw her princess castle.  While they were gone to AL, I pretty much just stayed at my house, watched movies, and did a bit of Christmas treat making.  I made two different kind of cookie dough balls and some peanut butter fudge.  Mama's favorite was the fudge...mine, the snickerdoodle dough balls. 

    I'll share the fudge today.  It's a recipe from Peabody, so you KNOW that it has to be good!  It ended up being pretty easy to make, though I'm not quite sure if I put enough sugar in the peanut butter portion.  Still good.  Try it out yourself!


    Double Layer Fudge adapted from Culinary Concoctions by Peabody
     
    Chocolate Layer
    1 can (14oz) condensed milk
    3 cups chocolate chips (of your choice I went semi-sweet)

    In a medium saucepan heat up condensed milk over low.  Add chocolate chips and melt. Stirring often.
    Mixture will start to get hard and lose its sheen. Spread into a buttered 13x9-inch pan lined with foil.

    Peanut Butter Layer from Alton Brown Food Network.com
    8 ounces (2 sticks) unsalted butter
    1 cup creamy peanut butter
    1 teaspoon vanilla extract
    1 pound powdered sugar
    chocolate chips and peanut butter chips to sprinkle on top about a 1/2 cup each

    Soften butter and combine in mixer with peanut butter.  Add in sugar until well combined.

    *(This may be where I messed up...obviously didn't read the instructions...This is how Peabody did it!):

    Combine the butter and peanut butter in a 4-quart microwave-safe bowl and cover with plastic wrap.
    Microwave for 2 minutes on high.  Stir and microwave on high for 2 more minutes. (Use caution when removing this mixture from the microwave, it will be very hot.)  Add the vanilla and powdered sugar to the peanut butter mixture and stir to combine with a wooden spoon. The mixture will become hard to stir and lose its sheen.*

    Pour the peanut butter layer on top of the chocolate layer. Sprinkle chocolate and peanut butter chips and press down to help them stick to fudge.  Refrigerate until cool, about 2 hours. Cut into 1-inch pieces and store in an airtight container at room temperature for up to a week. Enjoy!

    Saturday, December 22, 2012

    Christmas Mint Cookies

    I told D last week that I'd make cookies for him but we ran out of time before he had to go home...work was calling the next day.  I decided to make cookies anyway!  He doesn't really like mint, but I wanted to make cookies with the Christmas mint M&M's...so I did one pan with no M&M's and the rest with them.  They turned out REALLY good. 

    D said he liked them a lot.  I think I'd consider making this a new base dough recipe with varied mix ins.  I think one thing that made it better was the "sprinkle" of cream of tartar...I love that stuff!  Anyway, try these out for your favorite little elves...or even Santa!  :-)

    Christmas Mint Cookies
    2 sticks butter (1 cup), softened
    1 cup packed brown sugar
    1/2 cup sugar
    1 egg
    1 tsp vanilla
    3 cups flour
    1 tsp baking soda
    sprinkle/pinch cream of tartar
    1/2 cup mini chocolate chips
    1/2 cup chocolate chips
    1/2 cup mint M&M's

    Preheat oven to 350.  Cream together butter, brown sugar, and sugar.  Cream for 5 minutes.  Add egg and vanilla.  When mixed together, stir in dry ingredients.  Dough will be thick.  Add in chocolate chips and M&M's.  Place walnut sized drops of dough on a baking stone or pan.  Place pan in oven and bake for 12 minutes.  Remove from pan and allow to cool for 1 minute before removing to cooling rack.  Enjoy! 

    Monday, February 06, 2012

    Puppy Paws or Turtles?

    When my parents came for Christmas, Mama brought some little treats with her.  We love snacks in my family...especially at Thanksgiving/Christmas! 

    This year, instead of her typical toffee, she made a new candy...pretzel turtles.  I had seen this before but never made it.  Mama was super excited about them; and I must admit, they were pretty good...and simple.  You just take a pretzel, the traditionally shaped kind, and put a rolo on top.  Then you put those in the oven for just a few minutes, enough to soften the candy.

    You remove it from the oven, then press a pecan half into the candy...allow to cool and you have pretzel turtle....or puppy paws, depending on how you look at them!  :-)

    Pretzel Turtles
    mini twisted pretzels
    rolo candy
    pecan halves

    Preheat the oven to 300 degrees.  Take the desired number of pretzels and place them on a cookie sheet.  Unwrap the same number of rolo candies and place them on top of the pretzels.  Place the sheet carefully in the oven and bake for 4 minutes.  Remove from the oven and place a pecan half on each candy, pressing down slightly.  Allow the candy to cool and enjoy!!!

    Monday, January 30, 2012

    Alton's Fudge - the Peanut Butter version

    After D's mom made fudge when she was here in December, I decided I wanted to make some fudge.  So, over New Years, I decided to make some peanut butter fudge; but it needed to be quick as I was working 12 hour shifts for six days in a row.  I found Alton Brown's recipe and it turned out to be great.  Very quick and easy. If you have any peanut butter lovers coming to your house for the Super Bowl, you should make this.  You could even top it with Chocolate to make it Reese's like.  Mmmmm!

    Easy Peanut Butter Fudge
    8 ounces unsalted butter, plus more for greasing pan
    1 cup smooth peanut butter
    1 teaspoon vanilla extract
    1 pound powdered sugar (I guesstimated and  may have put a little more than necessary)


    Combine the butter and peanut butter in a microwave-safe bowl and cover with plastic wrap. Microwave for 2 minutes on high. Stir and microwave on high for 2 more minutes. Be careful...it's hot! Add the vanilla and powdered sugar to the peanut butter mixture and stir to combine. The mixture will become hard to stir and lose its sheen. Spread into an 8 by 8-inch pan lined with parchment paper. Fold the excess parchment paper so it covers the surface of the fudge and refrigerate until cool, about 2 hours. Cut into 1-inch pieces and store in an airtight container at room temperature for up to a week. Enjoy!

    Friday, January 13, 2012

    Burnt or Just a Chocolate Crust?

    Last month, one of my co-workers kept asking me to make a treat for the lounge.  I have kind of fallen behind on my lounge treats but haven't been at home much after work recently.  So, I planned to take some bars from my Southern Living book at the end of our regular month right before holiday schedule started.  Weeelllll, this recipe called for a graham cracker crust.  LOVE those...but this one was a chocolate version.  First, let me just say that it was SO hard to find the cookies. 

    It called for chocolate teddy grahams.  I mean, do those exist anymore?  I couldn't find them!  Just used Kroger brand.  Then I couldn't find the mint chocolate cookie bar candies.  So, I used mint flavored M&M's instead.  I really wish I could have found that candy because it sounded wonderful; I threw some Crunch bars in as well but they pretty much just melted in with everything else.  So, I make the bars and then cut them to get them ready to take to work.  Ugh...the crust tasted burnt!  I just couldn't take them.  Boo!  I didn't throw them away, though, and let Daddy, Mama, and D try them out.  According to them, they didn't taste burnt.  So, maybe I just wasn't used to the taste of the chocolate crust...I don't know!  In general, the bars were good...I'd give them another try if I could find that candy bar somewhere!

    Mint Chocolate Crumble Bars from Southern Living Incredible Cookies
    10 ounce package teddy bear shaped chocolate graham cracker cookies (not sure why this matters!), crushed (2.5cups)
    1/2 cup butter, melted
    3 (1.55 ounce) minty milk chocolate bars with crunchy cookie bits, chopped (I used 9 mini crunch bars and about 1 cup mint m&M's)
    6ounces white chocolate chopped
    1 cup chopped pecans
    1 cup semi-sweet chocolate chips
    1 egg
    1 14-ounce can sweetened condensed milk

    Preheat oven to 350. Combine cookie crumbs and butter; stir.  Press into a greased 13x9 pan. Place in oven and bake for 15 minutes.  Sprinkle candy bars and M&M's, white chocolate, pecans, and chocolate chips on the crust.  Combine egg and milk.  Pour over chocolate morsels.  Replace pan in oven and bake for 35 minutes.  Cool completely.  Cut into pieces and enjoy!

    Sunday, January 08, 2012

    So, Pumpkin is on Sale...Try This!

    D's parents gave me a couple of cookbooks for Christmas.  They are Taste of Home cookbooks, so you know they have good recipes in them.  At the beginning of holiday schedule, I decided that I should find a pumpkin coffee cake to take to work. 

    The Christmas recipe book had a great looking recipe in it.  Am I glad I tried it!  It was delicious...as evidenced by an empty container at the end of the day.  Several people had multiple pieces.  Can't wait to find and try more recipes in these books!

    Pumpkin Coffee Cake from Taste of Home Treasury of Christmas Recipes (original in parenthesis if I changed something)
    Topping:  1/4 cup brown sugar, packed
    1/4 cup sugar
    1/2 teaspoon cinnamon
    2 tablespoons cold butter
    1/2 cup chopped pecans

    Cake:  1/2 cup butter, softened
    1 cup sugar
    2 eggs
    6oz vanilla (or 8oz sour cream)
    1 cup canned pumpkin (or 1/2 cup)
    1 teaspoon vanilla
    2 cups flour
    1 teaspoon baking soda
    1 teaspoon baking powder
    1/4 teaspoon salt

    Preheat oven to 325.  In small bowl mix together topping ingredients, except pecans, until crumbly.  Stir in pecans and set aside.  In a mixing bowl, cream butter and sugar.  Add eggs on at a time.  Stir in yogurt, pumpkin, and vanilla.  Then stir in all dry ingredients. (I messed up and didn't read.  The instructions actually say to mix together yogurt, pumpkin and vanilla.  Then mix all dry ingredients.  Then add alternately with sour cream mixture.  Worked just fine how I did it.)  Spray a 13X9 pan with cooking spray.  Pour batter into pan.  Sprinkle with topping.  Place in oven and bake for 45 minutes or until a toothpick comes out of center clean.  Remove from oven and enjoy!

    Thursday, December 29, 2011

    Candy Cane Cookies

    Christmas is a time when we celebrate the birth of Jesus.  Candy canes are a traditional candy that you find at this time.  I've heard people say that the shape of the candy is a shepherd's staff because Jesus is the good Shepherd and that the red color is used to symbolize the blood he shed as the sacrifice to pay the debt for our sins.  Whether or not that is really why they are red and white or shaped in a crook, I don't know.  But it's a neat reminder of Jesus' sacrifice for us! 
    Right after I made those molasses cookies I made these peppermint butter cookies.  I had planned to make them before our holiday schedule started, but I seemed to run out of time.  These do require a brief, 30-minute chill time (or could be made the night before and pulled out when you want to use them...that's what I did) but they are fun and worth it.

      My dad liked them but, I think, prefers the traditional nut butter cookie.  The peppermint adds a fun, holiday spin on it, though.  Joanie, Mama's best friend, thought they were SO cute!  Such fun to tell her they were from the cookbook she gave me for my birthday last year.  :-)  Try them out sometime...I think they're still appropriate for a New Year's party!

    Peppermint Crescents from Southern Living Incredible Cookies
    1 cup butter, softened
    2/3 cup powdered sugar (you'll use a TOTAL of 2 2/3 cups)
    1 teaspoon peppermint extract
    2 1/2 cups flour
    1 cup powdered sugar, for dipping
    1 cup powdered sugar, for icing
    2 1/2 tablespoons milk
    1/2 teaspoon peppermint extract
    coarsely crushed peppermints

    Cream butter in electric mixer until smooth.  Add 2/3 cup powdered sugar and extract.  Gradually add flour to the butter mixture.  Place dough in plastic wrap and chill for 30 minutes (or overnight).  When ready, preheat oven to 325 degrees.  Pull off about a walnut sized piece of dough and roll into a 2-inch roll.  Shape it into a crescent and place on a baking stone.  Keep shaping until pan is full.  Bake for 18 minutes. 


    Remove from oven and allow to cool for one minute.  Then roll warm cookies in powdered sugar.  Repeat above process until all the dough is used.  You will have about 36 cookies. 
    In a small bowl, combine remaining 1 cup powdered sugar, milk, and extract to make a glaze.  Drizzle this over the cooled cookies.  Then sprinkle the peppermint bits over the icing and press gently to settle the candy.  Allow icing to set.  Enjoy!