Tuesday, December 29, 2009

S'more for the New Year

A few weeks ago we had a pot-luck lunch for the college Sunday School teachers. I took this yummy salad and a dessert. I knew there would be chocolate chip cookies there, so I wanted to take something a little different. Enter Peabody. She had posted this yummy looking S'more Brownie; so, I decided to give it a try. Um...Yum!!!! Honestly, my favorite part was the graham cracker crust...I love those things. But this was good all the way around. Try it out for your New Year's party!

S’mores Bars adapted from Culinary Concoctions by Peabody

Graham Cracker Crust

2 ¼ cups graham cracker crumbs (15-17 crackers)…I used 18
1/3 cup granulated sugar
1/2 cup unsalted butter, melted
Fudge Brownie Filling:

6 ounce unsweetened chocolate, chopped (I used 3 oz baking chocolate and the 3oz equivalent minus oil of cocoa)
1 cup unsalted butter, chopped into TBSP sized pieces
2 ½ cups granulated sugar
3 large eggs, lightly beaten
1 ½ tsp vanilla extract
1 ¾ cups all-purpose flour

1 ½ cups pecan halves, chopped
4 cups (packed) miniature marshmallows

Line a 13 x 9x 2 inch glass baking dish with foil, leaving a 1-inch over hang around the top edge of the pan. This makes clean up AWESOME! Smooth out any big wrinkles in the foils and then lightly coat the foil with nonstick cooking spray. Preheat oven to 350F.

Combine the graham cracker crumbs and sugar in a small bowl. Gradually add the melted butter until the crumbs just hold together when squeezed in your palm. (I did all of this in my food processor). Press the mixture into an even ¼ inch layer on the bottom of the prepared pan.

Combine the chocolate and butter in a large bowl that fists a double boiler. Place the bowl over barely simmering water and stir as needed until the chocolate and butter are melted. (Or slowly heat in the microwave...this is what I did. Forget the double boiler!) Remove from the heat and whisk in the sugar, followed by the beaten eggs and vanilla extract. Stir in the flour, mixing until smooth. Pour the batter on top of the graham cracker crust and level with a small offset spatula.

Scatter chopped nuts evenly over the batter. Bake 30-35 minutes, or until cake tester inserted in brownie center comes out with dark, damp crumbs on it. (I used 35 minutes) Do not overbake. Set on a wire rack and cool completely in the pan.

Distribute the marshmallows evenly over the brownie top. Place the pan under the broiler in the top third of the oven for about 1 minute, or until he marshmallows are puffy and golden brown. Watch carefully and rotate the pan regularly, as the marshmallow can easily burn! Cool until the topping is firm and easily cut without sticking.

Remove the brownies from the pan in one block by gently pulling up on the foil overhang. Place directly on a cutting board. Remove all foil and cut into 2-inch squares. For the neatest cuts, use a sharp knife, wiped clean with a warm, damp cloth between slices.

Thursday, December 24, 2009

Do You Think This Will Pass Inspection?

I was excited when I saw the Daring Baker Challenge for December...Gingerbread houses!!! The December 2009 Daring Bakers’ challenge was brought to you by Anna of Very Small Anna and Y of Lemonpi. They chose to challenge Daring Bakers’ everywhere to bake and assemble a gingerbread house from scratch. They chose recipes from Good Housekeeping and from The Great Scandinavian Baking Book as the challenge recipes. My mom got me cookie cutters last year that are for a house. So, Sarah came over one night and we set to make a gingerbread house from scratch. Dough...success! It was easy to make (though I did NOT refrigerate it) and smelled and looked just like it should. Toppings...I bought some great stuff. Icing...check, Sarah even brought extra sugar just in case. House...ummmm....just check out the disaster that ensued:

It all started out as a bad hair day. You see, Candy and Jack were selling their house. As Candy waited on the inspector, she went back to the days the house was being built. The walls were so pretty. They looked just like gingerbread! But there were cracks and weaknesses that they didn't know about. Even the decorators were excited about this house. Oh, how Candy loved her house. She decorated it for Christmas with all her favorite decorations. She even spiffied up the tree outside. Then, just as the inspector arrived...disaster struck! Something she never thought possible in MS...an avalanche! Or a bomb...no matter what it was awful!!! Cracks (not from the wonderful Yazoo clay) appeared. The roof came tumbling down! Candy quickly brought in the best builders she knew. Could they save the house? Could it pass inspection? The repairs just wouldn't stay! Maybe someone would like a skylight! Then Jack arrived home and greeted Candy with a frosty look. What have you done? WHAT happened to the house? It's crumbling. You'd think the house had just been stuck together! And Candy and Jack just gazed at their home as it was dismantled and taken away. So, as you can see...my gingerbread house didn't QUITE work and Jack and Candy ended up homeless! It was a very fun night though. Sarah and I laughed the whole time, squealed as things fell apart, and had so much fun making up stories about what had happened. Her husband didn't find it quite as funny but what does that matter!? :-) I used this Scandinavian recipe which was really good...and tasted good. Missed the part about "making" our own templates! Ooops...hopefully, I'll still be counted in the official participation. Thanks for a great challenge!

1 cup butter, room temperature [226g]
1 cup brown sugar, well packed [220g]
2 tablespoons cinnamon
4 teaspoons ground ginger
3 teaspoons ground cloves
2 teaspoons baking soda
½ cup boiling water
5 cups all-purpose flour [875g]

1. In a large bowl, cream the butter and sugar until blended. Add the cinnamon, ginger and cloves. Mix the baking soda with the boiling water and add to the dough along with the flour. Mix to make a stiff dough. If necessary add more water, a tablespoon at a time. Chill 2 hours or overnight.

2. Cut patterns for the house, making patterns for the roof, front walls, gabled walls, chimney and door out of cardboard.

3. Roll the dough out on a large, ungreased baking sheet and place the patterns on the dough. Mark off the various pieces with a knife, but leave the pieces in place.

4. [I rolled out the dough on a floured bench, roughly 1/8 inch thick (which allows for fact that the dough puffs a little when baked), cut required shapes and transferred these to the baking sheet. Any scraps I saved and rerolled at the end.]

5. Preheat the oven to 375'F (190'C). Bake for 12 to 15 minutes until the cookie dough feels firm. After baking, again place the pattern on top of the gingerbread and trim the shapes, cutting the edges with a straight-edged knife. Leave to cool on the baking sheet.


Tuesday, December 22, 2009

Cookie Canes

I've been so busy this month that I haven't been able to make my usual on call treats. However, last week I finally made these candy cane blossom cookies I had been meaning to make. They turned out yummy! I love sugar cookies and these were basically that with the candy cake flavored kisses on top. Perfect for a Christmas dessert.
Cookie Canes
  • 48 HERSHEY'S KISSES Brand Candy Cane Mint Candies
  • 1/2 cup (1 stick) butter or margarine, softened
  • 1 cup granulated sugar
  • 1 egg
  • 1-1/2 teaspoons vanilla extract
  • 2 cups all-purpose flour
  • 1/4 teaspoon baking soda
  • 1/4 teaspoon salt
  • 2 tablespoons milk
  • Red or green sugar crystals, granulated sugar or powdered sugar

Instructions:

1. Heat oven to 350°F. Remove wrappers from candies.

2. Beat butter, granulated sugar, egg and vanilla in large bowl until well blended. Stir together flour, baking soda and salt; add alternately with milk to butter mixture, beating until well blended.

3. Shape dough into 1-inch balls. Roll in red sugar, granulated sugar, powdered sugar or a combination of any of the sugars. Place on ungreased cookie sheet.

4. Bake 8 to 10 minutes or until edges are lightly browned and cookie is set. Remove from oven; cool 2 to 3 minutes. Press a candy piece into center of each cookie. Remove from cookie sheet to wire rack. Cool completely. About 4 dozen cookies.

Thursday, December 17, 2009

A Gift from Christmas Past

For some reason, my family doesn't really have that many family recipes...at least not many that I think of as family recipes. However, I have had a recipe card in my grandmother's (MaG) handwriting since I moved. I was just waiting for the right time to use it. The recipe is for a chocolate meringue pie. Pretty simple but oh so good. A couple of weeks ago, my Sunday School class had our Christmas party; I decided this was the perfect time! The pie uses one pie crust...so I used the recipe from my other grandmother (Granny). Making a pie crust is really pretty simple, you just have to get used to rolling it out. I almost burned the chocolate but pulled it off in the (St.) Nick of time. Then I came to a dilema...the instructions say to put butter in the chocolate mixture and stir but has NO amount of butter. It also says to use 3 egg whites for the meringue but doesn't tell any other ingredients. I couldn't get in touch with my mom so I just assumed that the amount of butter was around 2 Tablespoons and looked up how to do a meringue online. It all turned out great. My meringue even looked good...until the next morning when it had shrunk! Oh, well. When I cut into the pie I was so pleased...it looked like MaG's pie. One person even said it tasted just like something her grandmother would have made! Perfect! Chocolate Pie
1 cup sugar
2 T cocoa (or 1 oz baking chocolate)
1/3 cup flour
1/4 teaspoon salt
2 cups milk
3 egg yolks (save the whites for the meringue)
2 T butter
2 teaspoons vanilla
1 baked pie shell (9inch) **

For meringue: 3 egg whites
3/4 cup (more or less - depending on your desired sweetness)
1/2 teaspoon cream of tartar

In sauce pan, combine first four ingredients (sugar, cocoa, flour, salt); gradually add milk and stir. Cook and stir over medium heat till bubbly. Cook and stir 2 minutes. Remove from heat, stir small amount of hot mixture into egg yolks; immediately return to hot mixture; cook 2 minutes longer. Remove from heat and add butter and vanilla. Pour into cooled pie crust. *Spread merinuge atop pie and bake at 350 degrees for 15 minutes or until meringue browns. Cool.

*For meringue, whip 3 egg whites until stiff peaks form. Add sugar slowly. Then add cream of tartar for stabilization.

**Pie Crust
1 cup sifted flour
1/2 teaspoon salt
3 T water
1/3 cup shortening

Sift flour and salt into bowl. Remove 1/4 cup flour and blend to a paste. Cut shortening into remaining flour until pieces are size of small peas. Add paste to flour mixture. Mix with fork until dough comes together and can be shaped into a ball (this is best done by putting a piece of saran wrap over the bowl, dumping it, and pressing the dough together.) Place in the refrigerator for about 30 minutes. Roll out crust to 1/8 inch thick to cover 9-inch pie pan.
For this pie, prick holes in the crust with a fork or fill with uncooked peas or pie weights. Heat oven to 400 degrees F and bake for 10 minutes.

Wednesday, December 09, 2009

It's Nuts!!!

My goodness! It's almost Christmas. I've only got a couple of more people to get gifts for (would have been one but my original plan for one isn't going to work...grrr). I have two more normal calls and then it's Q2 for six days (call every other day) over Christmas. Another way you can tell Christmas is coming is from all the giveaways going on over the blogsphere. Kelly is giving away an HP touchscreen computer here (as are 4 other bloggers apparently). Sarah is giving away a 2010 planner (gotta stay organized). Tina is having multiple giveaways at her blog. I'm sure there are more...but you'll have to find them on your own. It's just nuts! What else is nuts? This dessert! The residents had a Thanksgiving pot luck on Wednesday before Thanksgiving but I wasn't there...I was home. However, I was "guilted" into sending something (after being told it was too bad I wasn't going to be there...I was the one who could cook!). I decided to send these pecan bars. They were VERY good. At first I didn't think that they were sweet enough, but I later decided that they had just enough sweet. I didn't have enough honey so I substituted syrup for the rest of the honey. This made the filling a little thinner but it cooked up just fine. I think I could eat several of these bars because they aren't that sweet. You could even say that they are a "good for you" (or at least less bad) dessert with the nuts being a main ingredient. :-) I think that alone makes them dangerous. But you'll just have to try them out for yourselves...my fellow residents did, and I was told that there were quickly none left.
Pecan Bars
  • 2 cups all-purpose flour
  • 2/3 cup powdered sugar
  • 3/4 cup butter, softened (I used 1/2 cup or 1 stick)
  • 1/2 cup firmly packed brown sugar
  • 1/2 cup honey (I substituted some of this with syrup)
  • 2/3 cup butter (I used 1/2 cup)
  • 3 tablespoons whipping cream (I used milk)
  • 3 1/2 cups coarsely chopped pecans

Sift together 2 cups flour and 2/3 cup powdered sugar. Cut in 3/4 (or 1/2) cup softened butter using a pastry blender or fork just until mixture resembles coarse meal. Pat mixture on bottom and 1 1/2 inches up sides of a lightly greased 13- x 9-inch baking dish.

Bake at 350° for 20 minutes or until edges are lightly browned. Cool.

Bring brown sugar, honey, 2/3 (or 1/2) cup butter, and whipping cream (or milk) to a boil in a saucepan over medium-high heat. Stir in pecans, and pour hot filling into prepared crust.

Bake at 350° for 25 to 30 minutes or until golden and bubbly. Cool completely before cutting into 2-inch squares.

Friday, December 04, 2009

Let Them Eat Cake

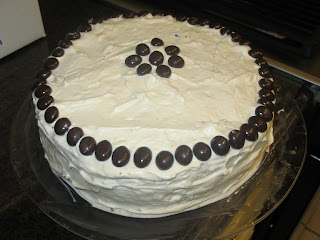
Oh, my! Sorry it has been so long. I've been meaning to sit down and post but have just be otherwise occupied with a new rotation...hospital wards again, which brings along with it call every 4th night and a stint of six days with three calls at Christmas. Then I get six days off in a row!!! I will still be cooking and posting, so be prepared. Last week I was able to go home for Thanksgiving to spend some time with my family...I had forgotten how much I like having time off until I had 5 days in a row...wow, awesome! Anyway, I had a great time. We had our typical tacos on Wednesday, followed by Thanksgiving meal on Thursday, and gumbo on Friday. Our Thanksgiving menu was turkey (smoked and baked), cornbread dressing, squash casserole, broccoli casserole, sweet potato casserole (see a pattern!), fruit salad, green beans with mushrooms, and rolls. We had an array of desserts as well: pecan pie, chocolate pecan pie, cranberry bliss bars (I think a copycat of Starbucks' version...I'll try and find a recipe to share), apple cheesecake, and tiramisu cake. I decided to make the cake because I love my brother and wanted to make something he'd like...though I'm not sure if he actually ate any! His (and his fiance's) favorite dessert is tiramisu but I didn't want to make that, so I compromised. The version I used (after debating between this one and this one) was Dorie's version. It was actually pretty simple to make. I baked the cakes the night before, so that the oven would be available for other use on Thursday. The only problem here was that the cake stuck a bit to the pan. However, it just place the stuck on pieces back on the cake and it didn't really matter. I didn't have espresso powder, so I used leftover brewed coffee for the syrup (ended up using about 4 T coffee) and the flavor was good. I think it would have been better if I had remembered to put the syrup on the TOP of the top layer but I forgot. Oh, well! Let me just say that the cake was a success! By the end of the day on Thursday there was only 1/4 of the cake left! One of my cousins even told me that she doesn't like sweets but that I had "made" her eat cake AND cookies. Great compliment. Though, I must admit, I think the favorite part of the cake was the chocolate covered coffee beans! :-) The frosting is a nice, mild flavor. I used cream cheese because marscapone is just too rich ($) for my blood! It is a little clumpier but can be worked with. I think another called the icing "divine." So, as we come into a season of family, food, fellowship, and celebration...try this cake! I think you will be pleased. Tiramisu Cake
Baking: From My Home to Yours by Dorie Greenspan

For the cake layers:
2 cups cake flour (I used 1 3/4 cups AP flour + 1/4 cup corn starch)
2 teaspoons baking powder
1/8 teaspoon baking soda
1/4 teaspoon salt
1 1/4 sticks (10 tablespoons) unsalted butter, room temperature
1 cup sugar
3 large eggs
1 large egg yolk (I didn't use this extra yolk)
1 1/2 teaspoons pure vanilla extract
3/4 cup buttermilk

For the espresso extract: (I used brewed coffee)
2 tablespoons instant espresso powder
2 tablespoons boiling water

For the espresso syrup:
1/2 cup water
1/3 cup sugar
1 tablespoon amaretto, Kahlua, or brandy (I didn't use this)
1 T espresso extract (or about 4 T brewed coffee...just tasted as you go for strength you want)

For the filling and frosting:
1 8-ounce container mascarpone (I used 8-oz 1/3 less fat cream cheese)
1/2 cup confectioners’ sugar, sifted
1 1/2 teaspoons pure vanilla extract
1 tablespoon amaretto, Kahlua, or brandy (I didn't use this)
1 cup cold heavy cream
2 1/2 ounces bittersweet or semisweet chocolate, finely chopped, or about 1/2 cup store-bought mini chocolate chips

Chocolate-covered espresso beans, for decoration (optional - but apparently a must in my family!)

Center a rack in the oven and preheat the oven to 350 degrees F. Spray two 9×2 inch round with baking spray. Dorie suggests lining with parchment or wax paper...maybe I should try this!

To make the cake:
Sift together the cake flour, baking powder, baking soda, and salt.

Working with you mixer, beat the butter on medium speed until soft and creamy. Add the sugar and beat for another 3 minutes. Add the eggs one by one, and then the yolk if using, beating for 1 minute after each addition. Beat in the vanilla; don’t be concerned if the mixture looks curdled (mine wasn't). Reduce the mixer speed to low and add the dry ingredients alternately with the buttermilk, adding the dry ingredients in 3 additions and the milk in 2 (begin and end with the dry ingredients); scrape down the sides of the bowl as needed and mix only until the ingredients disappear into the batter. Divide the batter evenly between the two pans and smooth the tops with a rubber spatula.

Bake for 28 to 30 minutes, rotating the pans at the midway point. When fully baked, the cakes will be golden and springy to the touch and a thin knife inserted into the centers will come out clean. Transfer the cakes to a rack and cool for about 5 minutes, then run a knife around the sides of the cakes, unmold them, and peel off the paper liners. Invert and cool to room temperature right-side up.

To make the extract: (I just used brewed coffee - probably not as strong as this would be)
Stir the espresso powder and boiling water together in a small cup until blended. Set aside.

To make the syrup:
Stir the water and sugar together in a small saucepan and bring just to a boil. Pour the syrup into a small heatproof bowl and stir in 1 tablespoon of the espresso extract and the liqueur or brandy; set aside. (I used 4 T coffee and no liquere, though I was told later that I should have!)

To make the filling and frosting:
Put the mascarpone, sugar, vanilla, and liqueur in a large bowl and whisk just until blended and smooth.

Working with the stand mixer with the whisk attachment or with a hand mixer, whip the heavy cream until it holds firm peaks. Switch to a rubber spatula and stir about one quarter of the whipped cream into the mascarpone. Fold in the rest of the whipped cream with a light touch.

To assemble the cake:
If the tops of the cake layers have crowned, use a long serrated knife and a gentle sawing motion to even them. Place one layer right-side up on a cardboard round or a cake plate protected with strips of wax or parchment paper. Using a pastry brush or a small spoon, soak the layer with about one third of the espresso syrup. Smooth some of the mascarpone cream over the layer - user about 1 1/4 cups - and gently press the chopped chocolate into the filling. Put the second cake layer on the counter and soak the top of it with half the remaining espresso syrup, then turn the layer over and position it, soaked side down, over the filling. Soak the top of the cake with the remaining syrup (Oops...forgot this!).

For the frosting, whisk 1 to 1 1/2 tablespoons of the remaining espresso extract into the remaining mascarpone filling (I TOTALLY didn't see this...this would have made it even better!). Taste the frosting as you go to decide how much extract you want to add. If the frosting looks as if it might be a little too soft to spread over the cake, press a piece of plastic wrap against its surface and refrigerate it for 15 minutes or so. Refrigerate the cake too.

With a long metal icing spatula, smooth the frosting around the sides of the cake and over the top. If you want to decorate the cake with chocolate-covered espresso beans, press them into the filling, making concentric circles of beans or just putting some beans in the center of the cake.

Refrigerate the cake for at least 3 hours (or for up to 1 day) before serving - the elements need time to meld.