Showing posts with label healthy redo's. Show all posts

Saturday, March 25, 2017

Zucchini Enchiladas

Not only has it been a long time since I've posted, but it's been AGES since I did a recipe post.  But we had a really unique and YUMMY meal last night (and I'm getting requests for the recipe); so, here it is!  I saw this on one of those random recipe videos on facebook and thought it looked good.  After a whole WEEK of sickness at our house, I was finally able to make it...but it was worth the wait!  It's chicken enchiladas but instead of tortillas, you use zucchini as the wrap.  Once it cooks, you really can't even tell that it's zucchini - which for some people is a plus!  Kate devoured it and said that it should be on kids' menus in restaurants!  Caleb ate it all and David said it was good.  WIN!!!  This is good for us, too, because it makes an easy gluten free option.  We will be doing this again.  Here is the link to the original recipe (which I didn't even look at before making mine, LOL!) with a helpful video for technique (I did everything based on the video): http://www.delish.com/cooking/recipe-ideas/recipes/a51783/zucchini-enchiladas-recipe/

Zucchini Enchiladas
 1onion, chopped
1 orange bell pepper, finely chopped
1/2 tsp dried garlic (or 1 tsp fresh, minced)
1 tsp chili powder
1.5 teaspoons cumin
1 pre-cooked Rotisserie chicken (I used Kroger's - you could also use your own chicken breasts that you cook and shred - probably about two)
1 can red enchilada sauce
3 zucchini, sliced VERY thinly (I used a vegetable peeler - my mandolin made slices that were slightly too thick)
fresh grated (or bought) cheese
cilantro (optional)

Preheat oven to 350 degrees.  Chop veggies.  Add onion, peppers and garlic to a saute pan (prepared with olive oil OR cooking spray).  Saute until translucent.  Add in chili powder and cumin.  Stir.  Shred chicken and stir into the onion mixture.  When well mixed, pour about half the can of enchilada sauce into the mixture and stir.  Set aside.

Cut the ends off the zucchini.  Slice in half lengthwise.  Using a vegetable peeler - something like this-

 (or mandolin OR if you're REALLY good just a knife), cut very thin and long slices of zucchini.
For each "enchilada" you will use three slices.  Three zucchini made about 12-13 "enchiladas" for me.  On a cutting board, lay out three slices of zucchini.  Place a spoonful of the chicken mixture across the slices.  Roll up down the length of the zucchini.
Place each "enchilada" into a 13x9 baking dish.  Once pan is full or all zucchini or chicken is used, pour remainder of enchilada sauce on top of the rolls.
Top with freshly grated cheese.  Place pan in over and bake at 350 for 20-30 minutes (I did about 35 due to kid issues and it was fine!).  Top with freshly cut cilantro.  Enjoy!

Wednesday, August 13, 2014

Oopsie!

Recently, I've found a gluten free hamburger bun that isn't a crazy amount of calories.  Seriously!  Those things are at least double the calories of normal buns.  however, I just found one that is about the same and is really good; so, I've gotten that a couple of times for David.  Before I found this one, I would make Oopsie rolls.  It is something that our neurology nutritionist suggested to me.  It uses eggs, cream cheese, and cream of tartar.  They work really well for bean burgers and David doesn't mind them.  The last time I made them, I messed up royally and didn't think they'd work.  However, (after I calmed down!) I poured the disastrous "foam" into a pan instead of making separate rolls and just made a sheet, that I cut into squares.  Kind of Kyrsal-esque!  Anyway, if you are gluten free or low carb, these are good bun options.

Oopsie Rolls from Your Lighter Side

3 large eggs (separated)
pinch of cream of tartar
3 ounces cream cheese, unsoftened (I used Nufchatel cheese)

Preheat oven to 300 degrees F.  Separate the eggs and add cream cheese to the yolks. Use a mixer to combine the ingredients together. In a separate bowl, whip egg whites and cream of tartar until stiff (if you’re using the same mixer, mix the whites first so you don't contaminate the bowl with yolk). Gradually fold the egg yolk mixture into the white mixture, being careful not to break down the whites. Spray a cookie sheet with non-stick spray and spoon the mixture onto the sheet, making 6 mounds. (I actually made about 10 smaller rolls). Flatten each mound slightly.  Place pan into oven and bake about 30 minutes (You want them slightly softer, not crumbly). Let cool on the sheet for a few minutes, and then remove to a rack and allow them to cool. Store in a loosely open sack and allow to rest on the counter before use (otherwise they might be too moist). Can be frozen.

Nutritional information per roll (per 6 total):

Calories:85 , Carbohydrates: .6 g, Fiber: 0g, Net Carbohydrates: .6g, Protein: 4g, Fat: 7.5

Sunday, March 16, 2014

Cauliflower Crust

Last month I found a recipe for cauliflower pizza crust.  I figured it would be a good thing to try since David likes pizza but we're trying to do gluten free (and succeeding pretty well...until this week when we HAD to eat our wedding cake.  BTW, it froze GREAT!).  It was quite the interesting process getting the cauliflower ready.  First you have to chop into TINY pieces the uncooked cauliflower then cook in the microwave...cauli-rice as she called it.
Then you SQEEEEEE-EEEEEZE all the water out of the cauliflower.  Don't I look like I'm having fun?! 
There was so much water!  Then you mix up the cauliflower with egg and cheese.  Um, yum!  I just topped it with our normal pizza stuff.  SO GOOD!  K liked it...
and David said he got used to it. 
Don't let that fool you.  He still took it to work for lunch later that week.  I don't think it bothered him too much.  Though I know he enjoyed the "regular" gluten free crust better.  Despite that, I still want to try the cheesy "bread" sticks recipe I found.  Lots of cheese on top....yes and yum!
Cauliflower Crust Pizza from Cook Lisa Cook
 1 head of cauliflower
Make Cauli-rice as below:
Remove the leaves and hard center core of the cauliflower.  Cut into florets.  Wash and then allow the cauliflower to dry completely.  (You want the cauliflower completely dry and you will NOT be adding any water when cooking, this helps to cut down on the boiled cauliflower taste and smell.)  Once dry, fill the bowl of a food processor about half full and using the chopping blade and the pulse action, process the cauliflower until it looks like the size of grains of rice.  Add the processed cauliflower to a microwave safe bowl and repeat with the remaining cauliflower.  Once all the Cauliflower has been processed and added to the microwave safe bowl, cover the bowl tightly with plastic wrap or a lid.  Microwave on high for 7 minutes. 

1 egg
1/3 cup shredded mozzarella (I used part skimmed)

1 TBS. parsley
1/4 tsp. salt
1/8 tsp. fresh ground pepper
Toppings of your choice, tomato, pesto or Alfredo sauce, cheese, precooked meats* & precooked veggies*

Preheat oven to 450F.  Line a baking sheet with either a Silpat or parchment paper.
Place the cooked Cauli-Rice into a tea towel and squeeze all the water out of the Cauli-Rice.  It is important to get the rice as dry as possible so that there won’t be extra moisture in the crust which will prevent it from crisping up properly.

In a medium bowl combine the dry Cauli-Rice, egg, 1/3 cup shredded mozzarella, fennel seeds, Italian seasoning, salt & pepper and mix to combine well.  Press the cauliflower mixture into an even thickness on the prepared pan, either into a round or rectangular shaped pizza. 
Bake for 15-20 minutes until the crust is firm and golden brown.  Remove the pan from the oven.  Top the cooked crust with sauce, cheese and toppings of your choice.  Place back in the oven and bake until cheese is melted and starting to brown. Enjoy!

Wednesday, March 12, 2014

Fajita Casserole

During January, I bought a rotisserie chicken on clearance at the grocery store.  Nothing on my "menu" used chicken but I decided to alter for frugality sake.  I decided to do a Mexican fajita casserole. 
At first I was going to use tortillas on the top and bottom, but once I got into making it, decided that it only needed the bottom layer.  I think I was correct.  I used tomatillo salsa, refried beans, sauteed onions and peppers, and cheese.  It turned out GREAT!  I will definitely make this again!  I think my little taste tester enjoyed, too!

Chicken Fajita Casserole by me!
4 corn tortillas
refried beans
rotisserie chicken, meat pulled off the bone
tomatillo salsa
1 onion
1 pepper
cheese, shredded (variety of your choice though I'd do cheddar or monterey jack)
salsa (If desired)

Cut peppers and onions into long pieces.  Saute until translucent; place in a bowl and set aside.  Pull chicken meat off the bone.  Warm in saute pan along with enough tomatillo salsa to coat the chicken. 

Preheat oven to 350.  In a casserole pan (11x8 or 13 x9), pour a small amount of tomatillo salsa.  Place the tortillas over the bottom of the pan.  Spread refried beans over the tortillas.  You may need to warm the beans slightly.  Place chicken over the beans.  Place the vegetables on top of the chicken.  Cover with cheese.  If you want some traditional salsa you can place some over the cheese.  Place the casserole in the over and bake until cheese is bubbly, about 20 minutes.  Enjoy!

Monday, December 02, 2013

Won Ton what?

Somewhere along the way, I got the idea that making lasagna with won tons would be fun.  Maybe it was the fact that I had a package of won ton wrappers in the refrigerator that I needed to use.  Maybe I really thought it would be fun.  Either way, I finally did it! 
David gave me "permission" to make a veggie lasagna and I decided to use the won tons.  I just lined the pan with won tons and did layers of veggies, spaghetti sauce, and cheese mixture the repeated.  It wasn't a complete loss but not a complete winner either.  Honestly, I think the thing that we all disliked the most was the wontons.  They just lent a funny flavor to the lasagna. 
Oddly enough, the veggies weren't the problem.  David actually took this to work for lunch on several days.  I'm assuming he actually ate it.  ;-)  Unfortunately, he caught a few of the thicker slices of eggplant.  I decided to slice the eggplant thinly and roast it but I caught a few slices more thickly than I would have liked.  I guess I could have pulled out my mandolin but I didn't.  I will definitely be doing veggie lasagna again (though I KNOW that David still wants the real lasagna more!  Gotta cook for myself some, right?!)...just not with wontons. 

Wonton Veggie Lasagna
wontons
1 eggplant, sliced paperthin and roasted
2 small yellow squash, cubed and roasted
2 small zucchini, cubed and roasted
1 onion, sliced and roasted
spaghetti sauce
2 cups cottage cheese
1 egg
1/2 cup fresh grated Parmesan cheese
1 teaspoon salt
parsley
Mozzarella cheese

Preheat oven to 350 degrees.  Prepare vegetables.  Mix the squash, zucchini, and onions together but keep the eggplant separate.  Meanwhile, mix cottage cheese, egg, Parmesan cheese, salt, parsley together in a bowl.  Spread about 1/4 cup spaghetti sauce in the bottom of a 13x9 pan.  Line with wonton wrappers.  Top this with a layer of the eggplant followed by the squash mixture.  Layer with spaghetti sauce. Then top with cheese mixture and mozzarella cheese.  Repeat layers ending with mozzarella cheese.  Place pan in oven and bake until cheese is melted and bubbly.  Enjoy!

Sunday, November 17, 2013

Would you Believe....

that these are gluten free?! 
We've been doing an experiment around here with gluten free eating.  Not sure if we'll continue but so far the hardest part has been lunches and eating out.  Most of the cereals David likes are rice based and gluten free.  Making supper gluten free is SUPER simple...no bread.  ;-)  I did get some gluten free spaghetti and it was a hit.  I have also made corn bread (with rice flour) and K's "J" recipe was an easily modified recipe.  However, what could I do for my baking?! 
Man, I have found several good gluten free cookie recipes.  I guess I'll just go in order that I made them.  This first cookie has a little bit of a different texture; but it's not due to being gluten free.  It's because there is quinoa in the cookies.  It just gives is a little bit of a crunch.  David made fun of them but still ate them all.  I'd call it a success.  Though he did eat them all, he liked the next week's cookies even better.  :-)

Quinoa Chocolate Chip Cookies from Simply Whole Kitchen
2 cups brown rice flour
1/2 tsp salt
1 tsp cinnamon
1/2 cup unsalted butter, at room temperature
2 eggs
1/2 cup brown sugar
1/3 cup vegetable oil
2 tsp vanilla extract
1 cup cooked (cooled) quinoa
2 cups old fashioned oats
1 cup chocolate chips

Preheat your oven to 375 degrees. In a large mixing bowl or stand mixer, combine the butter and brown sugar.  Add your eggs and mix to combine.  Add the vegetable oil and mix to combine.  Add the salt, cinnamon, and brown rice flour.  Add the cooked quinoa, oats and mix gently.  Then add the dark chocolate chips and stir to combine.  Using a tablespoon or medium cookie scoop, scoop the cookies onto a baking stone or cookie sheet.  Place in over and bake for 12-14 minutes or until slightly browned.  Enjoy!

Friday, November 08, 2013

Sneaking in Veggies

We love black bean burgers around here!  It is actually one of our favorites.  I decided to try to make my own version last month.  We had some left over roasted veggies (squash, zucchini, and peppers), so I threw those into the food processor and processed away until they were pureed.  Then I added the black beans and panko.  I cooked these in a skillet though I often try to do them on my grill pan. 
David and K didn't know the difference.  Now, I don't really have to "trick" them as K is a great eater and once she tries most foods a few times will at least eat a few bites.  Oddly enough, she's not a huge fan of potatoes which is fine with me.  And David has been doing a lot better about eating veggies.  However, I do like having the option of getting a few more veggies in us without having to struggle to do it.  So, for those moms out there who struggle with picky eaters, try out black bean burgers.  It will likely be a hit!

Veggie Black Bean Burgers
1 cup roasted veggies, pureed
1 can black beans (you could add about 1/2 can further if you wanted but I usually do just one)
1 egg (or 1/4 cup egg whites)
1/4 cup Panko bread crumbs
1/4 cup (give or take a little) corn mean - I like adding this for a little crunch when it cooks, you could use all bread crumbs if you wanted to
Tony's cajun seasoning

Puree veggies.  Add the beans and pulse until blended.  If you want some whole beans, add an extra half can near the end.  Add egg and pulse until mixed well.  Add seasoning and bread crumbs and corn meal.  Add until it holds together well.  If using extra beans, stir in at this point.  Heat a skillet on the stove over medium heat.  Spray with cooking spray.  Cook until browned then flip (about 5-6 minutes per side).  Enjoy!

Thursday, June 20, 2013

BBQ Red Bean Burgers

Thankfully, K is a good eater.  In fact, I think some of her favorite meals are when we have bean burgers.  So far I had tried black bean, white bean, chickpea...up next, red bean.  This one has a bar-b-que flavor to it, which makes it a little sweet.  I overcooked them, so they were a little dry, but David and K both liked them a lot.  David put cheese and more sauce on his.  A little healthy option for BBQ in the summer????  Probably not quite the same but still good and easy.

BBQ Red Bean Burger from The Kitchen Witch via Jackie Likes to Eat via pinterest
Ingredients:
1/2 onion, minced
1 clove garlic, minced
1 tomato, seeded and chopped
1/2 jalapeno, seeded and chopped
2 teaspoons chili powder
1 15 oz can reduced sodium red kidney beans, drained and rinsed
1/2 cup bread crumbs
1 egg
2 tablespoons barbecue sauce, plus extra for bun
4 slices cheddar cheese

Directions:

Heat a large skillet over medium heat. Add a teaspoon of olive oil and the onion, garlic, tomato, jalapeno, and chili powder. Saute until the onions are soft.

Place the kidney beans in a medium bowl and mash with a fork. Add the onion mixture, bread crumbs, egg, and barbecue sauce to the bowl and mix well.

Form the bean mixture into patties.  Add another tablespoon of olive oil to the skillet and brown the patties on both sides.

Tuesday, April 09, 2013

The Day Before

A month ago today I married, my sweet husband!  In that time, we've barely had a chance to stop.  Life is busy!  Thankfully, I did get to stop for about a week and enjoy things.  The Friday before the wedding, my precious Sunday school teacher (who has been such a present influence in my life even before Sunday school) along with her sister, our pastor's wife, and one of my best friend's mom held a bridesmaids' luncheon. 

It was fantastic!  The little touches were just everywhere from the monogrammed door hanging
to the monogrammed napkins
to the menus (tailored to what I would like)
to the special bride's chair
to the Bible verses that each of my bridesmaids read, including one specifically special to me and D. 

It was the perfect way to start a perfect weekend!  Thanks so much Mrs. Vickie, Mrs. Wanda, Mrs. Susan, and Mrs. Denise!

The fritatta was actually "my" fritatta.  I really must pull out that recipe again, it's so good! 

Guess it'll need to be when D isn't around to eat.  I think he'd make funny faces if he ate this.  The cake was a banana walnut caramel cake. OH MY WORD!  Can I just say DIVINE! 

I wanted to eat the entire large piece but refrained because I knew there was a yummy dinner coming later that night...and it was delicious!  (I actually have the recipe for the rolls pictured above. I'll have to find it and post it...they are some of the best...and make great cinnamon rolls, too!)

Garden Frittata
1 yellow squash, sliced
1 zucchini, sliced
1 onion, diced
1-2 tomatoes (I like Roma the best)
4 eggs
1 cup milk
2 garlic cloves, minced
1/2 teaspoon salt
2 teaspoons parsley
1/2 teaspoon pepper
1/4 cup feta cheese
1 cup low fat mozzarella (you can use less if you want)
 
Preheat oven to 350 degrees F. Put prepared squash, zucchini, and onion in a microwave safe bowl, cover with plastic wrap. Put bowl in the microwave and cook on high for 7-9 minutes. Drain these vegetables and pour them into the bottom of a pie pan. Place slices of tomato on top of the squash. Sprinkle mozzarella on top and then top with feta. Whisk together eggs, milk, garlic, salt, pepper, and parsley. Pour over the vegetables...slowly, to be sure that it doesn't run over. Place in the oven and bake for 50 minutes. Allow to set for 5 minutes before serving. 

Wednesday, March 27, 2013

Hidden or Not?

Where's my little helper? There she is!!!  Just like K wanted to hide, we had a secret ingredient to hide this month in the Daring Bakers.  Ruth from Makey-Cakey was our March 2013 Daring Bakers’ challenge host. She encouraged us all to get experimental in the kitchen and sneak some hidden veggies into our baking, with surprising and delicious results!
Her favorite parts about helping:  stirring, eating a chocolate chip ("Can I have one of those?"), and liking the beater...which she always asks for before we're done!
I thought it would be fun to mix things up a bit and make donuts.  K and D love donuts but I prefer not to get them.  K and D (especially D) also like chocolate...which I prefer to avoid for breakfast.  However, I thought I'd make an except this time.  I mean, I'm baking the donuts and putting carrots in them...which K was actually REALLY excited about!  She asked for a carrot to snack on while we were making them and INSISTED that SHE pour the carrots in the bowl!
I found the recipe on Pinterest, which I have come to LOVE as a paperless filing system!  GREAT!
The recipe is from Clever Muffin.  Several things I liked about this recipe: 
1. Not much sugar.  Yes, there is some but so many muffin recipes use a cup or more!  Use 1/2 a cup and make it brown...so much more flavor.
2. Not much oil...and olive oil at that!
3. My mistake - I forgot the eggs...didn't even notice!  It was so fudgy and moist even without them.  D, of course, said it needed to be more chocolatey.  Ha!

Verdict:  They like them!  K was excited from the beginning and couldn't wait to have her donut for breakfast on Sunday.  D tried it last night and said they were good.  He had complained about the carrots.  When I said you couldn't taste them he said "but I can see them!"  So, he kept the lights out when he ate it.  ;-)  Ha!  All in all a successful recipe to make everyone in the house happy!

Chocolate Carrot Muffins/Donuts adapted from Clever Muffin
1 cup raw oatmeal or quick oats
1 cup low-fat milk
3/4 cup flour / rice flour or a gluten-free alternative
1/2 cup brown sugar
1 teaspoon baking powder
1/2 teaspoon baking soda
2 tablespoons of cocoa powder
1 cup grated carrot
1 tablespoon olive oil
1/2 cup (about 100 grams) of dark chocolate chips
Note: I cut up some of a block of dark cooking chocolate for the chocolate chips, the recipe tends to lend itself to the rough kind of chocolate chips you get by doing it that way.
Method
  1. Preheat oven to 180 C. Grease a 12 cup muffin tin or line with patty cases and spray with cooking oil.
  2. Soak the oatmeal/oats in the milk while preparing the rest of the ingredients.
  3. Mix flour, sugar, baking powder, baking soda and cocoa powder together, then add the rest of the ingredients, including oats/oatmeal (don’t over mix!).
  4. Spoon into the prepared muffin tin and bake for 12-15 minutes or until a skewer comes out clean and they bounce back to touch. Cool on wire rack. Makes 12.
Enjoy!

Sunday, February 24, 2013

Adios, February

This month has been so long!  Yes, it's the shortest month but it doesn't seem like it.  Not only is the wedding drawing near but D has been on a call month.  The good thing is that he doesn't take overnight call.  The bad thing...you never know how late he'll have to work.  I'd rather know that I'll be staying with K rather than wondering if I'll be with her or back at my place.  Sigh...so frustrating.  Anyway, right before this month started, K was staying with D's parents and I had D pick what he wanted for dinner.

  I kind of figured he'd pick the Mexican casserole.  He loves ground beef...I do NOT like the flavor of it!  So, I used ground pork.  It is much better to me and I don't think anyone else really knows it's not beef.  The recipe calls for quite a bit of cheese and chips.  I didn't use nearly as much as called for and I don't think there was anything lacking.  D really liked it and I actually enjoyed it, too.  A good, easy dish that I think would please the whole family.

Mexican Casserole adapted from Plain Chicken
1 pound lean ground pork
 1 can Ranch Style beans
 tortilla chips, crushed
1 can Ro-tel tomatoes
1 cup shredded cheddar cheese, divided (not really sure how much I used - original recipe said 2 cups, I know I didn't use this much)
1 package taco seasoning
1 can cream of chicken soup
1/2 cup water

Preheat oven to 325 degrees. In a large skillet, brown meat and drain off fat (I did this the night before). Stir in beans, tomatoes, onion, taco seasoning, soup and water. Simmer over medium-low heat until everything is well combined and heated through.

Grease a 9×13 casserole dish. Put down a layer of crushed tortilla chips, followed by a layer of the meat/bean mixture, then half of the cheddar cheese. Repeat layers. Cover with foil and bake for 20-30 minutes, or until bubbly.

Let sit for 5-10 minutes before serving.  Enjoy!

Sunday, December 23, 2012

Soup's On!

We've been having the typical MS winter weather...3 days of "cold" weather followed by 3 of 70+ temps and back again.  When it gets cold (or even when it's not!) I like to have soup.  K went to see her grandparents last week, so D and I were alone.  We had a couple of parties to go to but several days in between.  I told D that I thought about soup or Mexican for dinner; so, he went and found a Mexican soup recipe after his clinic was over.  :-)  We ended up not having enough time to make it that night; so, I changed it to make overnight in the crockpot.  At first, we weren't so sure about it...but it turned out really good!  The recipe calls for 2 quarts of chicken broth, which I think was a little too much and I added an extra can of rotel tomatoes and red kidney beans.  YUM!  I still have some in my refrigerator and can't wait to have it for lunch.

Mexican Bean and Squash Soup adapted from AllRecipes
2 cups butternut squash - pealed and cut into 3/4-inch cubes
1 small yellow onion, chopped
2 stalks celery, chopped
2 Chipolte peppers (canned in adobo sauce) seeded, and minced
2 teaspoons basil
1 teaspoon cumin
2 15-oz cans diced tomatoes
2 quarts chicken broth (maybe 6 cups next time?)
1 can cannellini beans
1 can red kidney beans
1 can corn

For serving:
limes
tortilla chips
cheese
sour cream
green onions

Put all ingredients into crockpot and cook on high for 6-8 hours or low for 10 hours.  When ready to serve, squirt lime juice on each bowl and top with desired toppings.  Enjoy!

Saturday, October 20, 2012

What You Get When You Make Meatloaf Muffins!

Monday, D was on call, so I kept Miss K.  The next day, they were coming to my house for dinner because I needed an early night to get ready for my board exam the next day.  So, I decided to make dinner Monday to make Tuesday as easy as possible.  Now, D loves meatloaf.  I'm not the biggest fan because of the ground beef but can handle it because of the tomato sauce on it!  :-)  However, I didn't get around to making it until around 800 and I still hadn't eaten supper, was tired, and needed to study some.  Hmmm....how to make fast meatloaf?
 Meatloaf muffins.  It cuts the baking time from about an hour to about 20 minutes.  Winner!  Plus, it's preportioned, easy to reheat, and easy to transport.  I ended up using half beef, half turkey because that's what was in the oldest frozen ground meat pack.  Turned out good.  Tuesday D said he liked it (and then on Thursday when we had left overs..."This is good!"  Yay!).  K didn't care for it that much.  I can handle that.  Make meatloaf muffins for D and send them with him to work for lunch.  BTW, check out these beautiful pre-test flowers D gave me! 

They went home and I got ready for my test.  It was okay...not as awful as I was expecting but still difficult.  Now to wait for results in January!  YIKES!  For celebration, D and I decided to go out to eat.  He suggested a local Drive-In called Walker's.  YES! 
Now, this isn't your typical Drive-In.  Guy Fieri should totally visit here.  They serve mostly seafood.  We had redfish and red snapper...delicious!  D encouraged me to get dessert; so I had pumpkin, pecan, praline bread pudding....oh my!  Divine!  Then....whether it was the meatloaf muffins or something else....D asked me to marry him! 

Of course, I said "Yes!"  He picked out the ring all by himself and it is gorgeous!  I am so thankful that God placed him and K in my life, and that I am going to be able to be a part of their lives as a family. 
So, I guess there will be some different posts in addition to normal food stuff for a little while.  :-)

Meatloaf Muffins
1 pound ground meat, I used half beef, half turkey
20 crumbled saltine crackers
2 eggs
1/2 cup ketchup
2 tablespoons mustard
2 teaspoons Worcestershire sauce
garlic salt
pepper

Sauce
Ketchup
Mustard
 Sorry...no real measurements, I did about 3/4 ketchup, 1/4 mustard.  Warm and spoon over muffins.

Preheat oven to 350F.  In a medium sized bowl, place all ingredients.  Mix together with a wooden spoon or your hands.  Spray muffin pan with cooking spray.  Spoon meat mixture into muffin pan.  It will make 12 muffins.  Place into preheated over and allow to cook for 25 minutes.  Remove and allow to cool.  Enjoy...you might even get engaged if you make these!  ;-)

Thursday, September 27, 2012

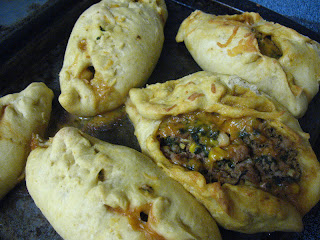
Empanada...Impanato...Spinado...whatever!

I planned to make these a lot earlier in the month but things kept coming up...board review, a spur of the moment dinner with friends, working in the peds ER...but K and I finally made them.  So glad she enjoys cooking...such a good helper! 
 Patri of the blog, Asi Son Los Cosas, was our September 2012 Daring Bakers’ hostess and she decided to tempt us with one of her family’s favorite recipes for Empanadas! We were given two dough recipes to choose from and encouraged to fill our Empanadas as creatively as we wished!  I decided to fill them with ground turkey mixed with corn, tomato sauce and cheese, seasoned with cumin (YUM!). 
I used less of this in my empanadas and added zucchini and squash.  K called them different things throughout the night.  First it was spinado.  Then it was impanato.  Cute either way!  She finally decided that she liked it.  D initially wasn't sure because I think he expected it to taste more Tex-Mex than it did...but then said that he liked it. 

Turns out these make great leftovers to take to work.  :-)  We both felt that they were a little to "bready" but I think that can be attributed to the fact that I used the wheat recipe AND didn't have a rolling pin at D's house to use...so I used a spaghetti-o's can wrapped in foil to roll it out.  Innovation I tell you!  ;-)  A fun challenge that I'm glad I got to do.

Empanada Dough

(a recipe using wheat flour from “La Empanada Gallega”)

Servings: 6

Ingredients:

3½ cups (500 gm) all-purpose (plain) or bread flour
1 cup (240 ml) warm water
½ cup less 1 tablespoon (100 ml) of liquid fat (oil, margarine, lard)
1 satchel (1 tablespoon) (15 gm) dry yeast or (1 oz) (30 gm) fresh yeast
1 teaspoon (5 ml) (6 gm) salt
1 teaspoon (3 gm) sweet paprika

Directions:

  1. Shift the flour into a bowl, make a well in the middle and add all the ingredients (you should break the fresh yeast as much as possible).
  2. Mix with a wooden spoon until all the ingredients have been incorporated
  3. Turn dough onto your counter and knead for 8 minutes
  4. Make a ball and allow to rise covered with a cloth for about half an hour before using. 
  5. Once risen, turn the dough back into a floured counter and tear off in small pieces (I got eight).
  6. Roll each piece out to desired size
  7. Place about 1/4 cup filling on each and top with a little cheese.  
  8. Pull edges of dough over filling in the middle and roll closed.  Then work your way out to the ends until it is completely closed around the filling.
  9. Place empanadas on a baking sheet and place into a preheated 350 degree oven.  Bake for 20-25 minutes. 
Filling:
1 pound ground turkey (Probably used about 1/2 of this eventually)
1 can corn
1 can tomato sauce
cumin
cheese

Cook turkey.  Then allow to cool.  Mix together turkey, corn, sauce and add cumin (about 1 tsp).  Fill empanadas.