
Well, not really...I say po-tay-to...but this month's Daring Baker's challenge gave room for different versions of the same thing...potato bread! I've never made potato bread but make bread quite often. I knew that this would be the perfect bread to make for my family Friday to go with our newly traditional gumbo on the day after Thanksgiving. Since my parents moved last year, our house has become the location for Thanksgiving, which is the big holiday for my dad's side of the family. We had 23 people there...not including the little kids. So, I had lots of samplers for this challenge.

The entire morning as people began arriving from their respective hotels the question kept being voiced, "Whacha making?" When I told them potato bread, I think their mouths becan salivating. In this recipe the amount of flour you use is dependant upon how much potato you use and how much liquid is produced. I think I ended up using 6 and 1/2 cups of flour (out of a possible 8 and 1/2) and my dough was fairly sticky; however, I didn't want to jeopardize the tenderness of the bread by adding too much flour...SO, I just worked with the stickiness!
 Tanna
Tanna gave us the option of doing loaves, rolls, focaccia, breadsticks, really whatever shape bread floated our boats as long as it was savory. I decided to do a focaccia an some rolls. When I pulled out the rolls, I was concerned. They felt really hard on top...THEN I tried to get them out of the pan. AHHHHH...stuck! I didn't spray the pan and they were very stubborn coming out. I'm not a big roll fan, so I didn't taste these and was extremely disappointed with them until my Aunt said that they were perfect. She described them like a baguette...crispy on the outside and melts in your mouth once you get inside.

I think that's a pretty good roll! The focaccia bread was by far the more popular version (except with my 15 month old cousin...

she's really into bread right now and loved the rolls!) with my family. I used waxed paper to put the dough on and, again, didn't spray it. When I tried to pull the paper off, any dough that had not been on flour was stuck!

It took some TLC to get it off, but it was worth it. This had the perfect texture. It was so soft and flavored nicely with olive oil, rosemary, thyme, and parmesan cheese. Overall, this was a good challene. A nice little change from all those sweets! The bread was fairly simple to put together and quick for a yeast bread (I started at 8 am and was finished by around 12:30). Check out the other Daring Bakers and their bread
here.

This is the recipe with instructions for rolls and focaccia.
Ingredients:
8-16 oz. floury (baking) potatoes, peeled and cut into chunks
4 cups(950 ml) water, reserve cooking water
1 tablespoon plus 1 teaspoon salt
2 teaspoons active dry yeast
6 ½ cups to 8 ½ cups (1 kg to 1350g) unbleached all-purpose
1 tablespoon unsalted butter, softened
1 cup (130g) whole wheat flour
Making the Dough (Directions will be for making by hand):
Put the potatoes and 4 cups water in a sauce pan and bring to boil. Add 1 teaspoon salt and cook, half covered, until the potatoes are very tender (this doesn't take long!). Drain the potatoes, SAVE THE POTATO WATER, and mash the potatoes well. Measure out 3 cups (750ml) of the reserved potato water. Add extra water if needed to make 3 cups. Place the water and mashed potatoes in the bowl you plan to mix the bread dough in. Let cool to lukewarm (70-80°F/21 - 29°C) – stir well before testing the temperature – it should feel barely warm to your hand. You should be able to submerge you hand in the mix and not be uncomfortable.
Mix & stir yeast into cooled water and mashed potatoes & water and let stand 5 minutes. Then add 2 cups of flour to the yeast mix and allow to rest several minutes. Sprinkle in the remaining 1 tablespoon salt and the softened butter; mix well. Add the 1 cup whole wheat flour, stir briefly.
Add 2 cups of the unbleached all-purpose flour and stir until all the flour has been incorporated (now you have used 4 cups of the possible 8 ½ cups suggested by the recipe). Turn the dough out onto a generously floured surface (I used a really big bowl, so I just left it in the bowl) and knead for about 10 minutes, incorporating flour as needed to prevent sticking. The dough will be very sticky to begin with, but as it takes up more flour from the kneading surface, it will become easier to handle; the kneaded dough will still be very soft. Place the dough in a large clean bowl or your rising container of choice, cover with plastic wrap or lid, and let rise about 2 hours or until doubled in volume.
Turn the dough out onto a well-floured surface and knead gently several minutes. It will be moist and a little sticky.
To make rolls: Butter a 13 x 9 inch sheet cake pan or a shallow cake pan. Cut the (1/3 is what I used) dough into 12 equal pieces. Shape each into a ball under the palm of your floured hand and place on the baking sheet, leaving 1/2 inch between the balls. Cover with plastic wrap and let rise for about 35 minutes, until puffy and almost doubled.
 To make focaccia:Flatten out the dough to a rectangle about 10 x 15 inches with your palms and fingertips. Tear off a piece of parchment paper or wax paper a little longer than the dough and dust it generously with flour. Transfer the focaccia to the paper. Brush the top of the dough generously with olive oil, sprinkle on a little coarse sea salt, as well as some rosemary leaves, if you wish and then finally dimple all over with your fingertips. Cover with plastic and let rise for 20 minutes.
Preheat oven to 450°F(230°C)
For rolls: Dust risen rolls with a little all-purpose flour or lightly brush the tops with a little melted butter or olive oil (the butter will give a golden/browned crust). Bake rolls until golden, about 30 minutes. Transfer the rolls to a rack when done to cool.
For foccaia:Place a baking stone or unglazed quarry tiles, if you have them, if not use a no edged baking/sheet (you want to be able to slide the shaped dough on the parchment paper onto the stone or baking sheet and an edge complicates things). Place the stone or cookie sheet on a rack in the center of the oven and preheat to 450°F/230°C.
If making foccacia, just before baking, dimple the bread all over again with your fingertips. Leaving it on the paper, transfer to the hot baking stone, tiles or baking sheet. Bake until golden, about 10 minutes. Transfer to a rack (remove paper) and let cool at least 10 minutes before serving.
 I thought they sounded good, and when I described them to Daddy his eyes got big! The interesting thing about these cookies is that they don't use any flour. I thought this might make them extra crispy, but they remained a pleasant, though slightly crispy, texture. Kaitlyn was a WONDERFUL little chef, helping me scrape the peanut butter into the bowl, pouring in sugar, turning on the mixer, and even putting (the first pan of) cookies on the stones.
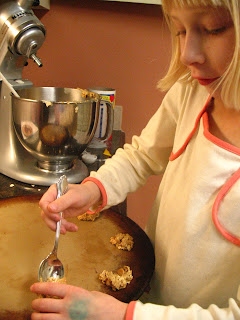 A good idea if you want to involve kids in baking cookies is to break the eggs into a little bowl, so that you know that there aren't any shells in there, and letting them pour the eggs in. In the end, I think Kaitlyn had a really fun time but decided that, though she liked the butter scotch chips, she didn't like the cookies...I think she didn't really taste them! :-) So much fun....I can't wait to cook with another little one!
  Oatmeal PeanutButter Cookies
 Place stone/sheet in oven and bake for 12 minutes or until the bottom is brown and there is some browning on top. Cool on sheet for about 5 minutes and then put on cooling rack. This makes about 6 dozen cookies.
 Easy Fiesta Green Beans
 I did make a slight change in the recipe that makes it not quite as bad for ya. Originally, it calls for a 1/2 stick (1/4 cup) of butter to be stirring into the broccoli with the cheese, but I've found that it really doesn't neet this extra butter, the cheese is enough. Doing this does make it a bit more creamy and thick, but it's still yummy and I guess cheesier tasting. Anyway, this is a casserole I grew up eating and enjoyed making. Because of the broccoli, this is a Thanksgiving worthy entry for
  Broccoli Casserole
  I decided on one from my newest cookbook, Fresh Every Day by Sara Foster. I really like the cookbook and wish that I could spend more time cooking "real" food from it! Maybe one day, just not right now. Everything has it's season...including pumpkin. SO, I picked out a pumpkin muffin recipe and started. YUM! These were really good muffins. I changed just a little bit...the recipe below is with my changes. Because of the pumpkin and cranberries, this is a great recipe for
  Pumpkin Muffins
 Preheat the oven to 375 degrees F. Spray muffin tin* with cooking spray. Stir the flour, baking powder, baking soda, cinnamon, nutmeg, and salt together in a large bowl. In a separate bowl, stir the sugar, butter, and eggs together. Stir in the pumpkin puree, milk, and raisins and chips. Pour into the bowl with the flour miture. Stir until the dry ingredients are just moistened - be careful not to overmix.
  Scoop batter into the muffin tins using a 1/3 cup measure. Bake for 25-30 minutes...I think I actually cooked mine for around 22 minutes. Allow the muffins to cool for a few minutes in the tin before removing them.
 *This says it makes 12 large muffins, but I got 12 regular sized muffins, 12 mini-muffins, and 6 muffin tops. Maybe I just didn't fill the tins enough, but I still would have gotten more than just 12.
 I've discovered that you can do a couple of variations on this. The original recipe calls for pecans. However, if you don't like nuts or don't have any on hand, you can replace the nuts with oatmeal. Either way is good but has it's own unique flavor. So, if it's chilly outside...gather the kids together (or yourself like I would!) and make some blondies. This is a simple recipe and would be GREAT for letting kids help.
  Caramel Blondies
  Mix until just blended. Spray a 13X9 pan.
  Pour the batter into this pan and place into the oven. Bake for 25 minutes. Remove from the oven and allow to cool for 5 minutes.
 Well, I've recently discovered that, although I CANNOT eat a baked sweet potato, I do like roasted sweet potatoes. So, at the grocery store, I picked up a HUGE sweet potato. Honestly, I felt a little bad for the thing. It was going to end up being picked up and thrown to the side because it was so big...too big to bake and, honestly, that's what most people get fresh sweet potatoes to do. Anyway, I brought the little guy home, chopped him up, and put him in the roasting pan. But he looked a little lonely. What can I put with Mr. Sweet Potato. Ah HA! I think the he would very much like to spend his last days with Miss Fuji Apple.
  So, out came Miss Apple (actually two)...they were chopped and mixed with Mr. Sweet Potato. It was a beautiful marriage melded together with some cinnamon (the spice of their lives), thyme (what marriage survives without that!?), and allspice (um...a little twist to make things interesting?). I think all the flavors worked well together. My class members enjoyed it as well. In fact, I told several of them the "recipe." I think the apples added a lot. Because of the health benefits from sweet potatoes AND apples (they're a healthy couple too!), this is my entry to
  Roasted Sweet Potatoes and Apples
  Microwave Cauliflower
  For months I've been watching, enjoying the posts, and thinking that would be fun. So I finally joined. Another reason...they make things that I can make but never would without "having" to make it...so it's a challenge for myself! This month the challenge was given by
  Basically, it's a Boston Cream Pie made with an orange chiffon cake and a true custard rather than just a cream...and it's set up a bit differently...custard on bottom, then cake, then chocolate. I made this for a get together with some friends from school. I don't really have any good ramekins that can be put in the oven, so I decided to make a large version of this. In the end, it turned out okay but my original plan didn't work.
 I wanted to let the custard set in a round cake pan, flip the pan over on a plate, and have the custard beautifully slip out onto the plate. Well...the slipping out was just a dream! I ended up scraping the custard out and spreading back into the proper shape on the plate. Then I topped it with my chiffon cake, which I thought turned out great. Everyone at the party enjoyed the cake. If you want to see some other entries drop by the
  Bostini Cream Pie (from Donna Scala & Kurtis Baguley of Bistro Don Giovanni and Scala's Bistro)Makes 8 generous servings
 I'll be doing this again. Because of all the veggies, this is full of antioxidants so it is perfect for
  Couscous Stuffed Peppers
 I have such a good Daddy...he brought the trout home and then grilled it on the cedar planks I got them for Christmas. Let me say, it was SOOOO good! I paired it with roasted sweet potatoes, tomato, corn, and squash.
  Speaking of sweet potatoes...if you ever get bored in the kitchen on a Saturday, especially with your mom!, just grab a sweet potato, hand the a strawberry to your mom and strike a pose
 . Then, wait for the perfect pitch, swing away, and hit that strawberry across the kitchen. This will result in a busted strawberry,
 a stained potato,
 and lots of laughs! Yes, I promise, I'm still in medical school but we all have our weaknesses!
 So, I pulled out a bag of my frozen blueberries from this summer and set to work. In deed, this is a simple recipe and turned out very well. The batter that I had was VERY thin and that led to some of the topping settling to the middle of the muffin. Just a nice little surprise there! Because of the blueberries this is full of antioxidants; thus, this is my entry for
  Blueberry Crumb Top Muffins
 Heat oven to 400 degrees.Grease bottoms only of 12 medium muffin cups or paper lined cups. Beat the milk, oil, vanilla extract and egg. Stir in the flour, sugar, baking powder & salt all at once until flour is moist THE BATTER SHOULD BE LUMPY-DO NOT OVERMIX. Add the blueberries, combine and divide batter evenly among muffin cups. Sprinkle each using about 2 tsp of the prepared topping. Bake 20-25 minutes or until golden brown. Remove from pan to cool.
 She has some great looking biscuit recipes. Now, biscuit making was always a skill that any good housewife had. The family would get up to prepare for a hard day of work and biscuits were a staple of the breakfast. Lots of people rave about their grandmother's biscuits. I don't remember biscuits specifically. In fact, our biscuits are usually the frozen kind. Now, don't pity my because these biscuits are puffy and yummy. In fact, it always amazed me that the biscuits from Pillsbury that are frozen always come out so fluffy, while homemade, which is supposedly the best ALWAYS, come out flatter. How is it that the frozen ones are so much better? So, I want to figure out this mystery. Maybe I'll do some homemade and freeze them. Maybe it's the freezing and baking from frozen state that makes them get tall.
  Anyway, I decided to try a version of Dorie's Basic Biscuits. I did make a few changes but followed her suggestion of using 1 3/4 cups AP flour and 1/3 cup cake flour. The biscuits were still a little flatter than a frozen biscuit but were very good. I've seen my roommate with one, so I know she likes them. Through the weeks I'm going to keep experimenting, but I would recommend these. If you want a little extra flair, throw in some blueberries or pecans before you start.
  Basic Biscuits adapted from Baking from my home to yours
  Preheat oven to 425 degrees F. Whisk together flour, baking powder, sugar, and salt. Drop the butter in and, using your washed hands, blend the butter and flour together quickly. You can also use a pastry blending if you desire. Do this until you have a pebbly, sandy mixture.
  Dorie suggests that these can be frozen after cutting by freezing them on a baking sheet, then wrapping them air tightly and placing in the freezer. They will just require a little longer to bake.