 Yes, it's that time again! I've been able to do my last two challenges fairly early in the month. This time, the challenge was Dorie Greenspan's Perfect Party Cake. I was really excited about this one because I thought it looked good.
  I became even more excited when I realized that my Sunday School class was having a lunch and I'd have a reason to make this cake! The only problem (in my opinion!)...the cake had buttercream. After making our December challenge, I determined that I'm not a buttercream fan...just feel like I'm eating butter! Thank goodness, Dorie offered an option to use fruit and whipped cream for a "lighter" cake. This was the option I decided on.
  The cake was very simple to make and turned out wonderful and fluffy. I did have a bit of trouble getting it out but I also didn't use the parchment paper in the bottom of the pan. Hey! That just meant there was some "goodie" in the bottom of the pan for me to eat...that's the best part anyway! Since I was using the whipped cream version, I made the cake the night before and then cut and iced it the next morning. I was pleased with the way it turned out and so were my friends. Before I knew it, all but three slices of the cake were gone! I did not expect that, but was happy everyone enjoyed it. The only comment I had, and I think I agree, was that the coconut was not needed. I think that with the whipped cream, the texture and even taste of the coconut distracted from the lightness and subtle taste of the cake. Overall, a WONDERFUL cake!
  Thank you, Morven, for choosing a great recipe and hosting this month. Check out the blogroll for more great entries.
Words from Dorie:
Stick a bright-coloured Post-it to this page, so you’ll always know where to turn for a just-right cake for any celebration. The original recipe was given to me by my great dear friend Nick Malgieri, of baking fame, and since getting it, I’ve found endless opportunities to make it – you will too. The cake is snow white, with an elegant tight crumb and an easygoing nature: it always bakes up perfectly; it is delicate on the tongue but sturdy in the kitchen – no fussing when it comes to slicing the layers in half or cutting tall, beautiful wedges for serving; and, it tastes just as you’d want a party cake to taste – special. The base recipe is for a cake flavoured with lemon, layered with a little raspberry jam and filled and frosted with a classic (and so simple) pure white lemony hot-meringue buttercream but, because the elements are so fundamental, they lend themselves to variation (see Playing Around), making the cake not just perfect, but also versatile.
 For the Cake
2 1/4 cups cake flour
1 tablespoon baking powder
½ teaspoon salt
1 ¼ cups whole milk or buttermilk (I prefer buttermilk with the lemon)
4 large egg whites
1 ½ cups sugar
2 teaspoons grated lemon zest
1 stick (8 tablespoons or 4 ounces) unsalted butter, at room temperature
½ teaspoon pure lemon extract
For the Buttercream
1 cup sugar
4 large egg whites
3 sticks (12 ounces) unsalted butter, at room temperature
¼ cup fresh lemon juice (from 2 large lemons)
1 teaspoon pure vanilla extract
For Finishing
2/3 cup seedless raspberry preserves (I used strawberry) stirred vigorously or warmed gently until spreadable
About 1 ½ cups sweetened shredded coconut
Getting Ready
Centre a rack in the oven and preheat the oven to 350 degrees F. Butter two 9 x 2 inch round cake pans and line the bottom of each pan with a round of buttered parchment or wax paper. Put the pans on a baking sheet.
To Make the Cake
Sift together the flour, baking powder and salt.Whisk together the milk and egg whites in a medium bowl.Put the sugar and lemon zest in a mixer bowl or another large bowl and rub them together with your fingers until the sugar is moist and fragrant. Add the butter and working with the paddle or whisk attachment, or with a hand mixer, beat at medium speed for a full 3 minutes, until the butter and sugar are very light.Beat in the extract, then add one third of the flour mixture, still beating on medium speed.
Beat in half of the milk-egg mixture, then beat in half of the remaining dry ingredients until incorporated. Add the rest of the milk and eggs beating until the batter is homogeneous, then add the last of the dry ingredients. Finally, give the batter a good 2- minute beating to ensure that it is thoroughly mixed and well aerated.
Divide the batter between the two pans and smooth the tops with a rubber spatula.Bake for 30-35 minutes, or until the cakes are well risen and springy to the touch – a thin knife inserted into the centers should come out clean. Transfer the cakes to cooling racks and cool for about 5 minutes, then run a knife around the sides of the cakes, unfold them and peel off the paper liners. Invert and cool to room temperature, right side up (the cooled cake layers can be wrapped airtight and stored at room temperature overnight or frozen for up to two months).
To Make the Buttercream
Put the sugar and egg whites in a mixer bowl or another large heatproof bowl, fit the bowl over a plan of simmering water and whisk constantly, keeping the mixture over the heat, until it feels hot to the touch, about 3 minutes. The sugar should be dissolved, and the mixture will look like shiny marshmallow cream.Remove the bowl from the heat.Working with the whisk attachment or with a hand mixer, beat the meringue on medium speed until it is cool, about 5 minutes.Switch to the paddle attachment if you have one, and add the butter a stick at a time, beating until smooth.Once all the butter is in, beat in the buttercream on medium-high speed until it is thick and very smooth, 6-10 minutes.During this time the buttercream may curdle or separate – just keep beating and it will come together again.On medium speed, gradually beat in the lemon juice, waiting until each addition is absorbed before adding more, and then the vanilla. You should have a shiny smooth, velvety, pristine white buttercream. Press a piece of plastic against the surface of the buttercream and set aside briefly.
To Assemble the Cake
Using a sharp serrated knife and a gentle sawing motion, slice each layer horizontally in half. Put one layer cut side up on a cardboard cake round or a cake plate protected by strips of wax or parchment paper.Spread it with one third of the preserves.Cover the jam evenly with about one quarter of the buttercream.Top with another layer, spread with preserves and buttercream and then do the same with a third layer (you’ll have used all the jam and have buttercream leftover).Place the last layer cut side down on top of the cake and use the remaining buttercream to frost the sides and top. Press the coconut into the frosting, patting it gently all over the sides and top.
Serving
The cake is ready to serve as soon as it is assembled, but I think it’s best to let it sit and set for a couple of hours in a cool room – not the refrigerator. Whether you wait or slice and enjoy it immediately, the cake should be served at room temperature; it loses all its subtlety when it’s cold. Depending on your audience you can serve the cake with just about anything from milk to sweet or bubbly wine.
Storing
The cake is best the day it is made, but you can refrigerate it, well covered, for up to two days. Bring it to room temperature before serving. If you want to freeze the cake, slide it into the freezer to set, then wrap it really well – it will keep for up to 2 months in the freezer; defrost it, still wrapped overnight in the refrigerator.
Playing Around
Since lemon is such a friendly flavour, feel free to make changes in the preserves: other red preserves – cherry or strawberry – look especially nice, but you can even use plum or blueberry jam.Fresh Berry CakeIf you will be serving the cake the day it is made, cover each layer of buttercream with fresh berries – use whole raspberries, sliced or halved strawberries or whole blackberries, and match the preserves to the fruit. You can replace the coconut on top of the cake with a crown of berries, or use both coconut and berries.
You can also replace the buttercream between the layers with fairly firmly whipped sweetened cream and then either frost the cake with buttercream (the contrast between the lighter whipped cream and the firmer buttercream is nice) or finish it with more whipped cream. If you use whipped cream, you’ll have to store the cake the in the refrigerator – let it sit for about 20 minutes at room temperature before serving.
 So, I decided to incorporate this into a spaghetti squash lasagna (really casserole). This almost ended in disaster when I dumped the remainder of some spaghetti sauce on top of the squash. Thank goodness I tasted it before I stirred...it was quite "friendly!" My lips puckered! That was quickly scooped off and thrown away. SO, I pulled out a can of Italian style, low salt, diced tomatoes and stirred that into the squash. While the squash was cooking (15 minutes on high in the microwave AFTER piercing the squash liberally), I roasted some vegetables. The veggies I used were eggplant, zucchini, asparagus, and sweet potato. Mmmm!
 The layers included the squash, then veggies, then cottage cheese mixture. I repeated and topped with mozzarella. It turned out pretty good but could use something else. I'm not sure what. I think next time I'm going to try a chicken spaghetti squash casserole!!! This can be served as a side dish or a main dish in larger portions. There are lots of great vitamins here, antioxidants, and Calcium and protein from the cottage cheese mixture. Because of all the great veggies and the antioxidants in the tomatoes, this is my entry to Cate's ARF Tuesday at
  Spaghetti Squash Casserole 1 spaghetti squash, cooked and "stringed" 1 can Italian style diced tomatoes, drained 1 sweet potato, sliced thin and roasted 1 bunch asparagus, snapped and roasted 1 zucchini, cut in moon shape and roasted 1 eggplant, diced and roasted 1 1/2- 2 cups cottage cheese 1/2 cup + grated parmesan cheese 1 T parsley salt pepper mozzarella cheese
  Preheat oven to 350 degress F.
 Why not make some eggs that will be certain to be eaten? That's what I did. This month's
  So, this is the candy I chose to use...and then hide because that's what you should do with Easter eggs, right? I chose to dye my cookie dough pink,
 blue,
blue, and purple
 ...which lead to a beautiful psychodelic art in my mixing bowl!
  Kind of reminds me of the car wash, Mama! Anyway, this is great for little hands and little mouths. They'll enjoy hiding the eggs inside cookie eggs and then finding the eggs inside with their little teeth!
  Enjoy!
  If you desire, split dough into equal parts for how many colors you want. Drip in food coloring and mix into dough. Using a cookie scoop,
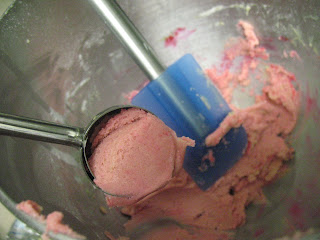 put dough onto baking sheet/stone.
 With the back of a teaspoon measure (sprayed with cooking spray),
  make a well in the dough. Place one candy egg in the well
 and shape dough around it.
 Be careful...
 you might have some eggs that like to peek out! With wet fingers (from water, please!),
  shape the cookies into the shape of an egg. Bake for 12 minutes. Don't worry...
 you might still have a few peekers! Remove from oven and
  allow to cool for 2-3 minutes before removing from pan to cooling rack.
  Place on a plate for the Easter bunny, or for anyone else who might like a cookie!, and let HIM find the eggs for a change and find the surprise inside!
 So, next time you want to feel a little better about your cookies, try out an oatmeal cookie. To make them better for you, add some fruit or nuts and leave out the chips or candy. Yum! OR, if you just want to indulge, throw in some delicious chocolate, candy, toffee....um, any other suggestions for a decadent oatmeal cookie? If so, try out this recipe, throw in your idea, and post about it! Could be fun!
  Oatmeal Cookies with Raspberry Chocolate Swirl Chips adapted from Fresh Everyday by Sara Foster
  There are many great recipes that have been tweeked to be less calorie-full. This one was great. The chicken is not saturated in sauce or fried but is instead marinated in a great asian marinade and then stir fried. I thought this tasted great! To me, you could add some more veggies to it...like grated carrots and sugar snap peas! That would be SOOO good. So, if you want a great, easy dish that's good for you and your family, try this one. Oh, and check out the other great recipes at Sweetnick's ARF Tuesday!
  Cashew Chicken
  When ready, drain the chicken and discard the marinade. Heat the oil in a wok or large nonstick skillet over medium-high heat. Add the onions and stir-fry for 1 minute.
 Add chicken
  and stir-fry for until slightly cooked through. Return cooked veggies and stir together. Serve the chicken and vegetable mixture over the cooked rice and top each serving evenly with cashews.
 Makes 4 servings. Per Serving: 264 calories, 6 g total fat, less than 1 g saturated fat, 0 g trans fat, 31 g carbohydrates, 4 g fiber, 0 g added sugar, 21 g protein, 83 mg sodium , 36 mg cholesterol
 then stop by and lend your brain!!!
 This trip was no different. There were two black bananas awaiting me. Mama even asked, "Are you going to make SUnday breakfast?" YEP! As many times as I've made banana bread or muffins, I still try to find new recipes.
  Usually, homemade banana muffins tend to be a little dense and maybe close to dry...this one was not. The texture reminded me of Betty Crocker Mixes...which is good. I would highly recommend this recipe. And because it has bananas and walnuts (or pecans in my case) it high in antioxidants...so, it's my entry to
  Banana Pecan Muffins Ingredients:
 Preheat the oven to 350 degrees F.