It's that time again...Daring Bakers emerge from the shadows and display their wonderful fares. This time, a Danish bread!  I must admit to you that I was not very excited about this challenge when it was revealed. I don't know why, but I just wasn't. The only thing I was glad of was that I would be able to make the bread for my family when I went home after my exam. In the end, this recipe excited me and I really enjoyed making it.
 I decided to use a peach filling because my parents had just gotten some from the farmer's market. I enlisted the help of my father but he's "never been good at peeling things," so the help left rather quickly! :-) In the end, I decided not to peel the peaches and it turned out well. I even ate some of the leftovers straight from the pot! :-)
  The first braid I made cooked a lot faster than the 25 minutes instructed. I probably could have taken it out after 5 minutes at 350 but I left if another 5 minutes, 5 short of that instructed and it was already a little too brown. For the second braid, I wanted to make a calzone type braid with sausage and cheese for my brother, but we forgot to get sausage, so I just filled it with chocolate and butterscotch chips.
  This time, the bread baked properly and was very good. The recipe was chosen by Ben at What's Cooking and Kelly at Sass and Veracity. Thanks for such a great challenge. This was probably one of my favorite challenges and I'll definitely make it again! Check out the other great breads by visiting our blogroll.
I must admit to you that I was not very excited about this challenge when it was revealed. I don't know why, but I just wasn't. The only thing I was glad of was that I would be able to make the bread for my family when I went home after my exam. In the end, this recipe excited me and I really enjoyed making it. I decided to use a peach filling because my parents had just gotten some from the farmer's market. I enlisted the help of my father but he's "never been good at peeling things," so the help left rather quickly! :-) In the end, I decided not to peel the peaches and it turned out well. I even ate some of the leftovers straight from the pot! :-) The first braid I made cooked a lot faster than the 25 minutes instructed. I probably could have taken it out after 5 minutes at 350 but I left if another 5 minutes, 5 short of that instructed and it was already a little too brown. For the second braid, I wanted to make a calzone type braid with sausage and cheese for my brother, but we forgot to get sausage, so I just filled it with chocolate and butterscotch chips. This time, the bread baked properly and was very good. The recipe was chosen by Ben at What's Cooking and Kelly at Sass and Veracity. Thanks for such a great challenge. This was probably one of my favorite challenges and I'll definitely make it again! Check out the other great breads by visiting our blogroll.Danish Dough
Makes 2-1/2 pounds dough
Makes 2-1/2 pounds dough
For the dough (Detrempe)
1 ounce fresh yeast or 1 tablespoon active dry yeast
1/2 cup whole milk
1/3 cup sugar
Zest of 1 orange, finely grated
3/4 teaspoon ground cardamom
1-1/2 teaspoons vanilla extract
1/2 vanilla bean, split and scraped
2 large eggs, chilled
1/4 cup fresh orange juice
3-1/4 cups all-purpose flour
1 teaspoon salt
Combine yeast and milk in the bowl of a mixer fitted with the paddle attachment and mix on low speed. Slowly add sugar, orange zest, cardamom, vanilla extract, vanilla seeds, eggs, and orange juice. Mix well. Change to the dough hook and add the salt with the flour, 1 cup at a time, increasing speed to medium as the flour is incorporated. Knead the dough for about 5 minutes, or until smooth. You may need to add a little more flour if it is sticky. Transfer dough to a lightly floured baking sheet and cover with plastic wrap. Refrigerate for 30 minutes. Without a standing mixer: Combine yeast and milk in a bowl with a hand mixer on low speed or a whisk. Add sugar, orange zest, cardamom, vanilla extract, vanilla seeds, eggs, and orange juice and mix well. Sift flour and salt on your working surface and make a fountain. Make sure that the “walls” of your fountain are thick and even. Pour the liquid in the middle of the fountain. With your fingertips, mix the liquid and the flour starting from the middle of the fountain, slowly working towards the edges. When the ingredients have been incorporated start kneading the dough with the heel of your hands until it becomes smooth and easy to work with, around 5 to 7 minutes. You might need to add more flour if the dough is sticky.
For the butter block (Beurrage)
1/2 pound (2 sticks) cold unsalted butter
1/4 cup all-purpose flour
Butter Block
1. Combine butter and flour in the bowl of a mixer fitted with a paddle attachment and beat on medium speed for 1 minute. Scrape down the sides of the bowl and the paddle and then beat for 1 minute more, or until smooth and lump free. Set aside at room temperature.
2. After the detrempe has chilled 30 minutes, turn it out onto a lightly floured surface. Roll the dough into a rectangle approximately 18 x 13 inches and ¼ inch thick. The dough may be sticky, so keep dusting it lightly with flour.
 Spread the butter evenly over the center and right thirds of the dough.
 Fold the left edge of the detrempe to the right, covering half of the butter.
  Fold the right third of the rectangle over the center third.
  The first turn has now been completed. Mark the dough by poking it with your finger to keep track of your turns, or use a sticky and keep a tally. Place the dough on a baking sheet, wrap it in plastic wrap, and refrigerate for 30 minutes.
3. Place the dough lengthwise on a floured work surface. The open ends should be to your right and left. Roll the dough into another approximately 13 x 18 inch, ¼-inch-thick rectangle. Again, fold the left third of the rectangle over the center third and the right third over the center third. No additional butter will be added as it is already in the dough. The second turn has now been completed. Refrigerate the dough for 30 minutes.
4. Roll out, turn, and refrigerate the dough two more times, for a total of four single turns. Make sure you are keeping track of your turns. Refrigerate the dough after the final turn for at least 5 hours or overnight. The Danish dough is now ready to be used. Just look at those layers!
 If you will not be using the dough within 24 hours, freeze it. To do this, roll the dough out to about 1 inch in thickness, wrap tightly in plastic wrap, and freeze. Defrost the dough slowly in the refrigerator for easiest handling. Danish dough will keep in the freezer for up to 1 month.
Danish Braid
Makes enough for 2 large braids
Makes enough for 2 large braids
Ingredients
1 recipe Danish Dough (see above)
2 cups apple filling, jam, or preserves (see above)
For the egg wash: 1 large egg, plus 1 large egg yolk (I skipped this)
1. Line a baking sheet with a silicone mat or parchment paper. On a lightly floured surface, roll the Danish Dough into a 15 x 20-inch rectangle, ¼ inch thick. If the dough seems elastic and shrinks back when rolled, let it rest for a few minutes, then roll again. Place the dough on the baking sheet.
2. Along one long side of the pastry make parallel, 5-inch-long cuts with a knife or rolling pastry wheel, each about 1 inch apart. Repeat on the opposite side, making sure to line up the cuts with those you’ve already made.

3. Spoon the filling you’ve chosen to fill your braid down the center of the rectangle. Starting with the top and bottom “flaps”, fold the top flap down over the filling to cover. Next, fold the bottom “flap” up to cover filling. This helps keep the braid neat and helps to hold in the filling. Now begin folding the cut side strips of dough over the filling, alternating first left, then right, left, right, until finished. Trim any excess dough and tuck in the ends.

Proofing and Baking
1. Spray cooking oil (Pam) onto a piece of plastic wrap, and place over the braid. Proof at room temperature or, if possible, in a controlled 90 degree F environment for about 2 hours, or until doubled in volume and light to the touch.
2. Near the end of proofing, preheat oven to 400 degrees F. Position a rack in the center of the oven.
3. Bake for 10 minutes, then rotate the pan so that the side of the braid previously in the back of the oven is now in the front. Lower the oven temperature to 350 degrees F, and bake about 15-20 minutes more, or until golden brown. Cool and serve the braid either still warm from the oven or at room temperature. The cooled braid can be wrapped airtight and stored in the refrigerator for up to 2 days, or freeze for 1 month.
2. Near the end of proofing, preheat oven to 400 degrees F. Position a rack in the center of the oven.
3. Bake for 10 minutes, then rotate the pan so that the side of the braid previously in the back of the oven is now in the front. Lower the oven temperature to 350 degrees F, and bake about 15-20 minutes more, or until golden brown.
Cool and serve the braid either still warm from the oven or at room temperature. The cooled braid can be wrapped airtight and stored in the refrigerator for up to 2 days, or freeze for 1 month. Workday Salad
  They are not sweet scones, but the blueberries add the perfect amount of sweetness and tartness. To me, it was just so much fun to bite into a blueberry and have its flavor meld with the wholesome wheatiness of the scone. So, try these out...they're healthy and yummy! One of the things a favorite pediatric attending told me...if you tell your child such-and-such is a treat, he'll think it's a treat. SO, if you bring you child up on less sweet muffins/scones, he'll think that's how they should be rather that the sweeter version. Sweet or not, these are very good! Check out the other great recipes over at Cate's.
 Whole Wheat Blueberry Scones
 the S'more Cupcake!!! I found
  S'more Cupcakes
  Place 7-8 marshmallows on top of each batter.
  Top with remaining batter. Be careful not to run out of batter; just be "frugal" with your batter until you're sure you have enough.
 Bake at 350F degrees for 22-25 minutes or until done. Cool in pans or on sheet for 15 minutes. Remove from pans and cool completely on a wire rack.
 When cool, ice with chocolate frosting. Before ready to serve, place a small square (each large rectangle will provide 8) in the cupcake. Top with a few marshmallows. Enjoy!
 Many of you have probably heard about or seen the Sweet Melissa cookbook; in fact, there were several giveaways, all of which I entered but none of which I won! Oh, well. I did, however, see
  Anyway, I took a little bag of these to Emily at church and she later said that she barely got out of the orchestra room with them in tact! I agree, they were quite good. The outside has that sugary crispness but the inside is soft. In addition to great texture, they're not flat!
  They stayed nice and rounded on the top...though one of my friends has a recipe that make really rounded snickerdoodles, maybe she uses shortening? So, if you want a good cookie to make with your kiddos or even to relieve some stress (like me!), try these cookies!
  Snickerdoodles- adapted from
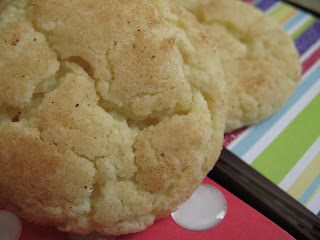
 I didn't even remember finishing this recipe because of how strangely it started. I don't know what the issue was, but the instructions said to knead. Please, tell me someone...how do you knead a "muffin" batter? Something was wrong that day b/c my dough was not thick enough. So, I just added a bit more flour and didn't knead...I just placed the batter/dough onto the stone. Turned out okay but I'd like to try it again and see if the outcome is better! Visit Cate's site to see the other great entries.
  Banana Bran Scones adapted from Cooking Light Nov 2007 Ingredients
 Combine flour and next 6 ingredients (through cinnamon) in a food processor; pulse until mixture resembles coarse meal. Combine banana and brown sugar in a medium bowl; let stand 5 minutes. Add flour mixture and 1/4 cup buttermilk alternately to banana mixture, stirring just until moist. Turn dough out onto a lightly floured surface; knead lightly 1 1/2 minutes with floured hands. Pat dough into a 6-inch circle on a baking sheet lined with parchment paper. Cut dough into 8 wedges, cutting into, but not through, dough. Brush 1 1/2 teaspoons buttermilk over surface of dough; sprinkle with granulated sugar. Bake at 400° for 12 minutes or until lightly browned. Remove from pan; cool on wire racks.